-
General
-
Releases
-
Base Connector
-
- Beginner's Guide
- Overview
- Stations
- Datamaps
- Importing templates
- Setting conditions
- Job filter function
- How to create backups
- Running and Monitoring Jobs
- Export Job Automation
- Import/Export & copy of data map rows
- Synchronizing references that are not contained in views
- Get the preconfigured "Source data set - Template"
- Configuring categories and products
- Fill Bundle and Variant tables from children
- Channel/View Tree Maintenance Active Job
- Configuring the price & stock modules
- Configuring the price/stock value ranges
- Configuring volume discounts/scale prices
- How to export prices
- How to export stock values from certain storage units
- Use of Contentserv Credentials
- Connector & Station User Limitation
- Formats
- SC::Dynamic Image Crop Preset
- Placeholders
- Show all articles ( 11 ) Collapse Articles
-
- Working with placeholder in conditions
- Improve usability of SC::Tables
- Placeholder for SC::Price, SC::Channel, SC::Stock
- REST Service API for SAWS Tables (Prices, Stock, Channels & Complex Articles)
- Dataflow import of SC::Tables
- Dataflow export of SC::Tables
- The datamap summary - Creating an automated documentation
- Export images as a ZIP file
- Image export with direct access to the CONTENTSERV platform
- Image export with no access to the CONTENTSERV platform
- Image export from a third party system
- How to configure CS Dashboard
- Setup a transformation list for CSTypes
- FAQ
- Export Smart Document via Active Script and assign output to product
- Format Macros
- Controlling Connector Jobs via the REST API
- Sales Channel Maintenance via Excel Cross-Reference
- Sales Channel Inheritance Active Job
- Job Parameters & Context Parameters
- Show all articles ( 5 ) Collapse Articles
-
-
- Send value of a PIM reference
- Loop values for CS PIM references
- Send value of a MAM reference
- Loop values for CS MAM references
- Send value of a Channel (view) reference
- Loop values for CS Channel (Views) references
- Send value of an attribute reference
- Send value of a user reference
- Loop values for user references
- Send value of a reference (deprecated)
-
- Loop values for several attributes simultaneously
- Loop values for child elements
- Loop values for CS PIM references
- Loop values for CS Channel (Views) references
- Loop values for CS MAM references
- Loop values for user references
- Loop values for SC::Prices
- Loop values for SC::Stocktable entries
- Loop values for SC::Complex products
- Loop values for CS type reference
- Loop values for a CS table
- Loop value for simple data record
- Loop values for JSON Objects
-
- Create a JSON-String (create an array)
- Format value lists
- Tree paths or values from tree elements
- Multistep formatting
- Send accesslevel of the object
- Send value of a job parameter
- Search for values in several attributes
- Format with PHP Code (deprecated)
- Format Macros
- Load data via REST Service
- AI Value Transformation Format
- AI Value Translation Format
- Store value into a Contentserv Item
- Execute a conditional format (switch-case) Format Plugin
- Load array value from the Contentserv getValues Format Plugin
- Process HTML table Format Plugin
- Show all articles ( 1 ) Collapse Articles
-
Owl Cloud Services
-
Owl Data Hub
-
Ursula AI
- Ursula AI
- Supported AIs
- AI Value Transformation Format
- AI Value Translation Format
- Generate Descriptions with Ursula AI Active Job
- Populate Attributes via Ursula AI Active Job
- AI Product Tree Organizer Active Job
- Mapping Sales Channels via the Ursula AI Active Job
- Store value into a Contentserv Item
-
GenericJSON / DynamicJSON Connector
-
-
- Send value of a PIM reference
- Loop values for CS PIM references
- Send value of a Channel (view) reference
- Loop values for CS Channel (Views) references
- Send value of a MAM reference
- Loop values for CS MAM references
- Send value of an attribute reference
- Send value of a user reference
- Loop values for user references
- Send value of a reference (deprecated)
-
- Loop values for several attributes simultaneously
- Loop values for child elements
- Loop values for CS PIM references
- Loop values for CS Channel (Views) references
- Loop values for CS MAM references
- Loop values for user references
- Loop values for SC::Prices
- Loop values for SC::Stocktable entries
- Loop values for SC::Complex products
- Loop values for a CS table
- Loop values for CS type reference
- Loop value for simple data record
- Loop values for JSON Objects
-
- Create a JSON-String (create an array)
- Format value lists
- Tree paths or values from tree elements
- Multistep formatting
- Send accesslevel of the object
- Send value of a job parameter
- Search for values in several attributes
- Format with PHP Code (deprecated)
- Format Macros
- Load data via REST Service
- AI Value Transformation Format
- AI Value Translation Format
- Store value into a Contentserv Item
- Execute a conditional format (switch-case) Format Plugin
- Load array value from the Contentserv getValues Format Plugin
- Process HTML table Format Plugin
- Show all articles ( 1 ) Collapse Articles
-
GenericXML Connector
-
- Creating your first export
- Building XML Target Keys
- Creating a Salesforce export
- All Tutorials for creating XMLs
- SAWSConnector settings
- Station configuration
- Example station configuration
- Source data set configuration
- Example source data set mappings for the XML export
- Job configuration
- Simple XML Tags
- Images
- References
- SC::Prices
- SC::Stock
- SC::Channel
- Specials
- BMECat 1.2 Template
- Show all articles ( 3 ) Collapse Articles
-
-
- Send value of a PIM reference
- Loop values for CS PIM references
- Send value of a Channel (view) reference
- Loop values for CS Channel (Views) references
- Send value of a MAM reference
- Loop values for CS MAM references
- Send value of an attribute reference
- Send value of a user reference
- Loop values for user references
- Send value of a reference (deprecated)
-
- Loop values for several attributes simultaneously
- Loop values for child elements
- Loop values for CS PIM references
- Loop values for CS Channel (Views) references
- Loop values for CS MAM references
- Loop values for user references
- Loop values for SC::Prices
- Loop values for SC::Stocktable entries
- Loop values for SC::Complex products
- Loop values for a CS table
- Loop values for CS type reference
- Loop value for simple data record
- Loop values for JSON Objects
-
- Create a JSON-String (create an array)
- Format value lists
- Tree paths or values from tree elements
- Multistep formatting
- Send accesslevel of the object
- Send value of a job parameter
- Search for values in several attributes
- Format with PHP Code (deprecated)
- Format Macros
- Load data via REST Service
- AI Value Transformation Format
- AI Value Translation Format
- Store value into a Contentserv Item
- Execute a conditional format (switch-case) Format Plugin
- Load array value from the Contentserv getValues Format Plugin
- Process HTML table Format Plugin
- Show all articles ( 1 ) Collapse Articles
-
SimpleExcel Connector
-
-
- Send value of a PIM reference
- Loop values for CS PIM references
- Send value of a Channel (view) reference
- Loop values for CS Channel (Views) references
- Send value of a MAM reference
- Loop values for CS MAM references
- Send value of an attribute reference
- Send value of a user reference
- Loop values for user references
- Send value of a reference (deprecated)
-
- Loop values for several attributes simultaneously
- Loop values for child elements
- Loop values for CS PIM references
- Loop values for CS Channel (Views) references
- Loop values for CS MAM references
- Loop values for user references
- Loop values for SC::Prices
- Loop values for SC::Stocktable entries
- Loop values for SC::Complex products
- Loop values for a CS table
- Loop values for CS type reference
- Loop value for simple data record
- Loop values for JSON Objects
-
- Create a JSON-String (create an array)
- Format value lists
- Tree paths or values from tree elements
- Multistep formatting
- Send accesslevel of the object
- Send value of a job parameter
- Search for values in several attributes
- Format with PHP Code (deprecated)
- Format Macros
- Load data via REST Service
- AI Value Transformation Format
- AI Value Translation Format
- Store value into a Contentserv Item
- Execute a conditional format (switch-case) Format Plugin
- Load array value from the Contentserv getValues Format Plugin
- Process HTML table Format Plugin
- Show all articles ( 1 ) Collapse Articles
-
Magento Connector
-
-
- Send value of a PIM reference
- Loop values for CS PIM references
- Send value of a Channel (view) reference
- Loop values for CS Channel (Views) references
- Send value of a MAM reference
- Loop values for CS MAM references
- Send value of an attribute reference
- Send value of a user reference
- Loop values for user references
- Send value of a reference (deprecated)
-
- Loop values for several attributes simultaneously
- Loop values for child elements
- Loop values for CS PIM references
- Loop values for CS Channel (Views) references
- Loop values for CS MAM references
- Loop values for user references
- Loop values for SC::Prices
- Loop values for SC::Stocktable entries
- Loop values for SC::Complex products
- Loop values for a CS table
- Loop values for CS type reference
- Loop value for simple data record
- Loop values for JSON Objects
-
- Create a JSON-String (create an array)
- Format value lists
- Tree paths or values from tree elements
- Multistep formatting
- Send accesslevel of the object
- Send value of a job parameter
- Search for values in several attributes
- Format with PHP Code (deprecated)
- Format Macros
- Load data via REST Service
- AI Value Transformation Format
- AI Value Translation Format
- Store value into a Contentserv Item
- Execute a conditional format (switch-case) Format Plugin
- Load array value from the Contentserv getValues Format Plugin
- Process HTML table Format Plugin
- Show all articles ( 1 ) Collapse Articles
-
Shopware 5 Connector
-
- Configuration Shopware
- Configuration PIM
- Shopware attribute setting
- Configuration SAWSConnector
- Station configuration
- Source data set configuration
- Configuring categories and products
- Price table configuration for Shopware
- Result in Shopware
- Subshops and the SAWSConnector Shopware
- ean
- Custom Fields (attribute)
- highlight
- purchaseSteps
- stockMin
- supplierNumber
- notification
- shippingFree
- length
- height
- width
- weight
- shippingTime
- metaKeywords
- Show all articles ( 9 ) Collapse Articles
-
-
- Send value of a PIM reference
- Loop values for CS PIM references
- Send value of a Channel (view) reference
- Loop values for CS Channel (Views) references
- Send value of a MAM reference
- Loop values for CS MAM references
- Send value of an attribute reference
- Send value of a user reference
- Loop values for user references
- Send value of a reference (deprecated)
-
- Loop values for several attributes simultaneously
- Loop values for child elements
- Loop values for CS PIM references
- Loop values for CS Channel (Views) references
- Loop values for CS MAM references
- Loop values for user references
- Loop values for SC::Prices
- Loop values for SC::Stocktable entries
- Loop values for SC::Complex products
- Loop values for a CS table
- Loop values for CS type reference
- Loop value for simple data record
- Loop values for JSON Objects
-
- Create a JSON-String (create an array)
- Format value lists
- Tree paths or values from tree elements
- Multistep formatting
- Send accesslevel of the object
- Send value of a job parameter
- Search for values in several attributes
- Format with PHP Code (deprecated)
- Format Macros
- Load data via REST Service
- AI Value Transformation Format
- AI Value Translation Format
- Store value into a Contentserv Item
- Execute a conditional format (switch-case) Format Plugin
- Load array value from the Contentserv getValues Format Plugin
- Process HTML table Format Plugin
- Show all articles ( 1 ) Collapse Articles
-
Shopware 6 Connector
-
- Tutorial Video
- First steps
- Import Shopware settings
- Export categories
- Export media files
- Export simple products
- Export multiple languages
- Export variant products
- Export product properties
- Export custom fields
- Export product cross-selling relationships
- Export prices
- Export stocks
- Export into any other Shopware field
- How to address multiple Shopware 6 websites
- How to address different Shopware 6 Sale-Channels from one Contentserv System
- Useful Links
- Sales Channel Maintenance via Excel Cross-Reference
- Show all articles ( 3 ) Collapse Articles
-
-
- Send value of a PIM reference
- Loop values for CS PIM references
- Send value of a MAM reference
- Loop values for CS MAM references
- Send value of a Channel (view) reference
- Loop values for CS Channel (Views) references
- Send value of an attribute reference
- Send value of a user reference
- Loop values for user references
- Send value of a reference (deprecated)
-
- Loop values for several attributes simultaneously
- Loop values for child elements
- Loop values for CS PIM references
- Loop values for CS Channel (Views) references
- Loop values for CS MAM references
- Loop values for user references
- Loop values for SC::Prices
- Loop values for SC::Stocktable entries
- Loop values for SC::Complex products
- Loop values for a CS table
- Loop values for CS type reference
- Loop value for simple data record
- Loop values for JSON Objects
-
- Create a JSON-String (create an array)
- Format value lists
- Tree paths or values from tree elements
- Multistep formatting
- Send accesslevel of the object
- Send value of a job parameter
- Search for values in several attributes
- Format with PHP Code (deprecated)
- Format Macros
- Load data via REST Service
- AI Value Transformation Format
- AI Value Translation Format
- Store value into a Contentserv Item
- Execute a conditional format (switch-case) Format Plugin
- Load array value from the Contentserv getValues Format Plugin
- Process HTML table Format Plugin
- Show all articles ( 1 ) Collapse Articles
-
OXID Connector
-
-
- Send value of a PIM reference
- Loop values for CS PIM references
- Send value of a MAM reference
- Loop values for CS MAM references
- Send value of a Channel (view) reference
- Loop values for CS Channel (Views) references
- Send value of an attribute reference
- Send value of a user reference
- Loop values for user references
- Send value of a reference (deprecated)
-
- Loop values for several attributes simultaneously
- Loop values for child elements
- Loop values for CS PIM references
- Loop values for CS Channel (Views) references
- Loop values for CS MAM references
- Loop values for user references
- Loop values for SC::Prices
- Loop values for SC::Stocktable entries
- Loop values for SC::Complex products
- Loop values for a CS table
- Loop values for CS type reference
- Loop value for simple data record
- Loop values for JSON Objects
-
- Create a JSON-String (create an array)
- Format value lists
- Tree paths or values from tree elements
- Multistep formatting
- Send accesslevel of the object
- Send value of a job parameter
- Search for values in several attributes
- Format with PHP Code (deprecated)
- Format Macros
- Load data via REST Service
- AI Value Transformation Format
- AI Value Translation Format
- Store value into a Contentserv Item
- Execute a conditional format (switch-case) Format Plugin
- Load array value from the Contentserv getValues Format Plugin
- Process HTML table Format Plugin
- Show all articles ( 1 ) Collapse Articles
-
Typo3 Connector
-
-
- Send value of a PIM reference
- Loop values for CS PIM references
- Send value of a Channel (view) reference
- Loop values for CS Channel (Views) references
- Send value of a MAM reference
- Loop values for CS MAM references
- Send value of an attribute reference
- Send value of a user reference
- Loop values for user references
- Send value of a reference (deprecated)
-
- Loop values for several attributes simultaneously
- Loop values for child elements
- Loop values for CS PIM references
- Loop values for CS Channel (Views) references
- Loop values for CS MAM references
- Loop values for user references
- Loop values for SC::Prices
- Loop values for SC::Stocktable entries
- Loop values for SC::Complex products
- Loop values for a CS table
- Loop values for CS type reference
- Loop value for simple data record
- Loop values for JSON Objects
-
- Create a JSON-String (create an array)
- Format value lists
- Tree paths or values from tree elements
- Multistep formatting
- Send accesslevel of the object
- Send value of a job parameter
- Search for values in several attributes
- Format with PHP Code (deprecated)
- Format Macros
- Load data via REST Service
- AI Value Transformation Format
- AI Value Translation Format
- Store value into a Contentserv Item
- Execute a conditional format (switch-case) Format Plugin
- Load array value from the Contentserv getValues Format Plugin
- Process HTML table Format Plugin
- Show all articles ( 1 ) Collapse Articles
-
Other Connectors
RabbitMQ Connection
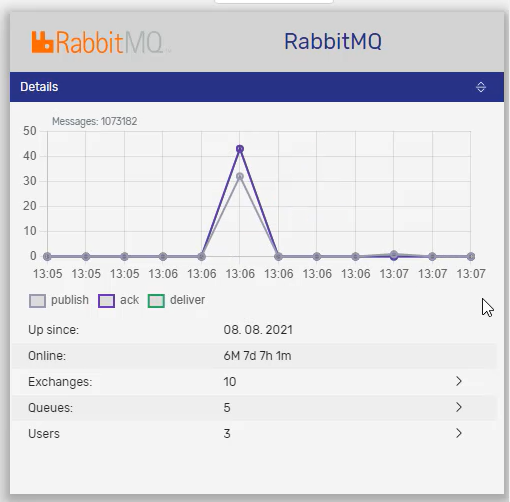
More and more systems (e.g. Magento) support asynchronous data transfer. So-called MessageBus systems are used for this. Here, the source system (e.g. Contentserv) sends data into a data pipeline and all systems (e.g. your shop system) that are interested in this data retrieve the data and process it.
Your advantages:
– Distributed data processing
– Faster processing
– Data is not lost if the target system is not accessible
With the Owl RabbitMQ integration, we provide you with the framework so that you can start right away.
If you are interested or have any questions, please contact sawsconnector@saws.de.
How to transfer data to the RabbitQM
The easiest way to transfer product data into RabbitMQ is to use the GenericJSON Connector. This already includes a transmitter for RabbitMQ. In the meantime, our SAWSMagento and SAWSShopwareVIX Connectors also support the connection via RabbitMQ.
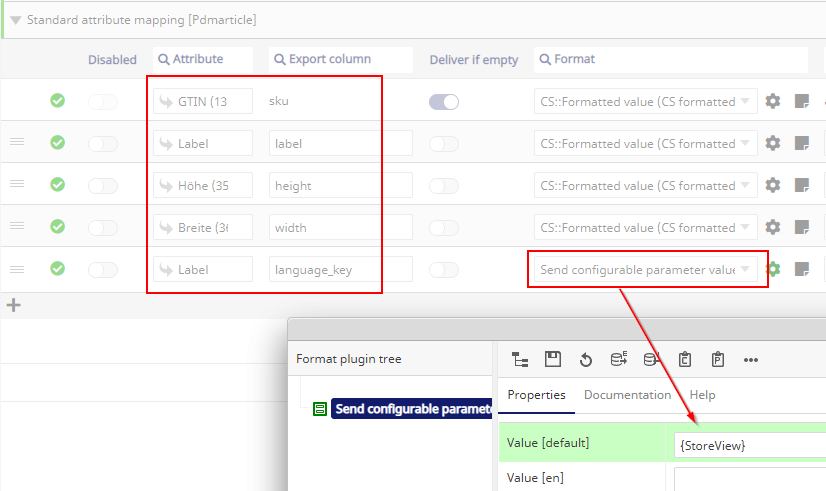
To export data from Contentserv, create a suitable data map and a job that contains the desired data. In addition to the product data, we also play out the language key, because we want to play out the German and English products in different queues later.
For example like this:

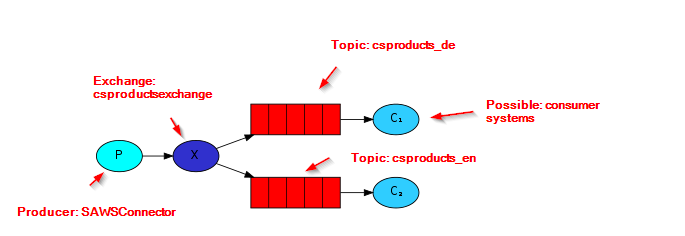
After you have set up the export, you must create the RabbitMQ exchanges and queues. We recommend sending the data to an Exchange node and distributing it to the respective queues via topics. If response messages are to be processed, the queue is queried directly. The following diagram shows the function of RabbitMQ very well.
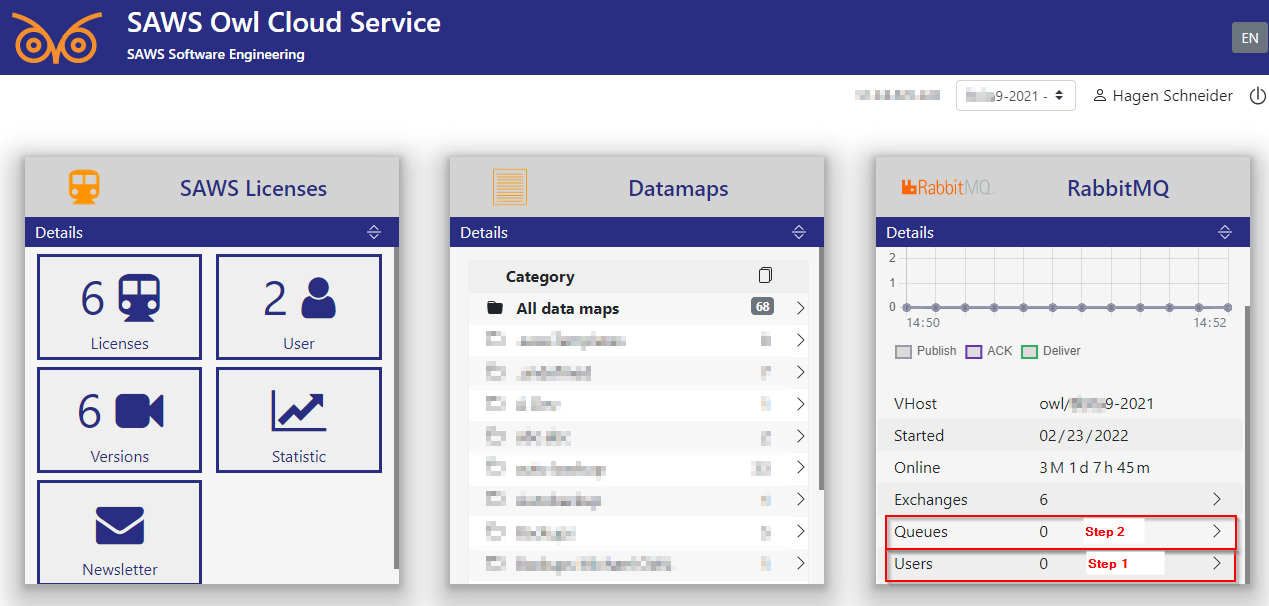
In the first step, create a user. Log into the OWL and navigate to the users on the RabbitMQ tile in step 1. If the tile is deactivated, then contact us!
Create a new user via the upper “Add User” button and assign a secure password!
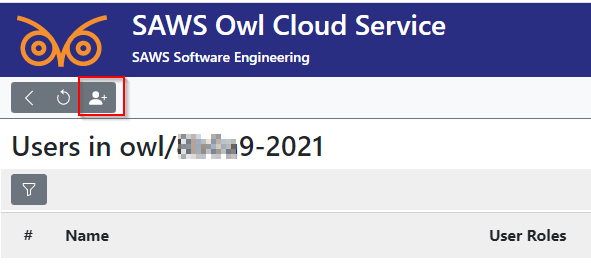
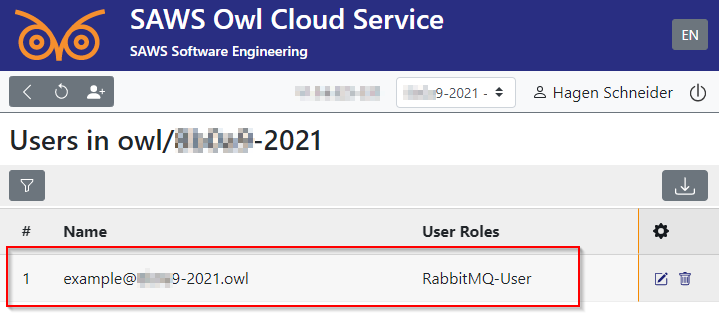
In step 2, you create the queues. To do this, navigate to the queues and create them via the “Add Queue” button. One for German and one for English.

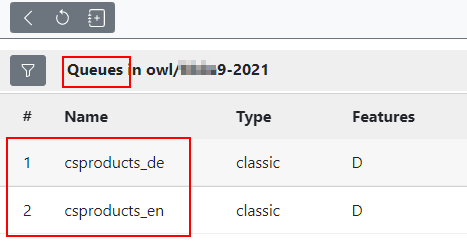
Then the Exchange node must be created. To do this, switch to the “Exchange” area and create a new exchange via the “Add Exchange” button.
It is important to “bind” to the respective queues with the correct topic so that the German products are also distributed to the German queue.
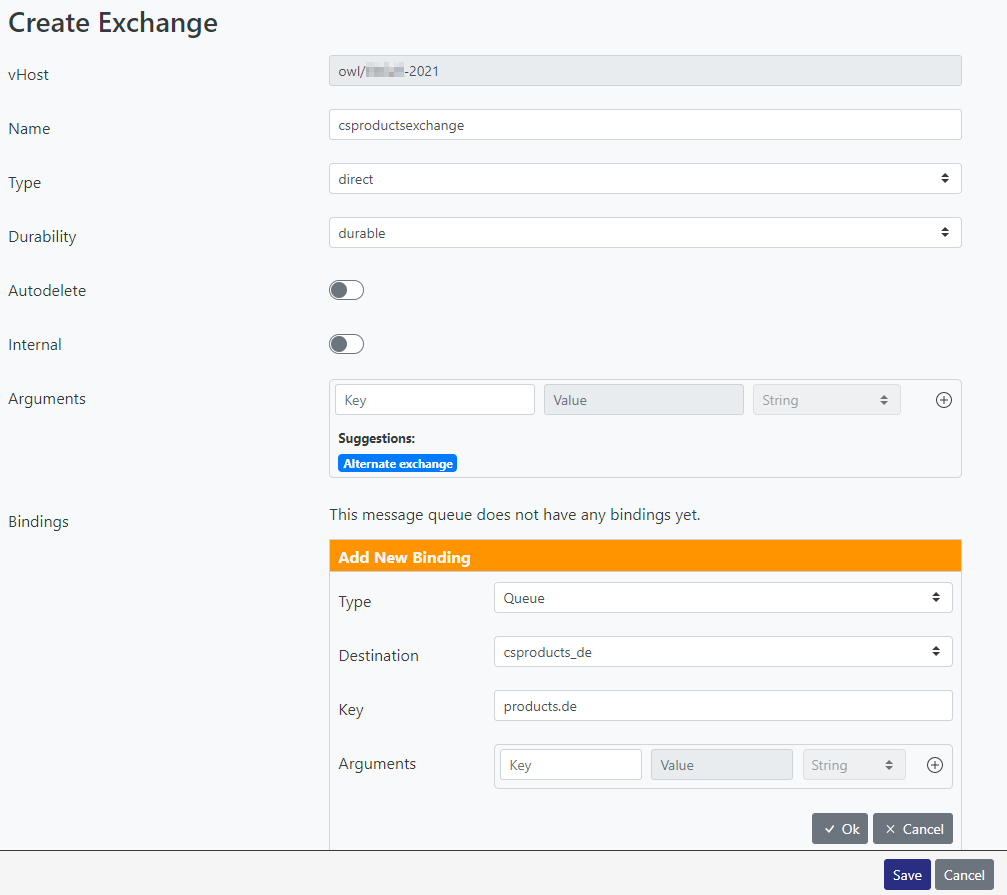

Once you have created the RabbitMQ page, you only need to configure a transmitter on the CS page and run the job via this transmitter.
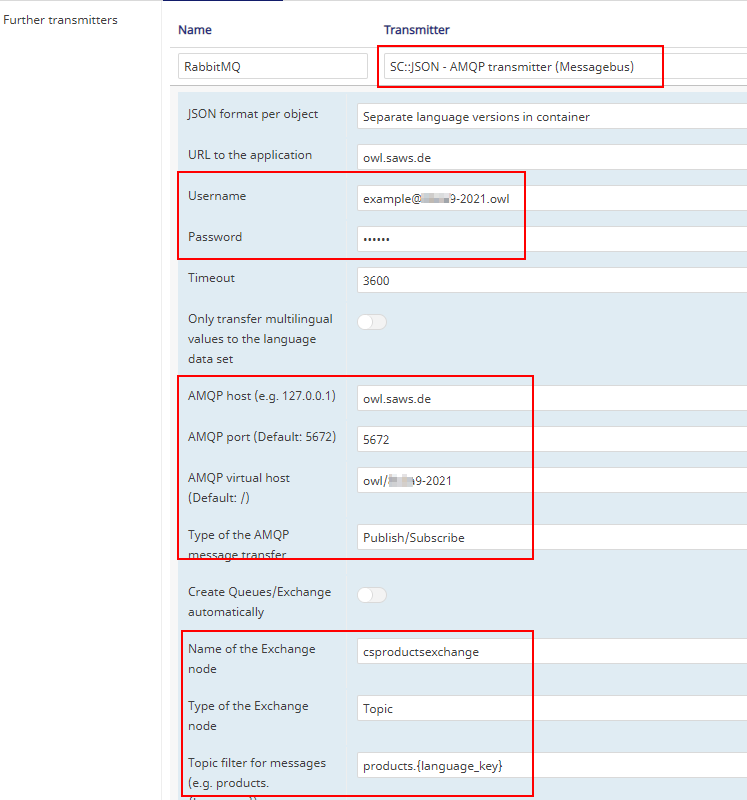
When configuring the transmitter, make sure you use the correct VHOST, because your user only has the right to write data to the exchange for the respective VHOST!
Open the station settings in the SAWS Connector and create a new AMQP transmitter under the “Data transmission” tab. AMQP – Advanced Message Queuing Protocol is the protocol that RabbitQM also uses to transmit messages.
You can have the Topic filter filled with placeholders from the data you send. This allows you to distribute products based on the product group, for example! Placeholders are provided with the brackets {}.
Hint: The name of the queue is a mandatory field, but irrelevant in this case, i.e. write e.g. csproducts in it.
Translated with www.DeepL.com/Translator (free version)
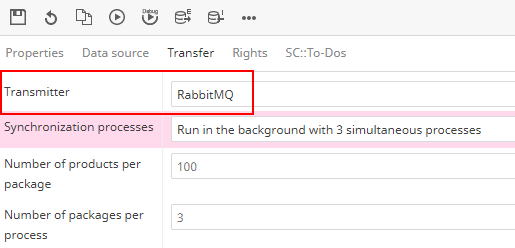
If the transmitter is configured, then you must select the respective transmitter in the SAWSConnector job so that your job uses the transmitter in the transmission.
Start the job in development mode with a few products. If you have done everything correctly, the topic should expand properly and the products should be split on the RabbitMQ page.
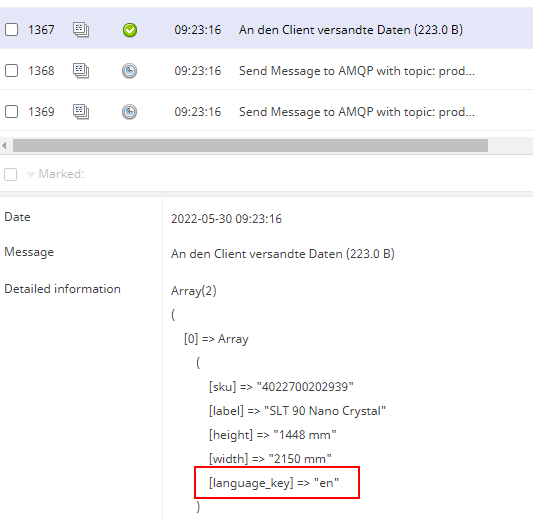
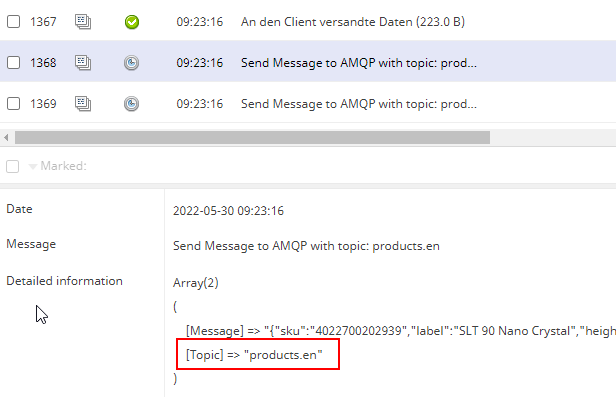
4 messages are sent to the exchange “csproductsexchange”.

And then divided into 2 German and 2 English products based on the topic.

If you have further questions or want to connect your own queue, please contact us. We also have our own transmitter for Apache Kafka connection including Avro schema validation.
