-
General
-
Releases
-
Base Connector
-
- Beginner's Guide
- Overview
- Stations
- Datamaps
- Importing templates
- Formats
- Setting conditions
- Placeholders
- Job filter function
- How to create backups
- Running and Monitoring Jobs
- Export Job Automation
- Import/Export & copy of data map rows
- Synchronizing references that are not contained in views
- Get the preconfigured "Source data set - Template"
- Configuring categories and products
- Channel/View Tree Maintenance Active Job
- Configuring the price & stock modules
- Configuring the price/stock value ranges
- Configuring volume discounts/scale prices
- How to export prices
- How to export stock values from certain storage units
- Use of Contentserv Credentials
- Connector & Station User Limitation
- SC::Dynamic Image Crop Preset
- Todos
- Show all articles ( 11 ) Collapse Articles
-
- Price Table
- Stock Table
- Sales Channel Table
- Complex Article Table
- Importing data into SAWS tables (price, stock, etc.)
- SAWSConnector Usages
- Variant Articles
- Assignment of articles to complex articles
- Searching for SC::Prices / SC::Stocks
- Searching for SC::Channels
- Setup a transformation list for CSTypes
- Context-Sensitive Product Value Export
-
- Working with placeholder in conditions
- Improve usability of SC::Tables
- Placeholder for SC::Price, SC::Channel, SC::Stock
- REST Service API for SAWS Tables (Prices, Stock, Channels & Complex Articles)
- Dataflow import of SC::Tables
- Dataflow export of SC::Tables
- The datamap summary - Creating an automated documentation
- Export images as a ZIP file
- Image export with direct access to the CONTENTSERV platform
- Image export with no access to the CONTENTSERV platform
- Image export from a third party system
- How to configure CS Dashboard
- Setup a transformation list for CSTypes
- FAQ
- Export Smart Document via Active Script and assign output to product
- Format Macros
- Controlling Connector Jobs via the REST API
- Sales Channel Maintenance via Excel Cross-Reference
- Sales Channel Inheritance Active Job
- Job Parameters & Context Parameters
- Logbook
- Fill complex article tables automatically
- Datamap Mapping Status
- SAWS Create CS Channels via SAWS Sales Channels
- Show all articles ( 9 ) Collapse Articles
-
-
- Send value of a PIM reference
- Loop values for CS PIM references
- Send value of a MAM reference
- Loop values for CS MAM references
- Send value of a Channel (view) reference
- Loop values for CS Channel (Views) references
- Send value of an attribute reference
- Send value of a user reference
- Loop values for user references
- Send value of a reference (deprecated)
- Merge reference values format plugin
- Search for usage of item
- Search for item IDs using attribute data
-
- Loop Head and Loop Value
- Loop values for several attributes simultaneously
- Loop values for child elements
- Loop values for CS PIM references
- Loop values for CS Channel (Views) references
- Loop values for CS MAM references
- Loop values for user references
- Loop values for SC::Prices
- Loop values for SC::Stocktable entries
- Loop values for SC::Complex products
- Loop values for CS type reference
- Loop values for a CS table
- Loop value for simple data record
- Loop values for JSON Objects
- Loop for value range entries
-
- Create a JSON-String (create an array)
- Format value lists
- Tree paths or values from tree elements
- Multistep formatting
- Send accesslevel of the object
- Send value of a job parameter
- Search for values in several attributes
- Format with PHP Code (deprecated)
- Format Macros
- Load data via REST Service
- AI Value Transformation Format
- AI Value Translation Format
- Store value into a Contentserv Item
- Execute a conditional format (switch-case) Format Plugin
- Load array value from the Contentserv getValues Format Plugin
- Process HTML table Format Plugin
- Replace via regex pattern format plugin
- Convert value ranges into each other
- Merge Array Format Plugin
- Export several attributes simultaneously
- Show all articles ( 5 ) Collapse Articles
-
Owl Cloud Services
-
Owl Data Hub
-
Ursula AI
- Ursula AI
- Supported AIs
- AI Value Transformation Format
- AI Value Translation Format
- Generate Descriptions with Ursula AI Active Job
- Populate Attributes via Ursula AI Active Job
- AI Product Tree Organizer Active Job
- Mapping Sales Channels via the Ursula AI Active Job
- Store value into a Contentserv Item
-
GenericJSON / DynamicJSON Connector
-
- SAWSConnector settings
- Categories
- Products
- Product-Category assignment
- Export von Feldkonfigurationen/Attribute/Wertelisten
- Finish the export
- Response log
- Sample JSONs
- SQL Transmitter
- Shopify Transmitter
- Base. (Baselinker) Transmitter
- PlentyONE Transmitter
- Building JSON Target Keys
- Default HTTP Transmitter
- Configuratorware Transmitter
-
-
- Send value of a PIM reference
- Loop values for CS PIM references
- Send value of a Channel (view) reference
- Loop values for CS Channel (Views) references
- Send value of a MAM reference
- Loop values for CS MAM references
- Send value of an attribute reference
- Send value of a user reference
- Loop values for user references
- Send value of a reference (deprecated)
- Merge reference values format plugin
- Search for usage of item
- Search for item IDs using attribute data
-
- Loop Head and Loop Value
- Loop values for several attributes simultaneously
- Loop values for child elements
- Loop values for CS PIM references
- Loop values for CS Channel (Views) references
- Loop values for CS MAM references
- Loop values for user references
- Loop values for SC::Prices
- Loop values for SC::Stocktable entries
- Loop values for SC::Complex products
- Loop values for a CS table
- Loop values for CS type reference
- Loop value for simple data record
- Loop values for JSON Objects
- Loop for value range entries
-
- Create a JSON-String (create an array)
- Format value lists
- Tree paths or values from tree elements
- Multistep formatting
- Send accesslevel of the object
- Send value of a job parameter
- Search for values in several attributes
- Format with PHP Code (deprecated)
- Format Macros
- Load data via REST Service
- AI Value Transformation Format
- AI Value Translation Format
- Store value into a Contentserv Item
- Execute a conditional format (switch-case) Format Plugin
- Load array value from the Contentserv getValues Format Plugin
- Process HTML table Format Plugin
- Response Handler Field Plugin
- Replace via regex pattern format plugin
- Convert value ranges into each other
- Merge Array Format Plugin
- Export several attributes simultaneously
- Show all articles ( 6 ) Collapse Articles
-
GenericXML Connector
-
-
- Send value of a PIM reference
- Loop values for CS PIM references
- Send value of a Channel (view) reference
- Loop values for CS Channel (Views) references
- Send value of a MAM reference
- Loop values for CS MAM references
- Send value of an attribute reference
- Send value of a user reference
- Loop values for user references
- Send value of a reference (deprecated)
- Merge reference values format plugin
- Search for usage of item
- Search for item IDs using attribute data
-
- Loop Head and Loop Value
- Loop values for several attributes simultaneously
- Loop values for child elements
- Loop values for CS PIM references
- Loop values for CS Channel (Views) references
- Loop values for CS MAM references
- Loop values for user references
- Loop values for SC::Prices
- Loop values for SC::Stocktable entries
- Loop values for SC::Complex products
- Loop values for a CS table
- Loop values for CS type reference
- Loop value for simple data record
- Loop values for JSON Objects
- Loop for value range entries
-
- Create a JSON-String (create an array)
- Format value lists
- Tree paths or values from tree elements
- Multistep formatting
- Send accesslevel of the object
- Send value of a job parameter
- Search for values in several attributes
- Format with PHP Code (deprecated)
- Format Macros
- Load data via REST Service
- AI Value Transformation Format
- AI Value Translation Format
- Store value into a Contentserv Item
- Execute a conditional format (switch-case) Format Plugin
- Load array value from the Contentserv getValues Format Plugin
- Process HTML table Format Plugin
- Replace via regex pattern format plugin
- Convert value ranges into each other
- Merge Array Format Plugin
- Export several attributes simultaneously
- Show all articles ( 5 ) Collapse Articles
-
SimpleExcel Connector
-
-
- Send value of a PIM reference
- Loop values for CS PIM references
- Send value of a Channel (view) reference
- Loop values for CS Channel (Views) references
- Send value of a MAM reference
- Loop values for CS MAM references
- Send value of an attribute reference
- Send value of a user reference
- Loop values for user references
- Send value of a reference (deprecated)
- Merge reference values format plugin
- Search for usage of item
- Search for item IDs using attribute data
-
- Loop Head and Loop Value
- Loop values for several attributes simultaneously
- Loop values for child elements
- Loop values for CS PIM references
- Loop values for CS Channel (Views) references
- Loop values for CS MAM references
- Loop values for user references
- Loop values for SC::Prices
- Loop values for SC::Stocktable entries
- Loop values for SC::Complex products
- Loop values for a CS table
- Loop values for CS type reference
- Loop value for simple data record
- Loop values for JSON Objects
- Loop for value range entries
-
- Create a JSON-String (create an array)
- Format value lists
- Tree paths or values from tree elements
- Multistep formatting
- Send accesslevel of the object
- Send value of a job parameter
- Search for values in several attributes
- Format with PHP Code (deprecated)
- Format Macros
- Load data via REST Service
- AI Value Transformation Format
- AI Value Translation Format
- Store value into a Contentserv Item
- Execute a conditional format (switch-case) Format Plugin
- Load array value from the Contentserv getValues Format Plugin
- Process HTML table Format Plugin
- Replace via regex pattern format plugin
- Convert value ranges into each other
- Merge Array Format Plugin
- Export several attributes simultaneously
- Show all articles ( 5 ) Collapse Articles
-
Magento Connector
-
-
- Send value of a PIM reference
- Loop values for CS PIM references
- Send value of a Channel (view) reference
- Loop values for CS Channel (Views) references
- Send value of a MAM reference
- Loop values for CS MAM references
- Send value of an attribute reference
- Send value of a user reference
- Loop values for user references
- Send value of a reference (deprecated)
- Merge reference values format plugin
- Search for usage of item
- Search for item IDs using attribute data
-
- Loop Head and Loop Value
- Loop values for several attributes simultaneously
- Loop values for child elements
- Loop values for CS PIM references
- Loop values for CS Channel (Views) references
- Loop values for CS MAM references
- Loop values for user references
- Loop values for SC::Prices
- Loop values for SC::Stocktable entries
- Loop values for SC::Complex products
- Loop values for a CS table
- Loop values for CS type reference
- Loop value for simple data record
- Loop values for JSON Objects
- Loop for value range entries
-
- Create a JSON-String (create an array)
- Format value lists
- Tree paths or values from tree elements
- Multistep formatting
- Send accesslevel of the object
- Send value of a job parameter
- Search for values in several attributes
- Format with PHP Code (deprecated)
- Format Macros
- Load data via REST Service
- AI Value Transformation Format
- AI Value Translation Format
- Store value into a Contentserv Item
- Execute a conditional format (switch-case) Format Plugin
- Load array value from the Contentserv getValues Format Plugin
- Process HTML table Format Plugin
- Replace via regex pattern format plugin
- Convert value ranges into each other
- Merge Array Format Plugin
- Export several attributes simultaneously
- Show all articles ( 5 ) Collapse Articles
-
Shopware 5 Connector
-
- Configuration Shopware
- Configuration PIM
- Shopware attribute setting
- Configuration SAWSConnector
- Station configuration
- Source data set configuration
- Configuring categories and products
- Price table configuration for Shopware
- Result in Shopware
- Subshops and the SAWSConnector Shopware
- ean
- Custom Fields (attribute)
- highlight
- purchaseSteps
- stockMin
- supplierNumber
- notification
- shippingFree
- length
- height
- width
- weight
- shippingTime
- metaKeywords
- Show all articles ( 9 ) Collapse Articles
-
-
- Send value of a PIM reference
- Loop values for CS PIM references
- Send value of a Channel (view) reference
- Loop values for CS Channel (Views) references
- Send value of a MAM reference
- Loop values for CS MAM references
- Send value of an attribute reference
- Send value of a user reference
- Loop values for user references
- Send value of a reference (deprecated)
- Merge reference values format plugin
- Search for usage of item
- Search for item IDs using attribute data
-
- Loop Head and Loop Value
- Loop values for several attributes simultaneously
- Loop values for child elements
- Loop values for CS PIM references
- Loop values for CS Channel (Views) references
- Loop values for CS MAM references
- Loop values for user references
- Loop values for SC::Prices
- Loop values for SC::Stocktable entries
- Loop values for SC::Complex products
- Loop values for a CS table
- Loop values for CS type reference
- Loop value for simple data record
- Loop values for JSON Objects
- Loop for value range entries
-
- Create a JSON-String (create an array)
- Format value lists
- Tree paths or values from tree elements
- Multistep formatting
- Send accesslevel of the object
- Send value of a job parameter
- Search for values in several attributes
- Format with PHP Code (deprecated)
- Format Macros
- Load data via REST Service
- AI Value Transformation Format
- AI Value Translation Format
- Store value into a Contentserv Item
- Execute a conditional format (switch-case) Format Plugin
- Load array value from the Contentserv getValues Format Plugin
- Process HTML table Format Plugin
- Replace via regex pattern format plugin
- Convert value ranges into each other
- Merge Array Format Plugin
- Export several attributes simultaneously
- Show all articles ( 5 ) Collapse Articles
-
Shopware 6 Connector
-
- Tutorial Video
- Initial Connection & Authentication
- Import Shopware settings
- Export categories
- Export media files
- Export simple products
- Export multiple languages
- Export variant products
- Export product properties
- Export custom fields
- Export product cross-selling relationships
- Export prices
- Export stocks
- Export into any other Shopware field
- How to address multiple Shopware 6 websites
- How to address different Shopware 6 Sale-Channels from one Contentserv System
- Useful Links
- Sales Channel Maintenance via Excel Cross-Reference
- Show all articles ( 3 ) Collapse Articles
-
-
- Send value of a PIM reference
- Loop values for CS PIM references
- Send value of a MAM reference
- Loop values for CS MAM references
- Send value of a Channel (view) reference
- Loop values for CS Channel (Views) references
- Send value of an attribute reference
- Send value of a user reference
- Loop values for user references
- Send value of a reference (deprecated)
- Merge reference values format plugin
- Search for usage of item
- Search for item IDs using attribute data
-
- Loop Head and Loop Value
- Loop values for several attributes simultaneously
- Loop values for child elements
- Loop values for CS PIM references
- Loop values for CS Channel (Views) references
- Loop values for CS MAM references
- Loop values for user references
- Loop values for SC::Prices
- Loop values for SC::Stocktable entries
- Loop values for SC::Complex products
- Loop values for a CS table
- Loop values for CS type reference
- Loop value for simple data record
- Loop values for JSON Objects
- Loop for value range entries
-
- Create a JSON-String (create an array)
- Format value lists
- Tree paths or values from tree elements
- Multistep formatting
- Send accesslevel of the object
- Send value of a job parameter
- Search for values in several attributes
- Format with PHP Code (deprecated)
- Format Macros
- Load data via REST Service
- AI Value Transformation Format
- AI Value Translation Format
- Store value into a Contentserv Item
- Execute a conditional format (switch-case) Format Plugin
- Load array value from the Contentserv getValues Format Plugin
- Process HTML table Format Plugin
- Replace via regex pattern format plugin
- Convert value ranges into each other
- Merge Array Format Plugin
- Export several attributes simultaneously
- Show all articles ( 5 ) Collapse Articles
-
OXID Connector
-
-
- Send value of a PIM reference
- Loop values for CS PIM references
- Send value of a MAM reference
- Loop values for CS MAM references
- Send value of a Channel (view) reference
- Loop values for CS Channel (Views) references
- Send value of an attribute reference
- Send value of a user reference
- Loop values for user references
- Send value of a reference (deprecated)
- Merge reference values format plugin
- Search for usage of item
- Search for item IDs using attribute data
-
- Loop Head and Loop Value
- Loop values for several attributes simultaneously
- Loop values for child elements
- Loop values for CS PIM references
- Loop values for CS Channel (Views) references
- Loop values for CS MAM references
- Loop values for user references
- Loop values for SC::Prices
- Loop values for SC::Stocktable entries
- Loop values for SC::Complex products
- Loop values for a CS table
- Loop values for CS type reference
- Loop value for simple data record
- Loop values for JSON Objects
- Loop for value range entries
-
- Create a JSON-String (create an array)
- Format value lists
- Tree paths or values from tree elements
- Multistep formatting
- Send accesslevel of the object
- Send value of a job parameter
- Search for values in several attributes
- Format with PHP Code (deprecated)
- Format Macros
- Load data via REST Service
- AI Value Transformation Format
- AI Value Translation Format
- Store value into a Contentserv Item
- Execute a conditional format (switch-case) Format Plugin
- Load array value from the Contentserv getValues Format Plugin
- Process HTML table Format Plugin
- Replace via regex pattern format plugin
- Convert value ranges into each other
- Merge Array Format Plugin
- Export several attributes simultaneously
- Show all articles ( 5 ) Collapse Articles
-
Typo3 Connector
-
-
- Send value of a PIM reference
- Loop values for CS PIM references
- Send value of a Channel (view) reference
- Loop values for CS Channel (Views) references
- Send value of a MAM reference
- Loop values for CS MAM references
- Send value of an attribute reference
- Send value of a user reference
- Loop values for user references
- Send value of a reference (deprecated)
- Merge reference values format plugin
- Search for usage of item
- Search for item IDs using attribute data
-
- Loop Head and Loop Value
- Loop values for several attributes simultaneously
- Loop values for child elements
- Loop values for CS PIM references
- Loop values for CS Channel (Views) references
- Loop values for CS MAM references
- Loop values for user references
- Loop values for SC::Prices
- Loop values for SC::Stocktable entries
- Loop values for SC::Complex products
- Loop values for a CS table
- Loop values for CS type reference
- Loop value for simple data record
- Loop values for JSON Objects
- Loop for value range entries
-
- Create a JSON-String (create an array)
- Format value lists
- Tree paths or values from tree elements
- Multistep formatting
- Send accesslevel of the object
- Send value of a job parameter
- Search for values in several attributes
- Format with PHP Code (deprecated)
- Format Macros
- Load data via REST Service
- AI Value Transformation Format
- AI Value Translation Format
- Store value into a Contentserv Item
- Execute a conditional format (switch-case) Format Plugin
- Load array value from the Contentserv getValues Format Plugin
- Process HTML table Format Plugin
- Replace via regex pattern format plugin
- Convert value ranges into each other
- Merge Array Format Plugin
- Export several attributes simultaneously
- Show all articles ( 5 ) Collapse Articles
-
Other Connectors
Source data set configuration
A source data set is the basic configuration of your snychronization efforts and can be used for several stations (=satellite systems). The advantage is that you only have to configure basic settings once and can use them multiple times.
Navigate to the SAWSConnector module. You can add a new source data set by clicking on the “station overview” button of a station:

The station overview will open up. It displays the chosen source data set on the left handside, all existing jobs in the middle and the station on the right handside of the window:

In order to add a new source data set, click on “Add new source data set” on the upper left handside of the screen:

You will be taken to a mask asking you to enter the name of your new source data set. Enter a name and click on the “Save” button:

The dialogue will reload and extent by further settings and the additional tab “Mapping tables”:

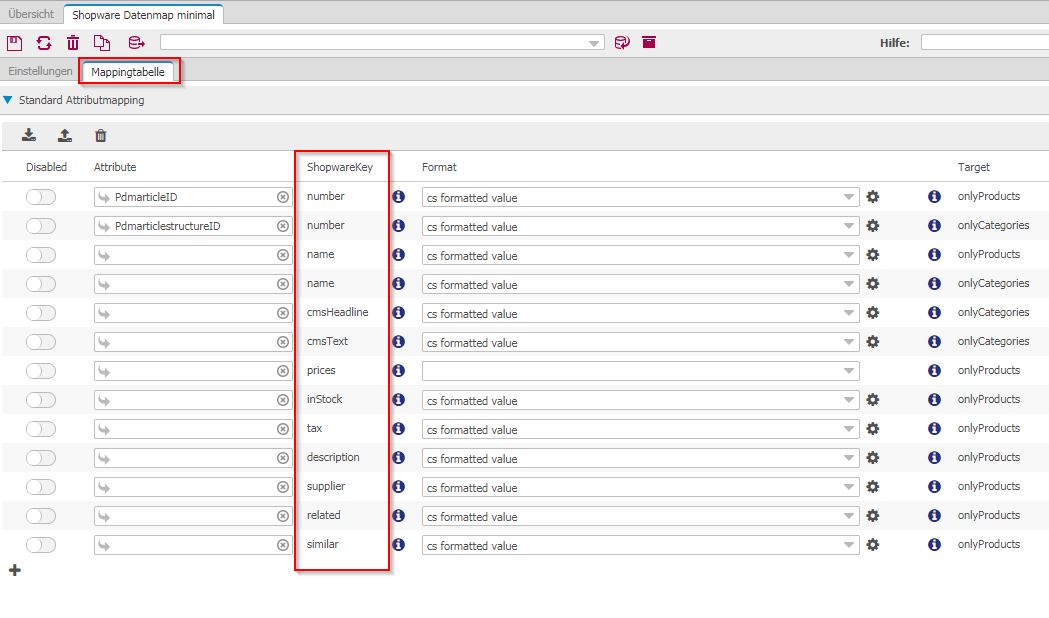
The mapping table already has a minimal configuration to create categories and products. The shopware keys must be mapped to the corresponding CS attribute, see below.
Configuration of the data source
Now the source data set can be further configured

This section lets you configure both workflows and attributes. Select all PIM View workflows you wish to be considered for the synchronization. Any workflow state you do not select will not be synchronized. Following that, choose the attributes or attribute sets (classes) you wish to synchronize to your Shopware shop. If the attribute set class has childs, then you have to select them too! You can use the dialogue chooser for attribute sets or add attributes manually in the field below. Manually added fields must be separated with the pipe sign “|”.
Store View Mapping
StoreViews in Shopware manage different language versions of a shop. The available language versions of products in the CONTENTSERV PIM need to be mapped to the relevant stores to ensure that language-specific data are synchronized to the correct StoreView. The SAWSConnector provides a simple mapping table:

Enter the Shopware shop name here as defined in your Shopware backend. Navigate to System > Configuration > Basic settings > Shop settings > Shops or there is a job for synchronize Shopware setting to CS (see Shopware Jobs further down). This will help you for mapping the right shop here.
Workflow State Mapping
You can also define what CONTENTSERV PIM View workflow status should become what product status in Shopware. The source data set offers another simple mapping table for that purpose:

Click on the “plus” button to add more lines to the table. Several CS status can be selected for Shopware online or offline.
Attribute mapping
Ultimately, every CONTENTSERV PIM field that contains data that your Magento shop needs must be mapped to its Magento counterpart. We created another mapping table for that. Click on the tab “mapping tables” on the upper left handside of the screen:

Standard attribute mapping
You can find the standard attribute mapping in the first section of the mapping table tab:
This section is added automatically to your source data set as soon as you set the desired application (in this case: Shopware). The section contains mandatory fields of Shopware – synchronization without the mapping of these attributes would fail. Additionally, we provide you with the attribute codes for related and similar products. We already provide you with the relevant Shopware attribute code. All you need to do is set the CONTENTSERV counterpart field.
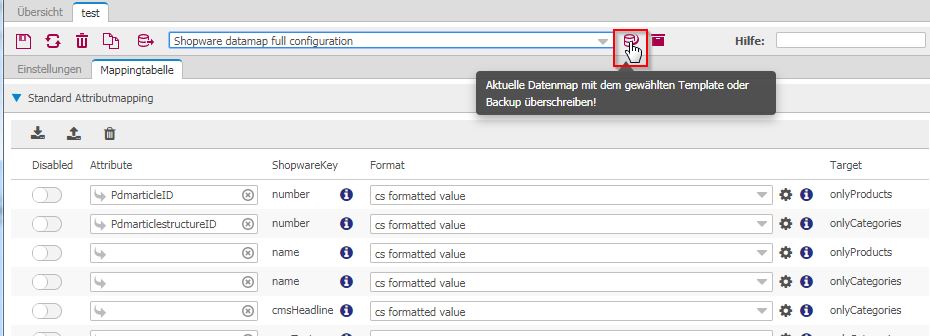
To simplify the configuration, a full preconfigured data map can be imported:
At the top of the menu, select the preconfigured “Shopware datamap full configuration”.

Click on the import button to load the JSON file.
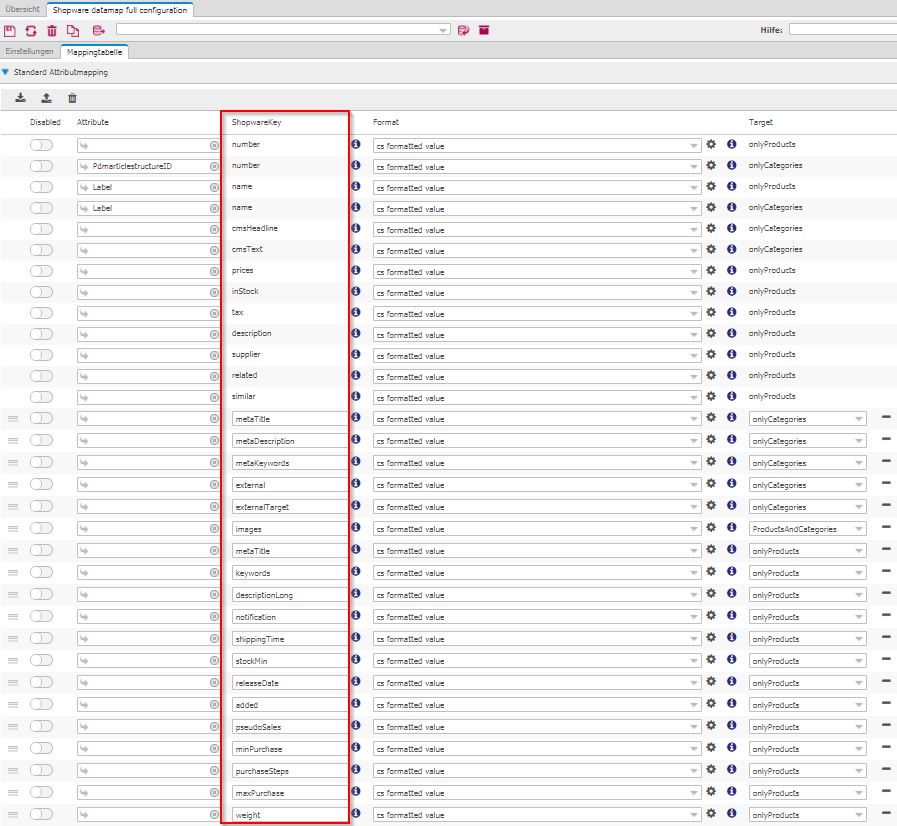
Full attribute mapping table for products an categories.
Notice: There are some more attributes e.g. special price attributes like priceGroupId, priceGroupActive for products or attribute1, attribute2, for categories, which can also be exported if required.
Additional attribute mapping
Additionally, if you set attributes in the “Configuration of the data source” section on the first tab of the source data set, all selected attributes will be displayed here as well.
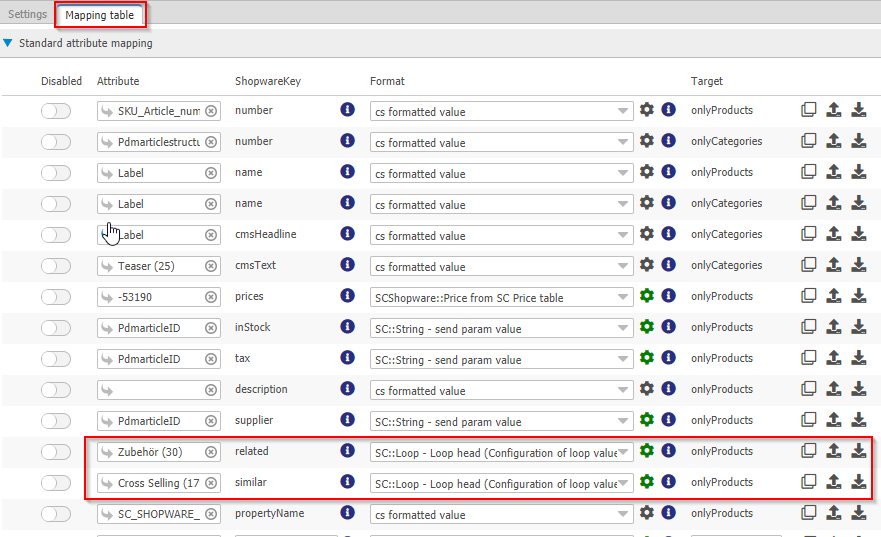
Your mapping table could look something like this when you are done:


Mapping of related and similar products
For the shopware key “related” and “similar” select the plugin SC::Loop head and click on the gearwheel button for the extended settings.
A new window opens and you can select the “Loop values for CS PIM references”.
Pleas click again on the gearwheel.
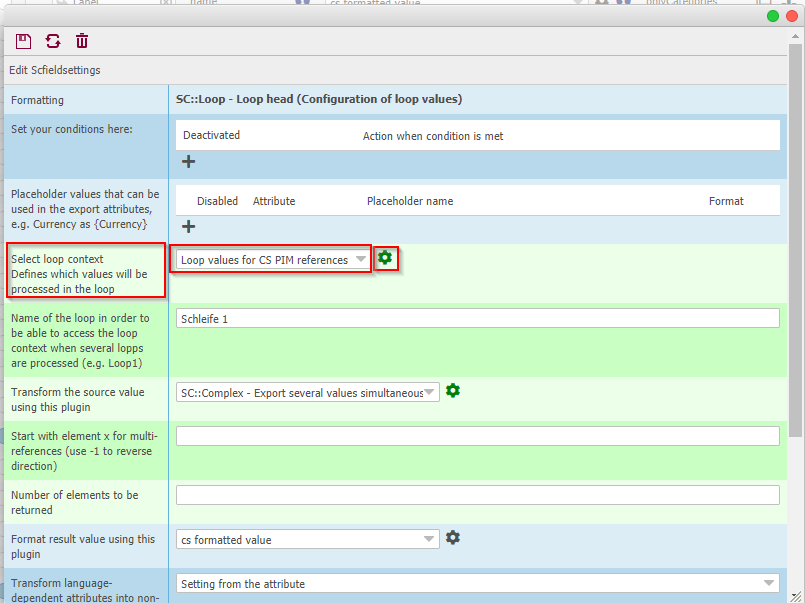
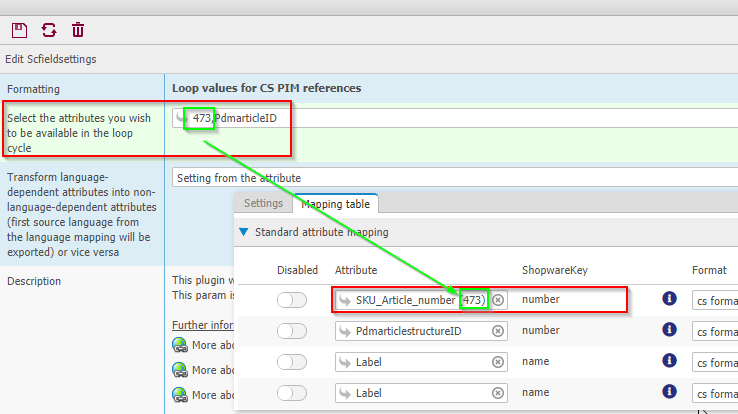
Select the attribute for the article number as selected in the standard attribute mapping for the “number” and select the PdmarticleID as well. Save the settings and go back to the settings for the single values.
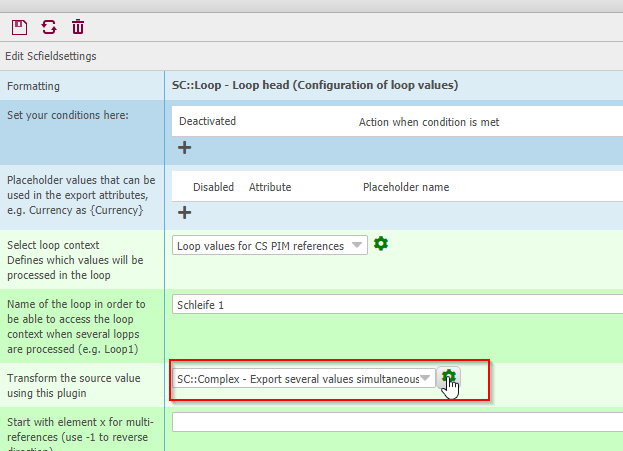
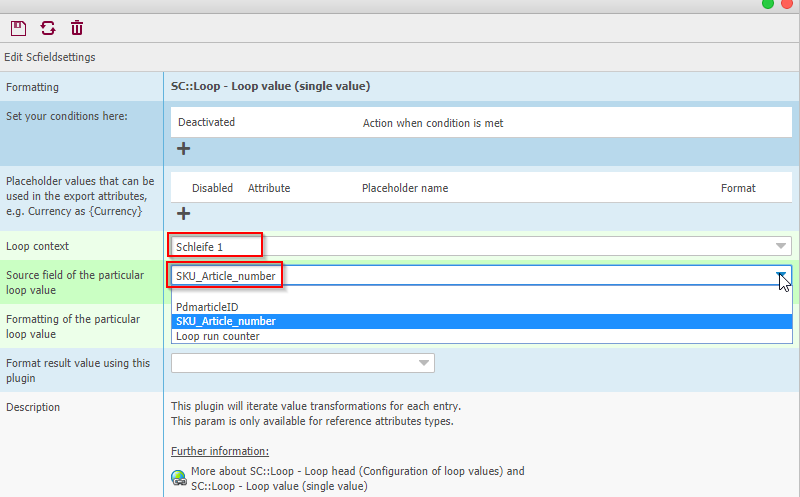
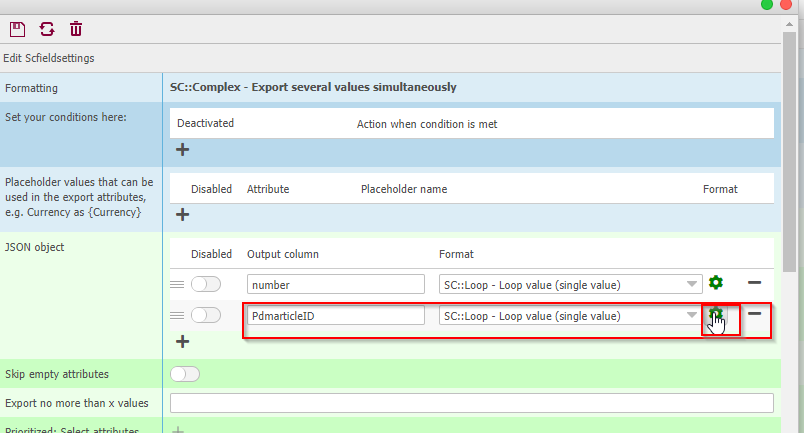
Select for the transformation of the source value the plugin SC::Complex – Export several values simultaneously and configure the plugin.
Enter for the output column number and PdmarticleID and select the plugin for the loop values.
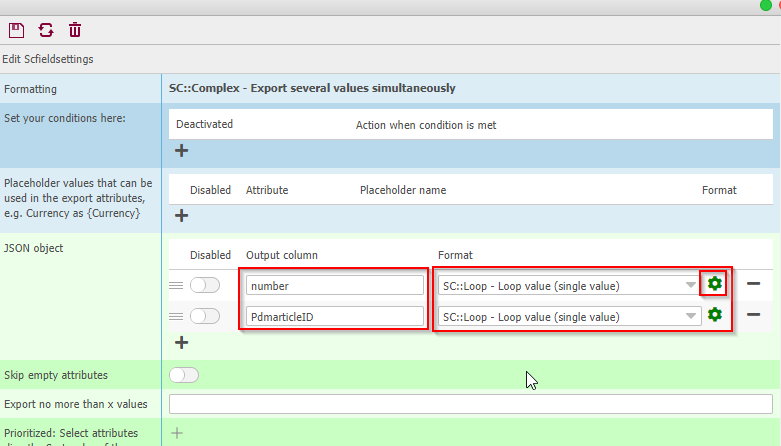
Choose the article number in the selectbox and for the formatting of the particular loop value the option “cs formatted value”
Likewise, you configure the second output column for the PdmarticleID
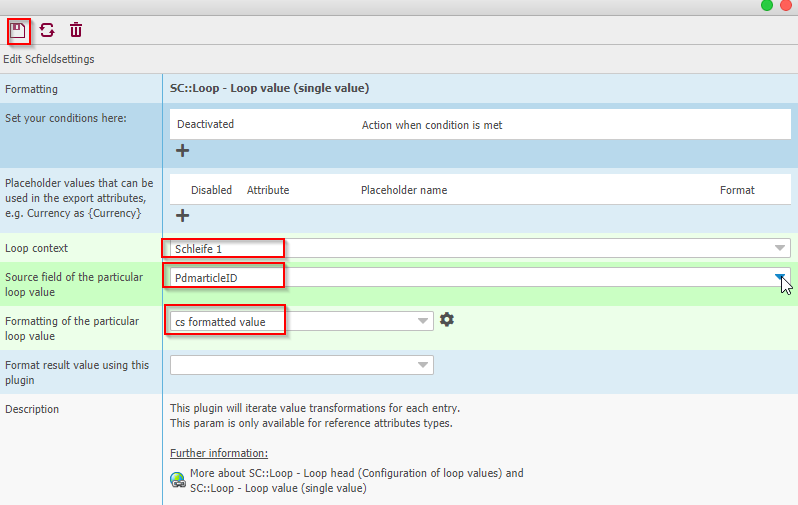
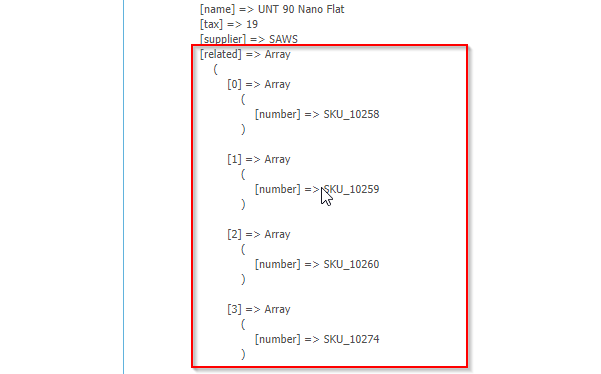
Save the settings and see the result in the log file:
Help for the mapping table
Help for the default mapping table

Help for mapping of additional attributes
