Creating your first export
This article is a step by step guide that walks you through creating your first XML product export. You will learn how to set up a basic XML connector, configure the necessary settings, and generate your first export with ease. By the end of this guide, you will have a solid foundation to build upon for more advanced exports in the future.
Creating a Station
Firstly, we need to create a station. The station will determine where our data will be sent to or stored. This will be further explained in the Transmitter section.
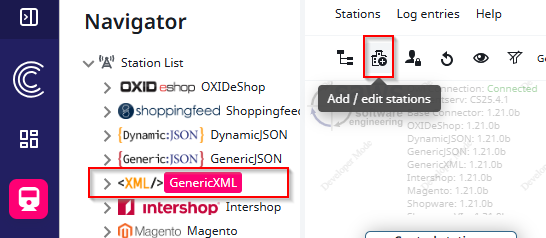
Select the “GenericXML connector”. Once selected, the Station Overview will open on the right side of the navigation bar. To create a new station, simply click the button that is highlighted in the screenshot (Add / edit stations).
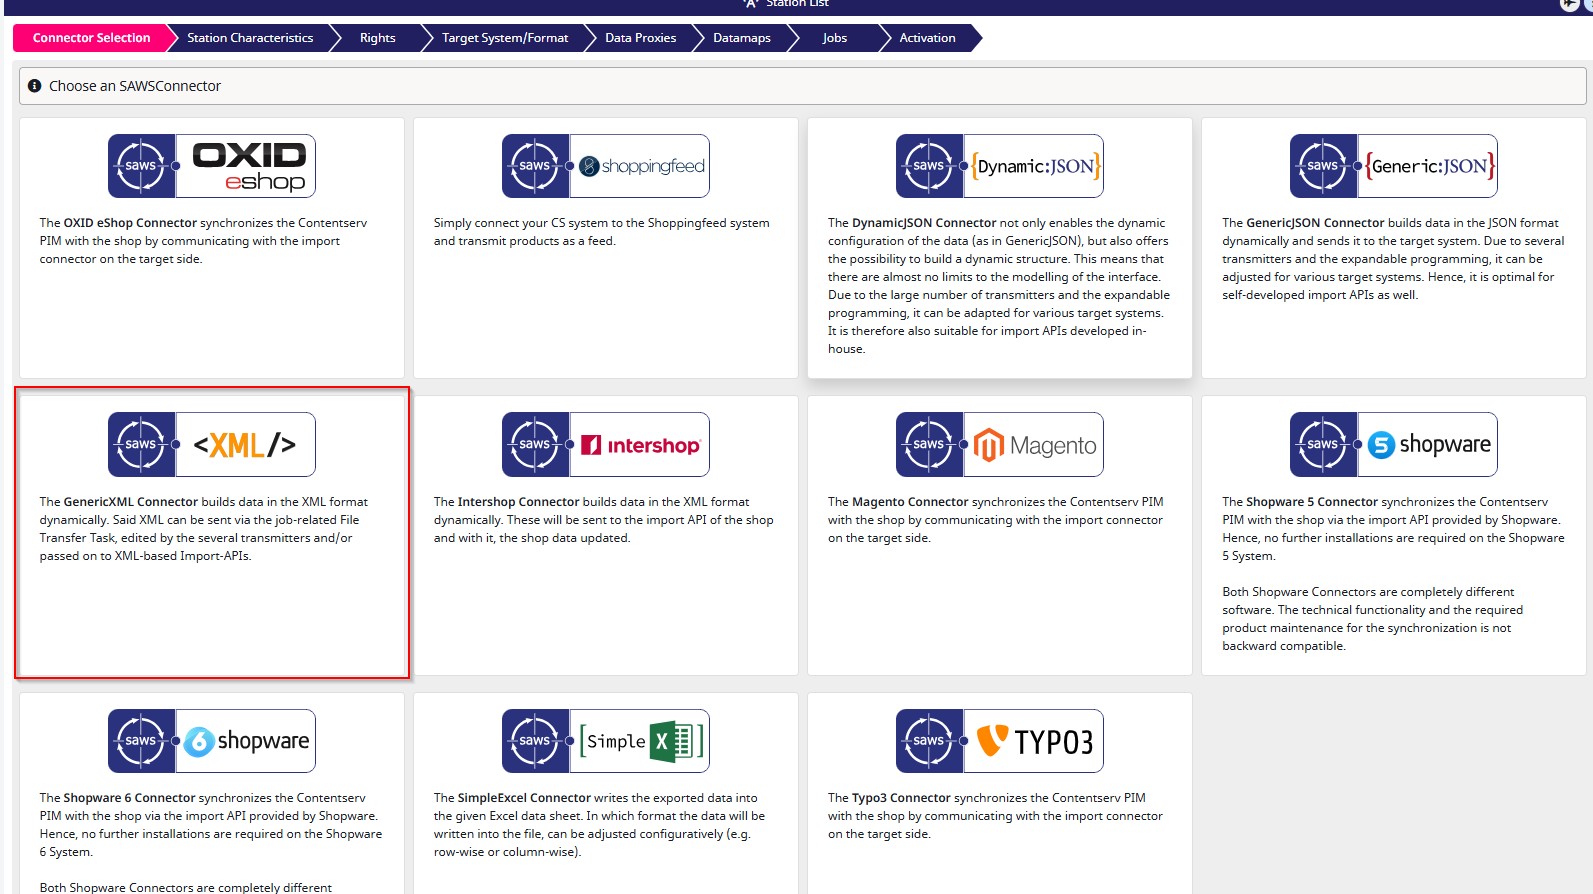
Next, choose the type of connector you would like to set up. In this case, select the “GenericXML connector”.
Next, click the “+ Add New Station” button.

Setting Up Your Station
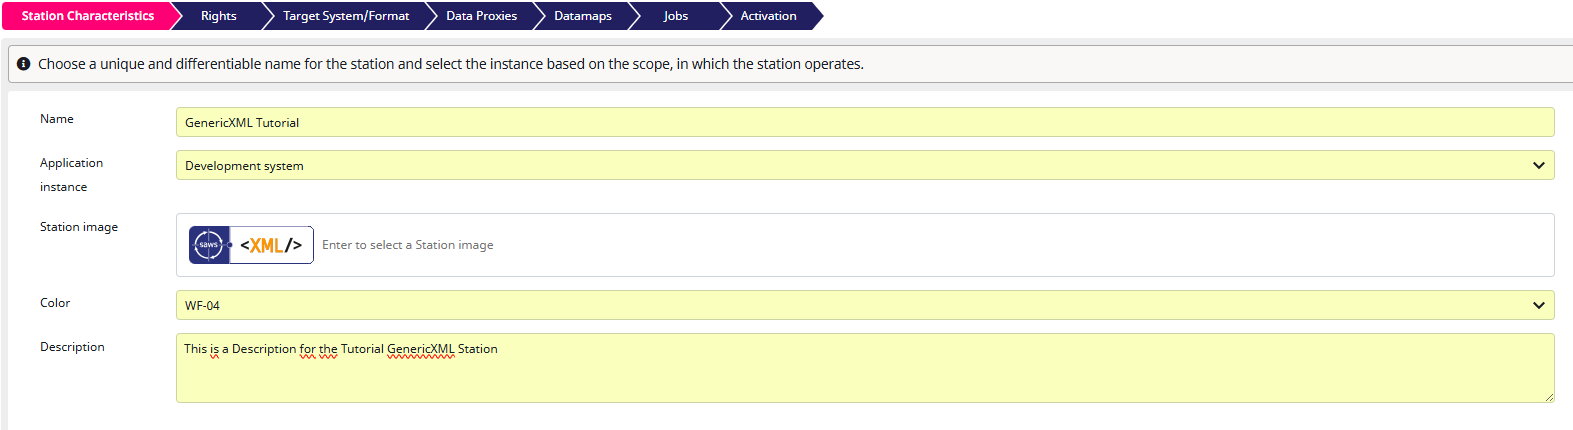
Now, you need to define the first characteristics of your GenericXML station. I selected Development system as the “Application instance”. This option does not affect the export in any way, the station will simply be marked with the abbreviation “DEV”. Don’t worry, you can always adjust these characteristics later. Once you have filled out the fields, click “Next” to continue. Switching to the next step automatically stores the current one. Pressing “Save” is only needed when you are planning to exit the configuration.
Rights
Next, you will reach the Rights section. For this part, I will simply link to the documentation that explains the Rights step: Rights Documentation
To continue, simply press the “Next” button.
Transmitter
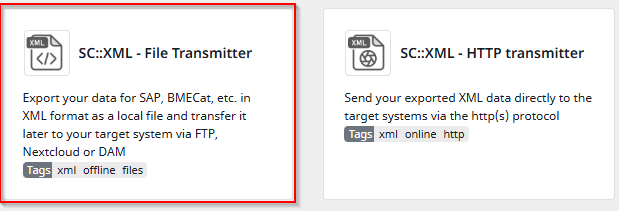
After completing the Rights section, you will move on to choosing the transmitter. For this tutorial, we will select the File Transmitter, but you can also use the HTTP Transmitter to send XML data directly to receiving systems. For more details about each transmitter, simply refer to their descriptions. If you want to export using FTP, SFTP, or WebDAV, you should also use the File Transmitter.
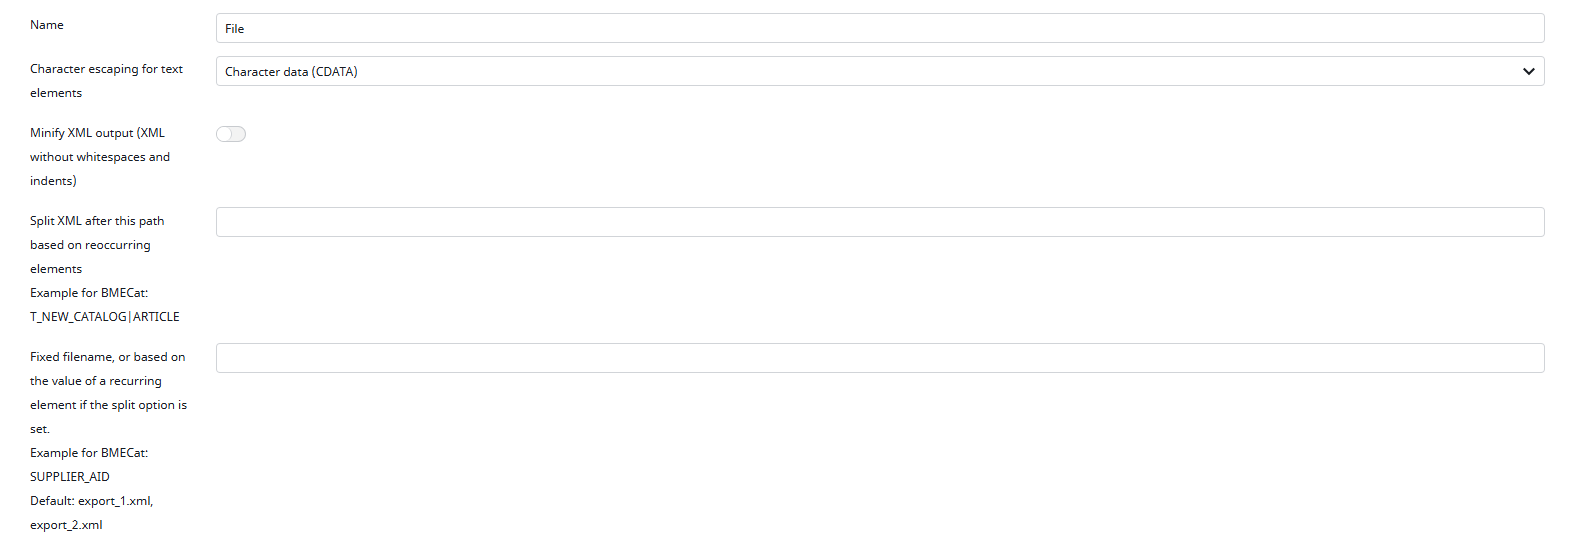
Next, you need to configure your file. In this section, you can adjust the formatting of your file and give it a name. I will now explain these options in more detail:
-
Character escaping for text elements
This is a choice between CDATA and PCDATA and determines how XML handles characters, especially special characters. In PCDATA, a<is parsed as<. In CDATA, the characters are wrapped in<![CDATA[ ]]>and anything inside is not parsed. For example:<message><![CDATA[Hello & welcome <user>!]]></message> -
Minify XML output
When enabled, the XML will no longer contain line breaks or indentation. Without this setting, the XML is more readable. It is recommended to keep this option turned off. -
Split XML after this path based on recurring elements
This option allows you to split the XML into multiple files after a specific element. For example, if you choosearticleand it occurs multiple times, eacharticlewill be written to a new XML file. -
Fixed filename, or based on the value of a recurring element (available only if Split XML is active)
This option allows you to name the resulting files based on a recurring element. This is useful if you want separate files for each item. For example, you could name each file after the Pdmarticlenumberelement if it recurs every time.
For this tutorial, I will use the configuration shown in the screenshot.
Creating a Datamap
Next, you will need to create a datamap. It will determine how and which product attributes are sent in the XML. To do this, simply click the “+ Add Datamap” button in the top right corner, or select an existing one if you already have one configured.

After creating a new Datamap, the next step is to assign some characteristics to it. Similar to when you created a Station, you will first need to add a label.
Optionally, you can also provide some documentation describing the purpose of this Datamap.
The PHP Memory Limit defines how much memory a single PHP process is allowed to use. Another setting you will see is “Objects exported via …”, but for the purposes of this tutorial we will leave this untouched. It’s a rather advanced and extensive topic, so leaving it on the default value is more than enough for now.

Once you have set up the basic characteristics, click “Next” to continue, or Save if you want to pause and come back later.
Configuring your Data Source
Next, we have to select a Value Reader, there are quite a few Options here, for this Tutorial we will be using the “PIM Product Reader” but i will also explain the other Value readers if you want to use another.
- DAM Reader: reads values from DAM files, this means, its specifically built for reading attributes from your DAM Media Files
- PIM Product Reader: is used to read Product values, for any product export. This is by far the most commonly used one. Note that, of course, DAM files referenced in products can also be exported with this reader.
- PIM Channel Reader: reads values from Contentserv Channels (analog to the product reader)
- SAWS Sales Channel Reader: can read products and channels, but only if they are assigned with SAWS Sales Channels
- Attribute Reader: only reads properties, attributes or classes. Useful for mirroring Contentserv attributes to target systems.
- Record Reader: only reads values from Contentserv database records, this can be useful if you want to export records like workflows or value ranges.

After selecting the “PIM Product Reader,” you will need to configure it. For this tutorial, we will not change any settings and will leave the Product Reader at its default configuration. This way, everything from our Datamap root node will be exported, which we will select in a few steps.
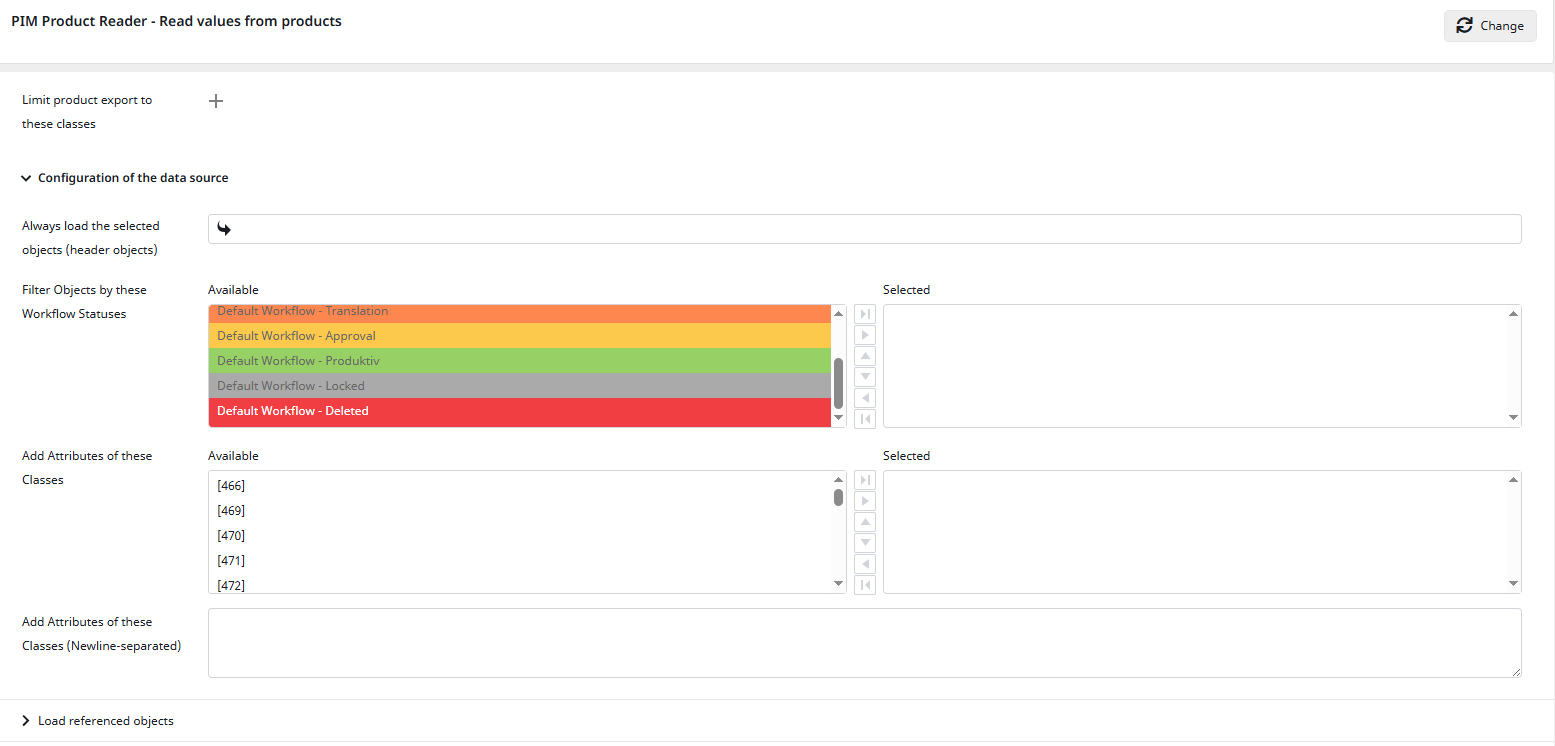
To continue, click “Next.”
Language
Now you will arrive at the Language Settings. In this step, you define which languages can be used later in your exports. For the purpose of this tutorial, I will add a few example languages.
To configure this, simply select a source language, a target language (this is the element that will appear in the XML file, for reference, many systems make use of ISO codes), a channel, and the currency. Optionally, you may also assign a stock, but since this is not needed in our tutorial, we will skip this feature.

Once you have added at least one language, click “Next” to proceed.
Node Mappings
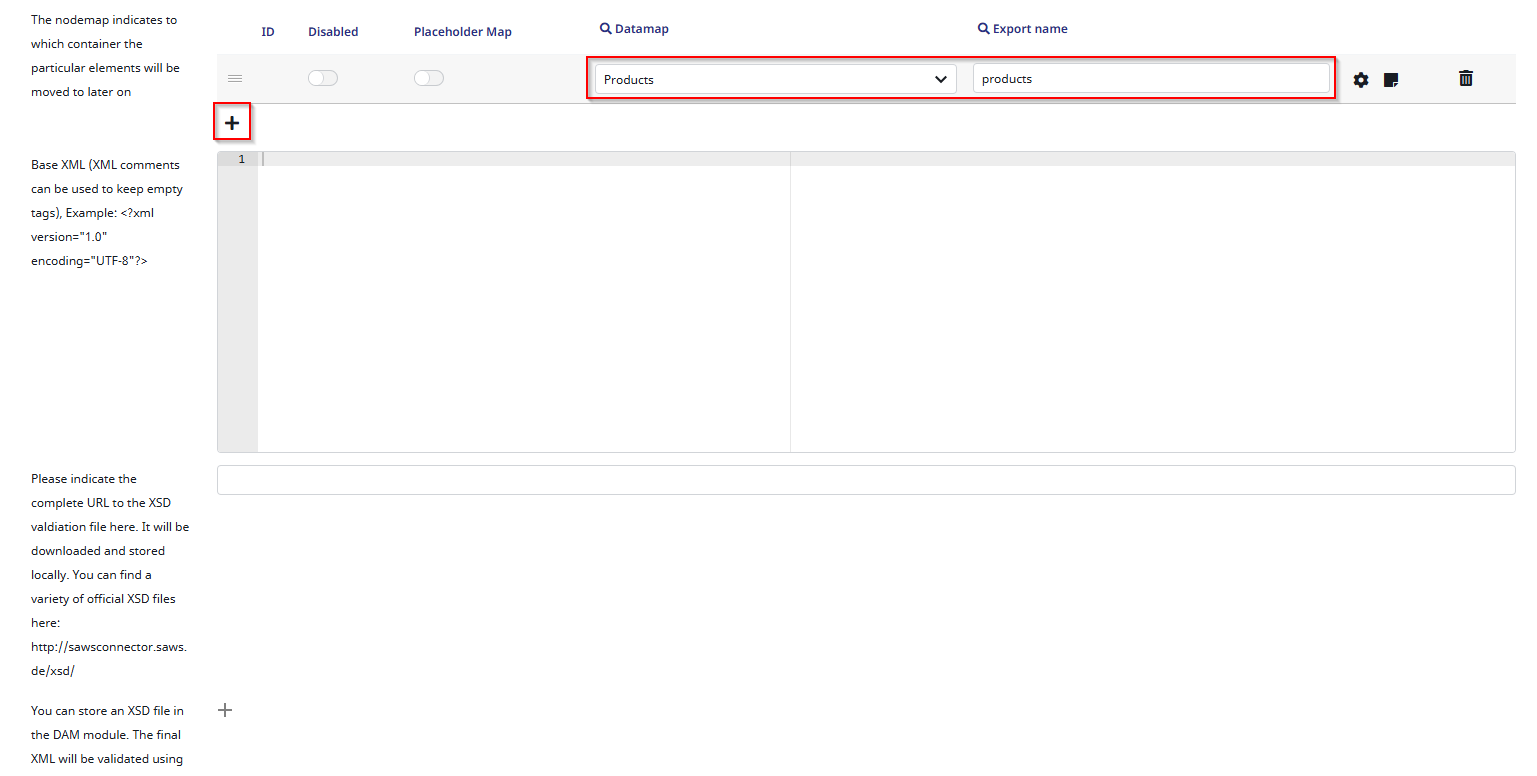
In this tutorial, we will only add a container without further configuration. To create a container, click the plus sign and a new container input will appear. In this tutorial, we will not use “Disabled” or “Placeholder Map” and will simply leave them turned off. For the datamap, select the “Products” datamap. For the export name, choose a name that fits your export in this example, I will simply use “products”. To continue, simply click “Next”.
Mapping
Now, we are getting to the most complicated Part of the “GenericXML Connector” more precisely, its the most complicated part of every SAWSConnector. For tutorial purposes, i will now show you how to create a “simple” mapping that exports some important attributes of your products.
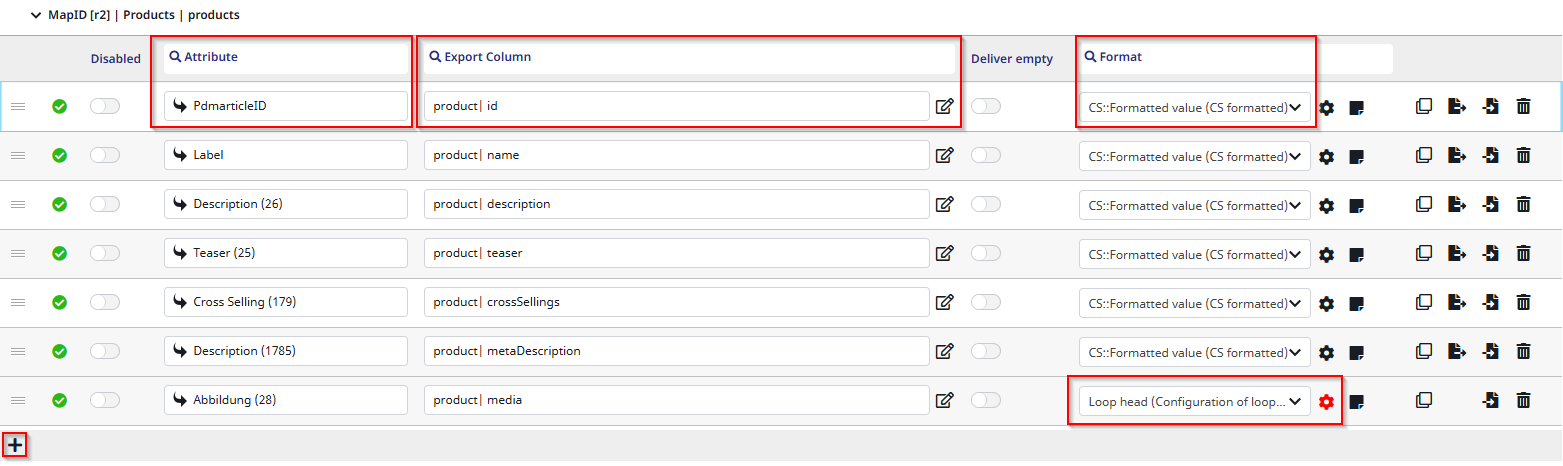
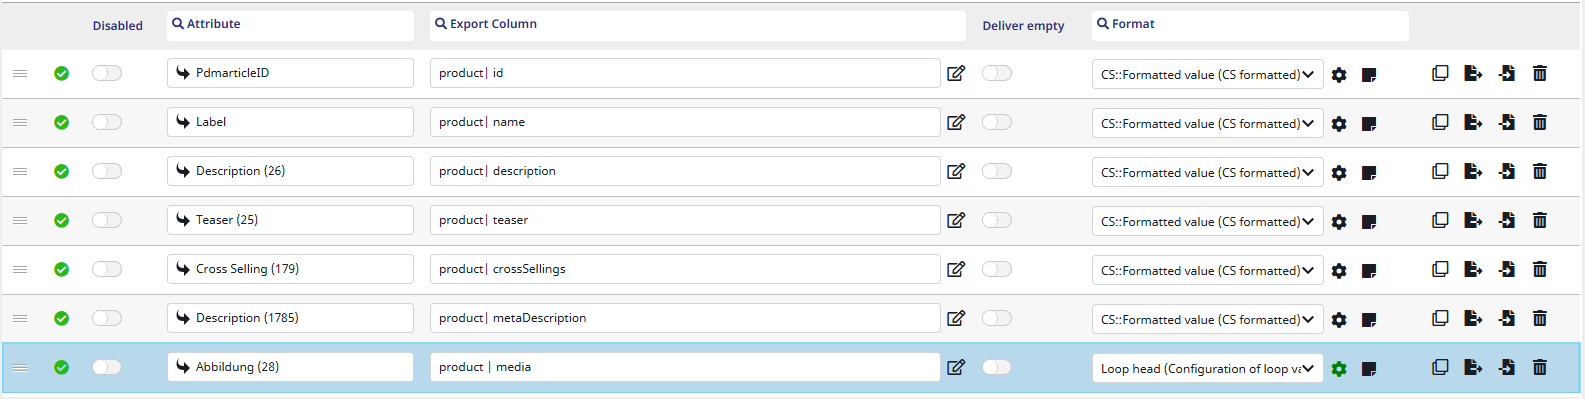
As you can see here, I created some entries. To create an entry, click the marked “+” button in the bottom-left corner. Most of these entries are quite similar, so I will explain the setup based on the first row I marked.
-
Attribute column
This column is for PIM attributes. These can be conveniently searched in an auto-complete by clicking into the free text field next to the arrow. If you are not sure which attributes exist, you can click the arrow to open the default Contentserv attribute selector. In my first row, I wanted to export the product ID. The attribute for this is “PdmarticleID” (this is the internal Contentserv name for the product ID). - Export column
Here, you need to give the export (in this case, the product ID) a name. In the GenericXML connector, a name must consist of a node (in this case “product”) acting as the container and a name (in this case “id”). A node refers to the the XML tag which will be created for each exported object. -
Format column
Each row also needs a format. I chose CS::Formatted value, which tells the connector how the value (in this case the PdmarticleID) should be formatted in the final XML file.
CS:Formatted Value for example formats the raw value 1000000 into 1.000.000.
As you can see, I also added a few more rows with other attributes. For each of them, the process is exactly the same except for the last one.
Loop configuration
In the last row, the format is set to “Loop head”. The loop head is most commonly used when handling multiple values. Since there can be multiple images referenced per product, it is a perfect fit here. One of my image attributes (DAM references) called “Abbildung” has been selected here. This will of course differ from yours.
I would like to elaborate a bit further on the “Loop head” format, as it can be quite complex but is also used frequently. When you select “Loop head” as a format, you must configure it in order for it to work. You can recognize this because the gear icon next to the input box will appear red.
Here’s a quick rundown of the gear colors:
- Black = Configuration is not stored but does not have to be since there are no required options e.g. in CS Formatted/Unformatted Value
- Green = Configuration is stored and every required option is set
- Red = Not every required option is set
- Light-green = Configuration is stored and every required option is set and this configuration has a condition
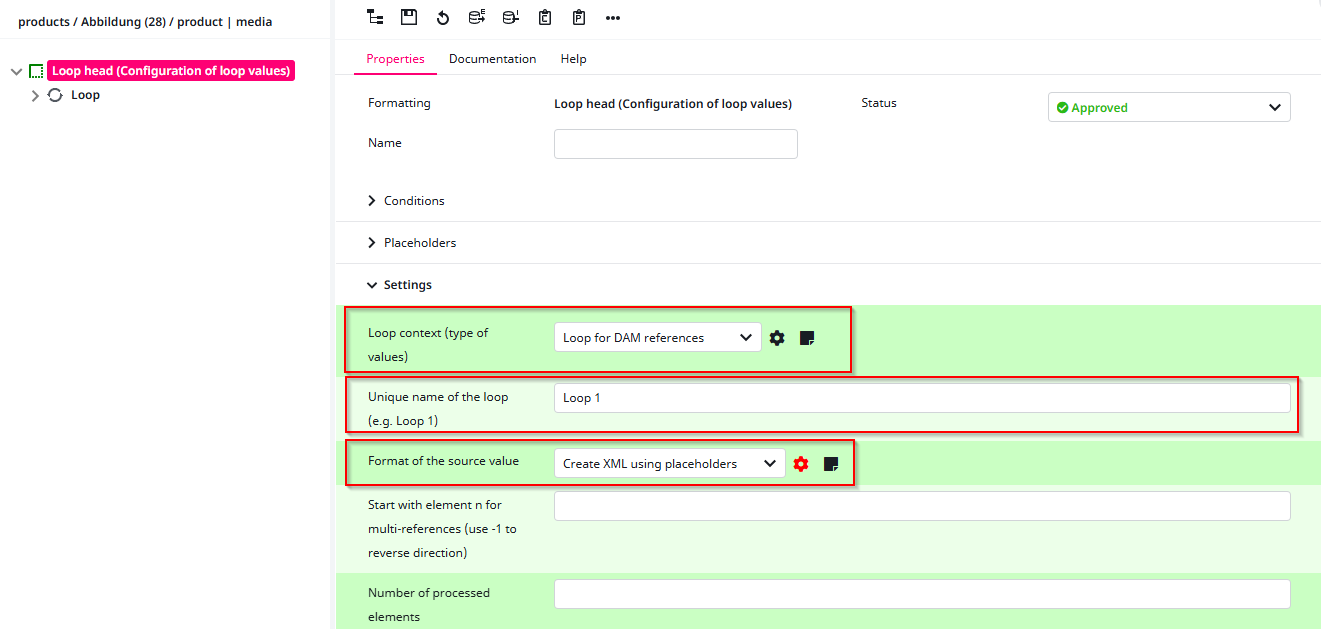
Your next step is to configure the Loop Head. To do this, click the gear icon a new window will pop up where you can adjust the settings. As you can see in the screenshot, I have already filled out a few fields, which I will now explain.
-
Context
This is the first selection. In our case, we want to loop over the images of the product, so we select the “Loop for DAM references”. -
Loop Name
Here, we will just use the default name “Loop 1”. However, if you are working with multiple loops inside one Loop Head, giving each loop a meaningful name is recommended. -
Format of the value
In this case, we want to create an XML element<image>with two sub-elements:<name>and<url>.
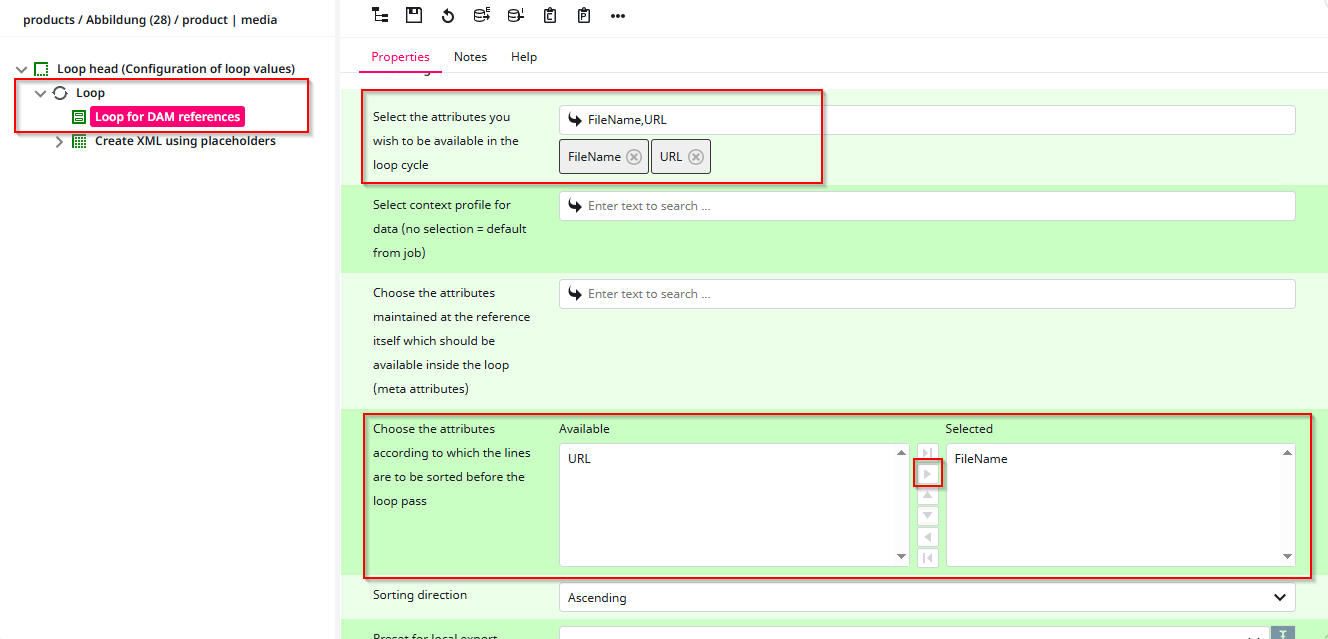
After configuring the Loop Head, we now need to set up the Loop Context. In this case, we choose DAM references. Next, we must specify which attributes we want to loop over.
To do this, first click on “Loop” in the tree on the left-hand side. You will then see two options select “Loop for DAM references” to configure it. After clicking, the configuration window (as shown in the screenshot below) will appear.
For this tutorial, we will loop over the FileName and URL of each image belonging to a product that is being exported. To achieve this, select the corresponding attributes in the upper row (as highlighted in the screenshot).
As you can also see, I marked an area below “Attributes.” This part is not essential, but I prefer to use it. In the larger box below, you can specify one or multiple attributes for sorting for example, sorting the export by Filename.
After you configured everything, as always click the “Save” Button.
Now, we need to configure the format so that the Loop Head knows which placeholders and attributes we are referring to, as well as how to export them later in the XML file. To do this, first open the Placeholders tab so we can configure them. After that, we will move on to the Settings tab. Nothing else in this window needs to be edited.
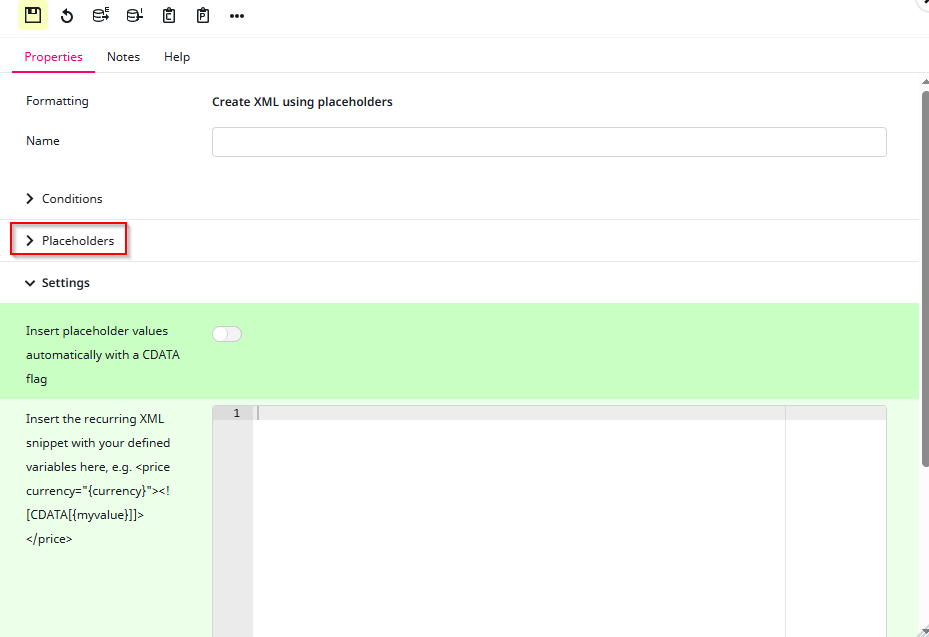
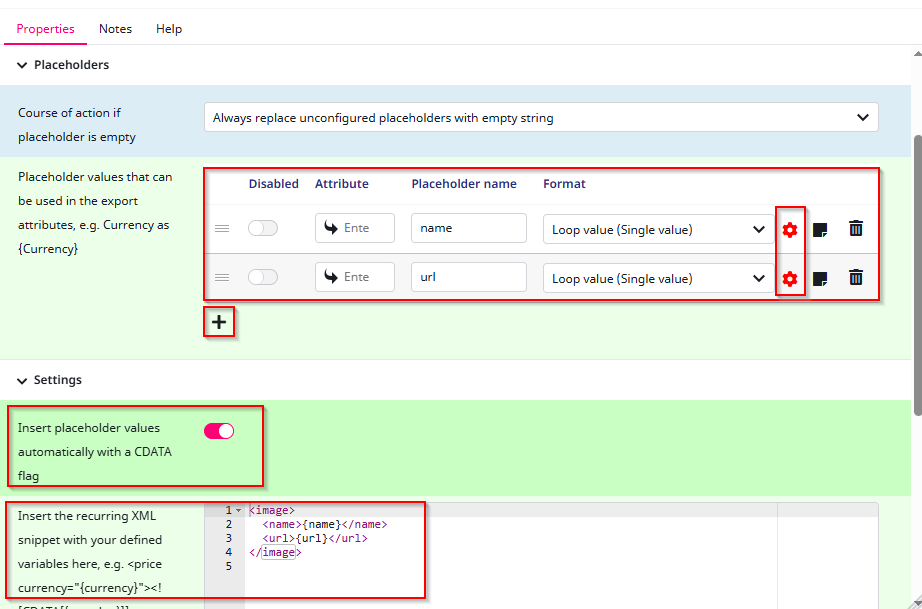
After opening the Placeholders tab, we need to create two placeholders and configure them later to be able to insert them into our XML snippet. To do this, simply click the “+” symbol. After creating the placeholders, assign each of them a name and a format. Since we want to export the filename (name) and the URL, I have given them appropriate names. The format for both is set to “Loop value (Single value)”, because each of these fields represents a single value rather than a list.
Before configuring the placeholders, we first need to define the structure for how the Loop Head should export them. In this case, I placed the name and URL in their own separate elements inside an <image> element.
For this, we will also enable CDATA. CDATA is an XML format used for special characters. It is only relevant for the connector and does not affect anything else.
Now that the loop context is set up, we can move on to configuring the placeholders.
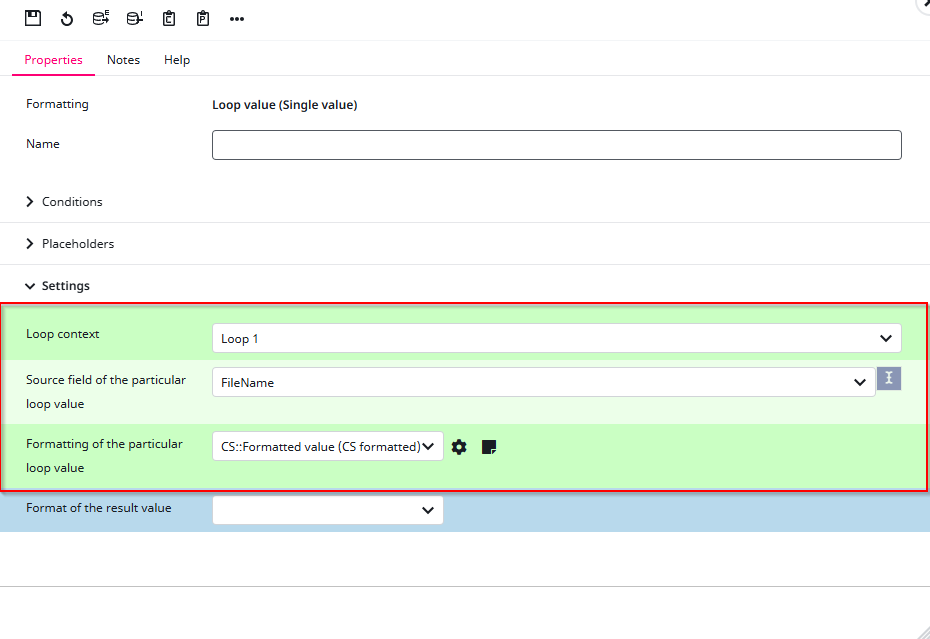
To do this, click on the gear icon next to the format of the placeholder you want to configure. Since we created two placeholders, you will need to repeat this step.
Let’s start with the “name” placeholder. First, select the Loop in this case Loop 1. Then choose the Attribute. Since this is the “name” placeholder, we select the Filename. Finally, define the Format. Because this represents a name, we use the Formatted value.
This step is crucial because it tells the connector what the placeholder “name” actually refers to in this case, the Filename that is looped over in the DAM loop.
After configuring, save your settings and repeat the process for the second placeholder. This time, instead of Filename, select the URL attribute.
After repeating the same process for the URL placeholder, you’ve successfully created your first Loop Head. With this, we’ve completed the first mapping process and can now move on to the Datamap Root Nodes. For reference, your mapping should now look like this.
You will re-visit the datamap very often when adjusting your exports further.
Datamap Root Nodes
After clicking the Next button, you will arrive at the Datamap Root Nodes. To put it simply, this step defines which products are allowed to be exported with this datamap. The exports can of course be limited further, so choose the general product tree here from which you plan to run exports from or leave it empty for no limitation.
To select the products, simply click on the Channel input and choose a folder from your product tree.

After selecting your folder, click Next to proceed to the Jobs tab.
Jobs
To create your first job, click the “+ Add Job” button highlighted in the screenshot.

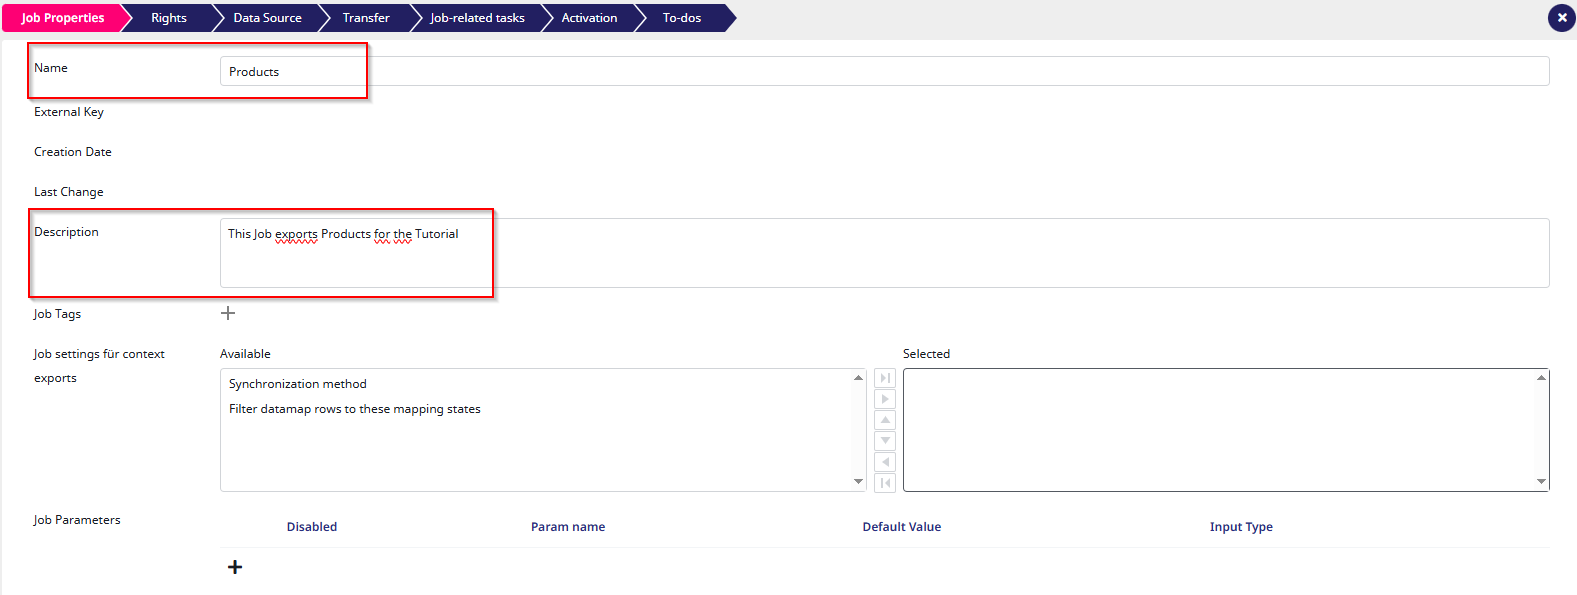
After clicking the button, you will be asked to configure your first job. You should now see the page shown in the screenshot. For this tutorial, we will only provide the job with a name and a description.
To briefly explain what a job does: a job determines which objects to export. They are represented by trains in the user-interface because they “go” to the target systems regularly. You can create multiple jobs per datamap, which can be useful, for example, if you want to export all products in a specific language or only export certain products by applying a filter.
After setting the job properties, click “Next” to continue.
Rights
Next up is the Rights step. This works the same way as the Station Rights section. As the name suggests, this step allows you to define which co-workers can access or edit this job.
For this tutorial, we will not configure any rights. However, feel free to check out the Rights article if you’d like to learn more.
To continue, simply click the “Next” button again.
Data Source
Next up is the Data Source step. Here, the root node for the job is selected, and with it all other filter options are defined. In this step, you can filter the job by languages, status, channels, workflow, and even the target language.
For this tutorial, we won’t apply any filters, since this job will serve as an export for everything.
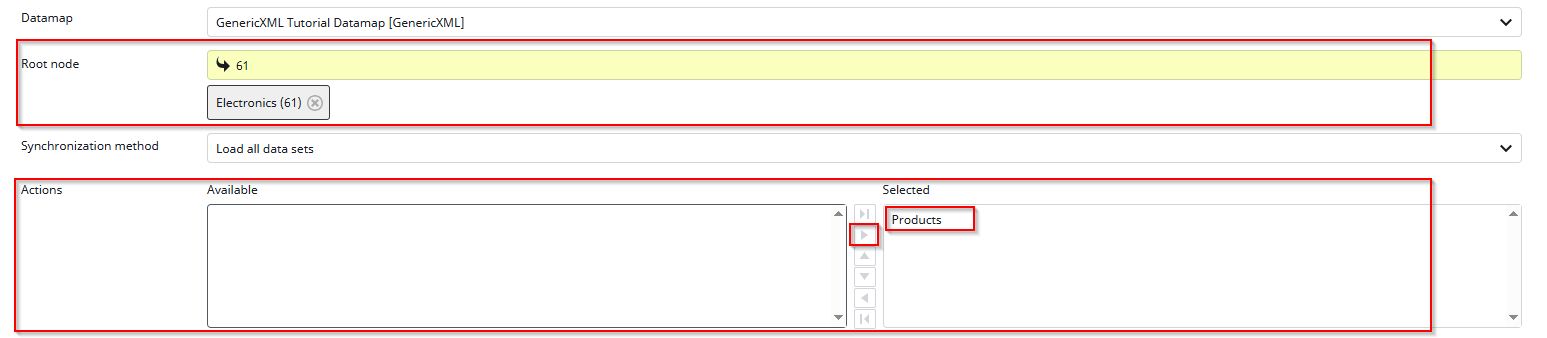
To set up the Data Source for a simple “all” export, we still need to configure a few settings. First, select the root node. In the XML Connector, you can only select one root node in the Datamap Root Nodes. For example, if your Datamap Root Node is set to “Electronics”, you could select the “TVs” folder as the job root node. Alternatively, if your Datamap Root Node is Clothes, you could select only the “Shirts” folder here. Note that multiple selections are allowed here.
Finally, select the “Actions”. Since we only selected “Products” in the Datamap Node Mappings, only “Products” are available in this view.
After configuring this basic data source, click the “Next” button to continue.
Transfer
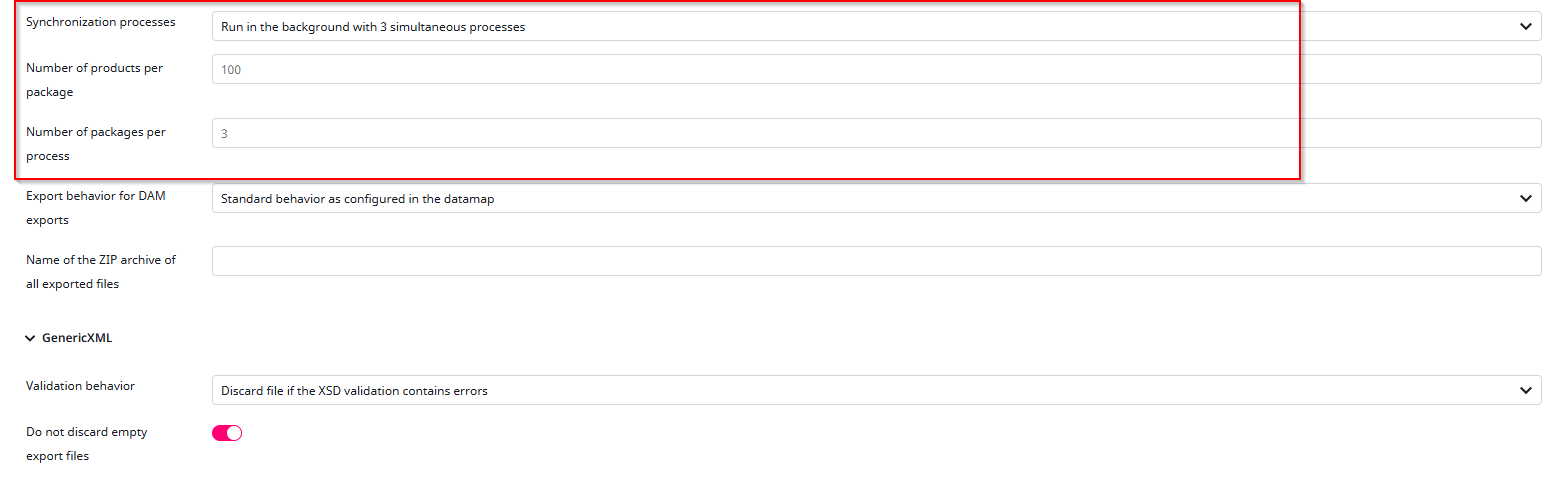
In this tutorial, we will not adjust any of the Transfer Settings, since they are not required. However, if you are exporting a large number of products, it may be helpful to fine tune some of these options.
Please keep in mind that higher transfer rates come at a cost, your server will need greater RAM and CPU capacity to handle them properly.
Click the “Next” button to continue.
Job-related tasks
For the purpose of this tutorial, we will not go into detail about Job-related tasks. However, feel free to explore this feature yourself by creating tasks with the “+” button.
Job-related tasks can be very useful for automating actions that should happen when a job starts or finishes. For example, you could automatically send an email once a job is completed.
If you’d like to dive deeper into this topic, we’ve got a dedicated documentation article here: Job-related tasks
Press “Next” to continue.
Activation
The “Activation” tab is also not covered in this tutorial, but make sure to keep the default settings enabled. “Active” simply means that the job is active and can be started, and “Job can write To-dos” should also remain turned on. Other than that, the remaining settings are not relevant for this tutorial.

As always to get to the Next Step, press the “Next” Button.
To-dos
Connector jobs can mark exported products with to-dos in the PIM population. These are not relevant for this tutorial.
How to Export
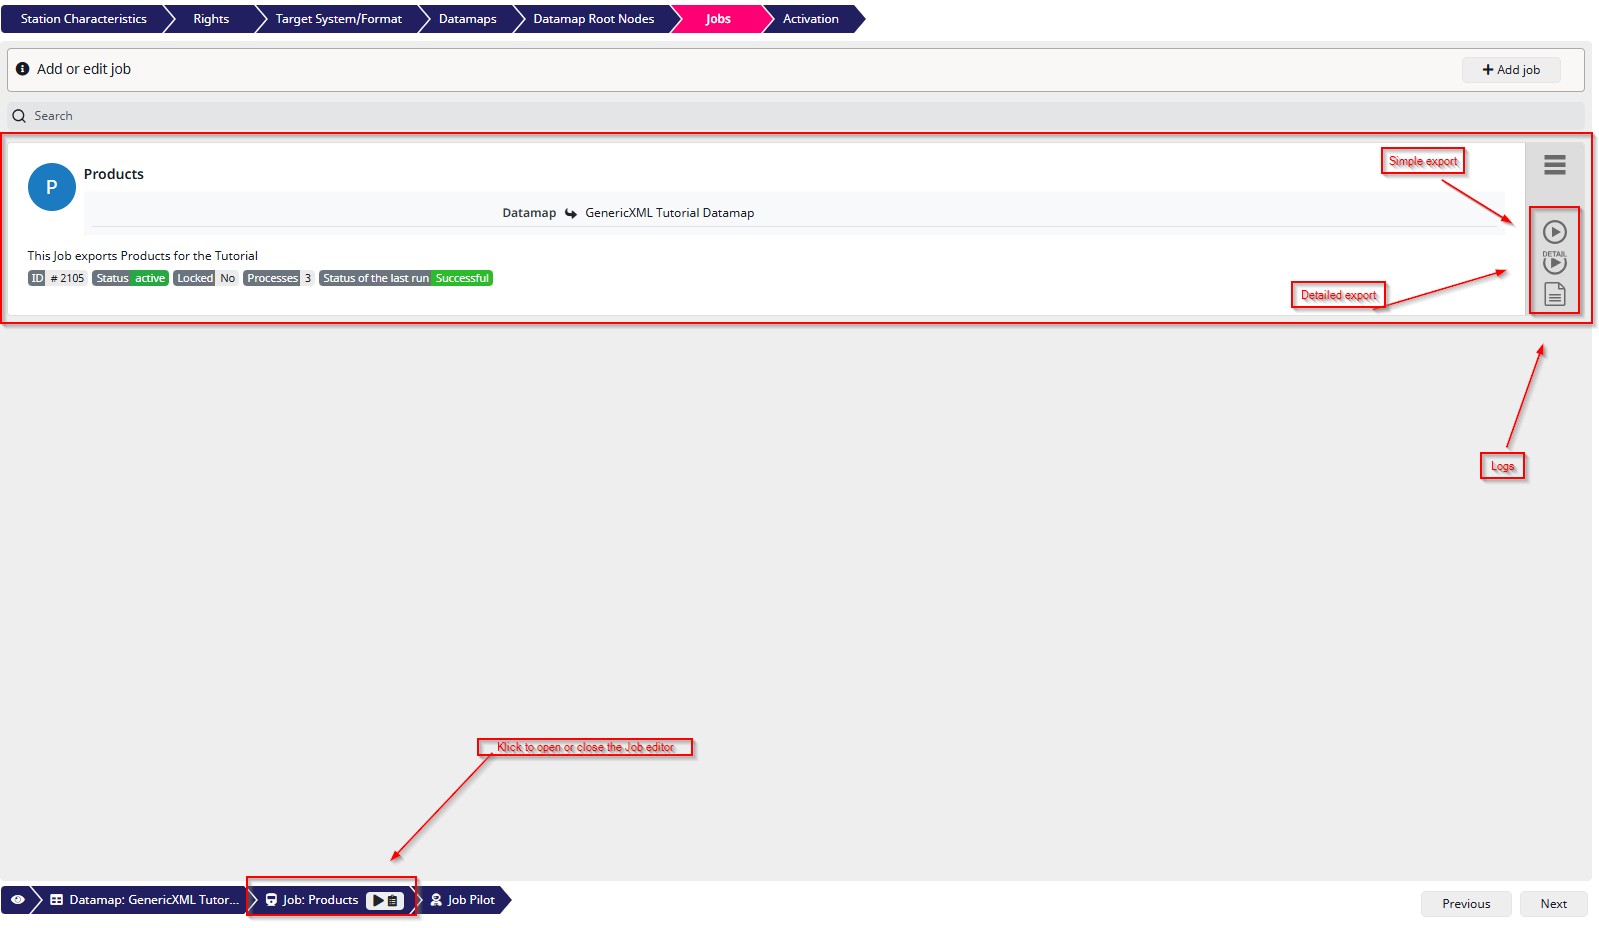
To export the job you just created, click on the selected job in the bottom bar to close the job editor. You will now see an overview of all jobs for the station. If you followed only this tutorial, there should be just one job listed the Products job.
In the screenshot, I have marked the buttons you can use to export the job. These include Simple Export, Detailed Export, and the Logs button. I recommend enabling the logs whenever you export something. The logs allow you to preview and download the generated XML file, as well as review the individual steps of the export process.
The difference between a simple export and a detailed export lies in the logs. A detailed export produces more log entries, which can be useful for troubleshooting or deeper analysis, but may not be necessary for every export.
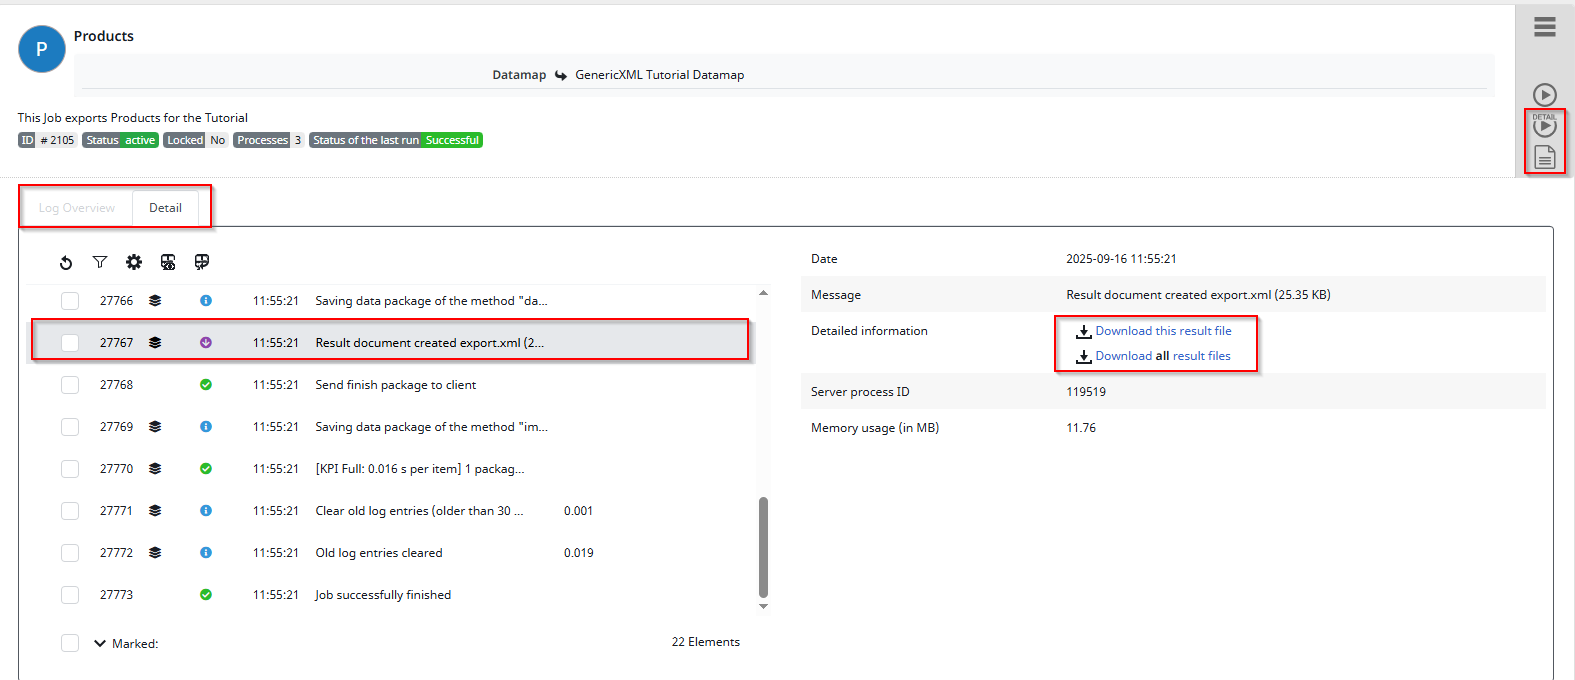
As you can see in this example I did a Detailed export and had a look at the Logs, where you can also find the File that’s been exported.
Job Pilot
A very important feature for exporting and fine-tuning your jobs is the Job Pilot. It allows you to run exports without permanently changing your job configuration.
This feature is especially useful if you need, for example, a one-time export with a filter you don’t normally use, or if you want to test and tweak your export settings until they’re perfect. Whenever you want to try something out without modifying the actual job, the Job Pilot is the right tool.
Additionally, the Job Pilot provides even more detailed logs, giving you deeper insights into what’s happening during the export.
To open the Job Pilot, simply click the “Job Pilot” button in the bottom left corner. If you have multiple jobs, you will need to select the one you want to run. In our case, since there is only one, the Products job will open automatically.

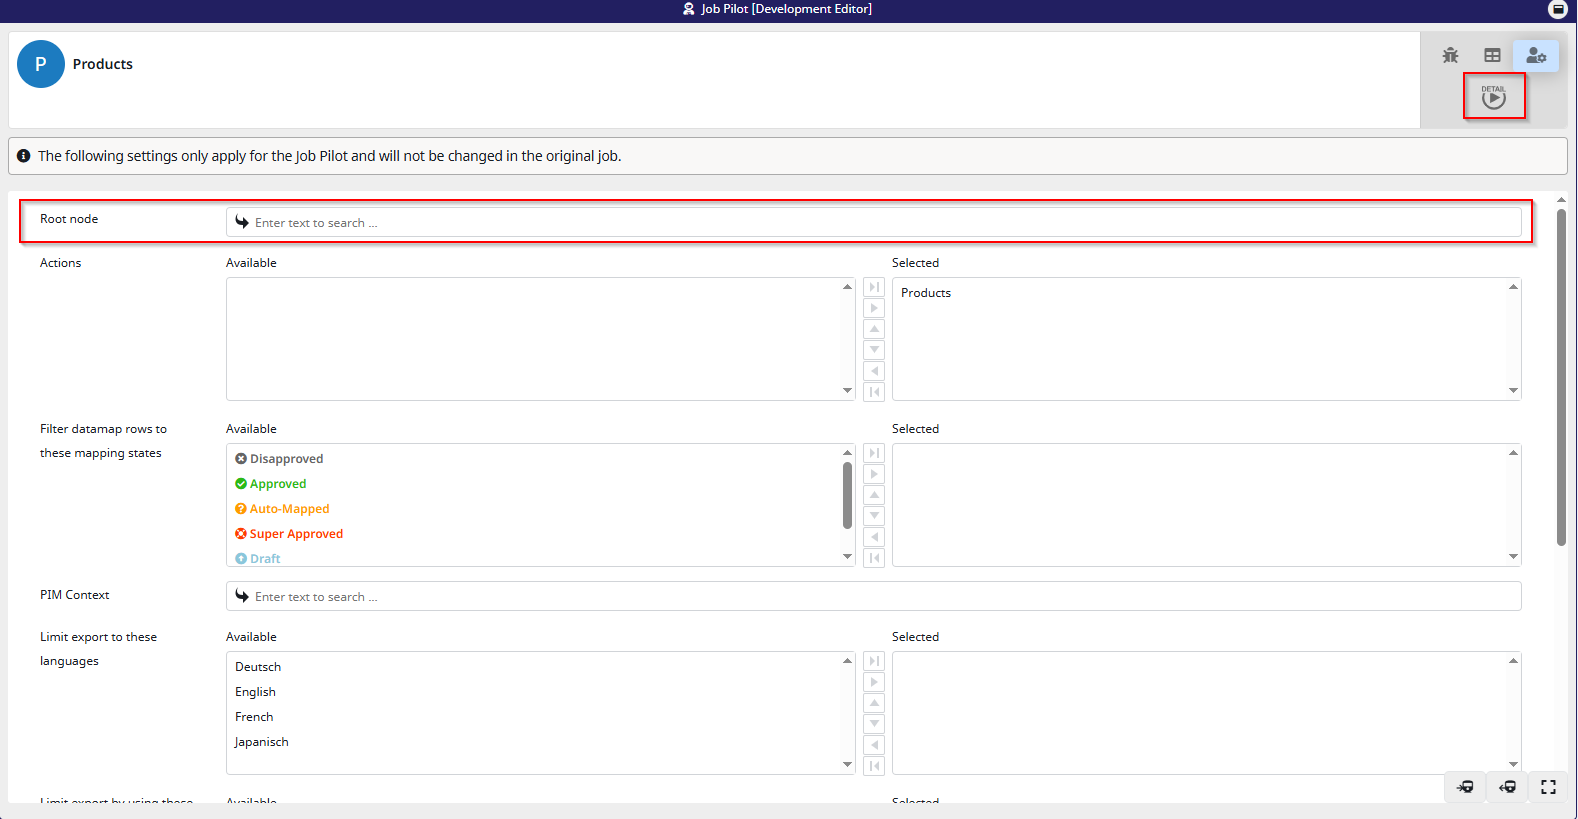
After pressing the “Job Pilot” button, the Pilot window will open. At first glance, it looks quite similar to the Data Source window from the job configuration and that’s exactly what it is, but in a non-permanent way.
Please note that by default no “Root node” is selected. This is intentional, as you might have a large root node set in your job configuration, but for testing purposes you may prefer selecting a smaller one to speed things up. The job pilot is optimized for about 10-20 exported objects.
Most of the filters are straightforward, so feel free to experiment with them. Once you’re ready to start a test export, simply click the Detailed Export button in the top right corner.
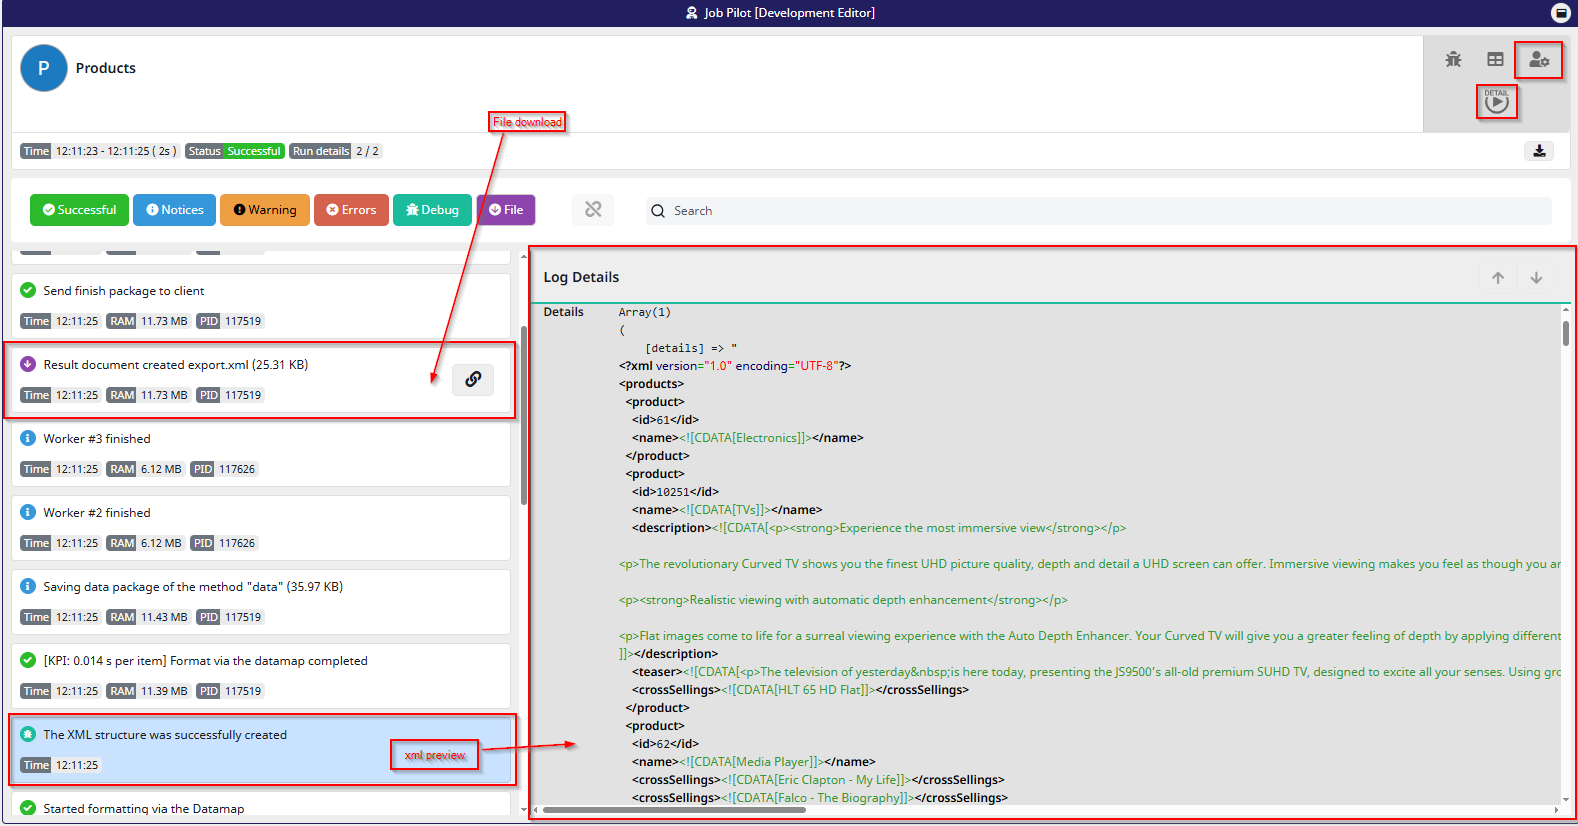
As you can see here, I ran a Job Pilot export with a few extra filters. In this view, you can not only see the XML file preview and download the file directly, but you can also filter the log messages by their status for example, show only warnings or errors. This makes it much easier to quickly identify potential issues or verify that everything ran smoothly.
If you want to return and edit the test run after exporting, simply click the marked symbol in the top right corner the icon with the person and the gear.
You’ve reached the end of this tutorial and successfully created your first basic export. This is an important milestone, and from here you can start exploring more advanced features to tailor the connector to your needs.
I encourage you to review the articles linked throughout this tutorial to gain a deeper understanding of the GenericXML Connector and its many configuration options.