-
General
-
Releases
-
Base Connector
-
- Beginner's Guide
- Overview
- Stations
- Datamaps
- Importing templates
- Setting conditions
- Job filter function
- How to create backups
- Running and Monitoring Jobs
- Export Job Automation
- Import/Export & copy of data map rows
- Synchronizing references that are not contained in views
- Get the preconfigured "Source data set - Template"
- Configuring categories and products
- Fill Bundle and Variant tables from children
- Channel/View Tree Maintenance Active Job
- Configuring the price & stock modules
- Configuring the price/stock value ranges
- Configuring volume discounts/scale prices
- How to export prices
- How to export stock values from certain storage units
- Use of Contentserv Credentials
- Connector & Station User Limitation
- Formats
- SC::Dynamic Image Crop Preset
- Placeholders
- Show all articles ( 11 ) Collapse Articles
-
- Working with placeholder in conditions
- Improve usability of SC::Tables
- Placeholder for SC::Price, SC::Channel, SC::Stock
- REST Service API for SAWS Tables (Prices, Stock, Channels & Complex Articles)
- Dataflow import of SC::Tables
- Dataflow export of SC::Tables
- The datamap summary - Creating an automated documentation
- Export images as a ZIP file
- Image export with direct access to the CONTENTSERV platform
- Image export with no access to the CONTENTSERV platform
- Image export from a third party system
- How to configure CS Dashboard
- Setup a transformation list for CSTypes
- FAQ
- Export Smart Document via Active Script and assign output to product
- Format Macros
- Controlling Connector Jobs via the REST API
- Sales Channel Maintenance via Excel Cross-Reference
- Sales Channel Inheritance Active Job
- Job Parameters & Context Parameters
- Logbook
- Show all articles ( 6 ) Collapse Articles
-
-
- Send value of a PIM reference
- Loop values for CS PIM references
- Send value of a MAM reference
- Loop values for CS MAM references
- Send value of a Channel (view) reference
- Loop values for CS Channel (Views) references
- Send value of an attribute reference
- Send value of a user reference
- Loop values for user references
- Send value of a reference (deprecated)
-
- Loop values for several attributes simultaneously
- Loop values for child elements
- Loop values for CS PIM references
- Loop values for CS Channel (Views) references
- Loop values for CS MAM references
- Loop values for user references
- Loop values for SC::Prices
- Loop values for SC::Stocktable entries
- Loop values for SC::Complex products
- Loop values for CS type reference
- Loop values for a CS table
- Loop value for simple data record
- Loop values for JSON Objects
-
- Create a JSON-String (create an array)
- Format value lists
- Tree paths or values from tree elements
- Multistep formatting
- Send accesslevel of the object
- Send value of a job parameter
- Search for values in several attributes
- Format with PHP Code (deprecated)
- Format Macros
- Load data via REST Service
- AI Value Transformation Format
- AI Value Translation Format
- Store value into a Contentserv Item
- Execute a conditional format (switch-case) Format Plugin
- Load array value from the Contentserv getValues Format Plugin
- Process HTML table Format Plugin
- Show all articles ( 1 ) Collapse Articles
-
Owl Cloud Services
-
Owl Data Hub
-
Ursula AI
- Ursula AI
- Supported AIs
- AI Value Transformation Format
- AI Value Translation Format
- Generate Descriptions with Ursula AI Active Job
- Populate Attributes via Ursula AI Active Job
- AI Product Tree Organizer Active Job
- Mapping Sales Channels via the Ursula AI Active Job
- Store value into a Contentserv Item
-
GenericJSON / DynamicJSON Connector
-
-
- Send value of a PIM reference
- Loop values for CS PIM references
- Send value of a Channel (view) reference
- Loop values for CS Channel (Views) references
- Send value of a MAM reference
- Loop values for CS MAM references
- Send value of an attribute reference
- Send value of a user reference
- Loop values for user references
- Send value of a reference (deprecated)
-
- Loop values for several attributes simultaneously
- Loop values for child elements
- Loop values for CS PIM references
- Loop values for CS Channel (Views) references
- Loop values for CS MAM references
- Loop values for user references
- Loop values for SC::Prices
- Loop values for SC::Stocktable entries
- Loop values for SC::Complex products
- Loop values for a CS table
- Loop values for CS type reference
- Loop value for simple data record
- Loop values for JSON Objects
-
- Create a JSON-String (create an array)
- Format value lists
- Tree paths or values from tree elements
- Multistep formatting
- Send accesslevel of the object
- Send value of a job parameter
- Search for values in several attributes
- Format with PHP Code (deprecated)
- Format Macros
- Load data via REST Service
- AI Value Transformation Format
- AI Value Translation Format
- Store value into a Contentserv Item
- Execute a conditional format (switch-case) Format Plugin
- Load array value from the Contentserv getValues Format Plugin
- Process HTML table Format Plugin
- Show all articles ( 1 ) Collapse Articles
-
GenericXML Connector
-
- Creating your first export
- Building XML Target Keys
- Creating a Salesforce export
- All Tutorials for creating XMLs
- SAWSConnector settings
- Station configuration
- Example station configuration
- Source data set configuration
- Example source data set mappings for the XML export
- Job configuration
- Simple XML Tags
- Images
- References
- SC::Prices
- SC::Stock
- SC::Channel
- Specials
- BMECat 1.2 Template
- Show all articles ( 3 ) Collapse Articles
-
-
- Send value of a PIM reference
- Loop values for CS PIM references
- Send value of a Channel (view) reference
- Loop values for CS Channel (Views) references
- Send value of a MAM reference
- Loop values for CS MAM references
- Send value of an attribute reference
- Send value of a user reference
- Loop values for user references
- Send value of a reference (deprecated)
-
- Loop values for several attributes simultaneously
- Loop values for child elements
- Loop values for CS PIM references
- Loop values for CS Channel (Views) references
- Loop values for CS MAM references
- Loop values for user references
- Loop values for SC::Prices
- Loop values for SC::Stocktable entries
- Loop values for SC::Complex products
- Loop values for a CS table
- Loop values for CS type reference
- Loop value for simple data record
- Loop values for JSON Objects
-
- Create a JSON-String (create an array)
- Format value lists
- Tree paths or values from tree elements
- Multistep formatting
- Send accesslevel of the object
- Send value of a job parameter
- Search for values in several attributes
- Format with PHP Code (deprecated)
- Format Macros
- Load data via REST Service
- AI Value Transformation Format
- AI Value Translation Format
- Store value into a Contentserv Item
- Execute a conditional format (switch-case) Format Plugin
- Load array value from the Contentserv getValues Format Plugin
- Process HTML table Format Plugin
- Show all articles ( 1 ) Collapse Articles
-
SimpleExcel Connector
-
-
- Send value of a PIM reference
- Loop values for CS PIM references
- Send value of a Channel (view) reference
- Loop values for CS Channel (Views) references
- Send value of a MAM reference
- Loop values for CS MAM references
- Send value of an attribute reference
- Send value of a user reference
- Loop values for user references
- Send value of a reference (deprecated)
-
- Loop values for several attributes simultaneously
- Loop values for child elements
- Loop values for CS PIM references
- Loop values for CS Channel (Views) references
- Loop values for CS MAM references
- Loop values for user references
- Loop values for SC::Prices
- Loop values for SC::Stocktable entries
- Loop values for SC::Complex products
- Loop values for a CS table
- Loop values for CS type reference
- Loop value for simple data record
- Loop values for JSON Objects
-
- Create a JSON-String (create an array)
- Format value lists
- Tree paths or values from tree elements
- Multistep formatting
- Send accesslevel of the object
- Send value of a job parameter
- Search for values in several attributes
- Format with PHP Code (deprecated)
- Format Macros
- Load data via REST Service
- AI Value Transformation Format
- AI Value Translation Format
- Store value into a Contentserv Item
- Execute a conditional format (switch-case) Format Plugin
- Load array value from the Contentserv getValues Format Plugin
- Process HTML table Format Plugin
- Show all articles ( 1 ) Collapse Articles
-
Magento Connector
-
-
- Send value of a PIM reference
- Loop values for CS PIM references
- Send value of a Channel (view) reference
- Loop values for CS Channel (Views) references
- Send value of a MAM reference
- Loop values for CS MAM references
- Send value of an attribute reference
- Send value of a user reference
- Loop values for user references
- Send value of a reference (deprecated)
-
- Loop values for several attributes simultaneously
- Loop values for child elements
- Loop values for CS PIM references
- Loop values for CS Channel (Views) references
- Loop values for CS MAM references
- Loop values for user references
- Loop values for SC::Prices
- Loop values for SC::Stocktable entries
- Loop values for SC::Complex products
- Loop values for a CS table
- Loop values for CS type reference
- Loop value for simple data record
- Loop values for JSON Objects
-
- Create a JSON-String (create an array)
- Format value lists
- Tree paths or values from tree elements
- Multistep formatting
- Send accesslevel of the object
- Send value of a job parameter
- Search for values in several attributes
- Format with PHP Code (deprecated)
- Format Macros
- Load data via REST Service
- AI Value Transformation Format
- AI Value Translation Format
- Store value into a Contentserv Item
- Execute a conditional format (switch-case) Format Plugin
- Load array value from the Contentserv getValues Format Plugin
- Process HTML table Format Plugin
- Show all articles ( 1 ) Collapse Articles
-
Shopware 5 Connector
-
- Configuration Shopware
- Configuration PIM
- Shopware attribute setting
- Configuration SAWSConnector
- Station configuration
- Source data set configuration
- Configuring categories and products
- Price table configuration for Shopware
- Result in Shopware
- Subshops and the SAWSConnector Shopware
- ean
- Custom Fields (attribute)
- highlight
- purchaseSteps
- stockMin
- supplierNumber
- notification
- shippingFree
- length
- height
- width
- weight
- shippingTime
- metaKeywords
- Show all articles ( 9 ) Collapse Articles
-
-
- Send value of a PIM reference
- Loop values for CS PIM references
- Send value of a Channel (view) reference
- Loop values for CS Channel (Views) references
- Send value of a MAM reference
- Loop values for CS MAM references
- Send value of an attribute reference
- Send value of a user reference
- Loop values for user references
- Send value of a reference (deprecated)
-
- Loop values for several attributes simultaneously
- Loop values for child elements
- Loop values for CS PIM references
- Loop values for CS Channel (Views) references
- Loop values for CS MAM references
- Loop values for user references
- Loop values for SC::Prices
- Loop values for SC::Stocktable entries
- Loop values for SC::Complex products
- Loop values for a CS table
- Loop values for CS type reference
- Loop value for simple data record
- Loop values for JSON Objects
-
- Create a JSON-String (create an array)
- Format value lists
- Tree paths or values from tree elements
- Multistep formatting
- Send accesslevel of the object
- Send value of a job parameter
- Search for values in several attributes
- Format with PHP Code (deprecated)
- Format Macros
- Load data via REST Service
- AI Value Transformation Format
- AI Value Translation Format
- Store value into a Contentserv Item
- Execute a conditional format (switch-case) Format Plugin
- Load array value from the Contentserv getValues Format Plugin
- Process HTML table Format Plugin
- Show all articles ( 1 ) Collapse Articles
-
Shopware 6 Connector
-
- Tutorial Video
- First steps
- Import Shopware settings
- Export categories
- Export media files
- Export simple products
- Export multiple languages
- Export variant products
- Export product properties
- Export custom fields
- Export product cross-selling relationships
- Export prices
- Export stocks
- Export into any other Shopware field
- How to address multiple Shopware 6 websites
- How to address different Shopware 6 Sale-Channels from one Contentserv System
- Useful Links
- Sales Channel Maintenance via Excel Cross-Reference
- Show all articles ( 3 ) Collapse Articles
-
-
- Send value of a PIM reference
- Loop values for CS PIM references
- Send value of a MAM reference
- Loop values for CS MAM references
- Send value of a Channel (view) reference
- Loop values for CS Channel (Views) references
- Send value of an attribute reference
- Send value of a user reference
- Loop values for user references
- Send value of a reference (deprecated)
-
- Loop values for several attributes simultaneously
- Loop values for child elements
- Loop values for CS PIM references
- Loop values for CS Channel (Views) references
- Loop values for CS MAM references
- Loop values for user references
- Loop values for SC::Prices
- Loop values for SC::Stocktable entries
- Loop values for SC::Complex products
- Loop values for a CS table
- Loop values for CS type reference
- Loop value for simple data record
- Loop values for JSON Objects
-
- Create a JSON-String (create an array)
- Format value lists
- Tree paths or values from tree elements
- Multistep formatting
- Send accesslevel of the object
- Send value of a job parameter
- Search for values in several attributes
- Format with PHP Code (deprecated)
- Format Macros
- Load data via REST Service
- AI Value Transformation Format
- AI Value Translation Format
- Store value into a Contentserv Item
- Execute a conditional format (switch-case) Format Plugin
- Load array value from the Contentserv getValues Format Plugin
- Process HTML table Format Plugin
- Show all articles ( 1 ) Collapse Articles
-
OXID Connector
-
-
- Send value of a PIM reference
- Loop values for CS PIM references
- Send value of a MAM reference
- Loop values for CS MAM references
- Send value of a Channel (view) reference
- Loop values for CS Channel (Views) references
- Send value of an attribute reference
- Send value of a user reference
- Loop values for user references
- Send value of a reference (deprecated)
-
- Loop values for several attributes simultaneously
- Loop values for child elements
- Loop values for CS PIM references
- Loop values for CS Channel (Views) references
- Loop values for CS MAM references
- Loop values for user references
- Loop values for SC::Prices
- Loop values for SC::Stocktable entries
- Loop values for SC::Complex products
- Loop values for a CS table
- Loop values for CS type reference
- Loop value for simple data record
- Loop values for JSON Objects
-
- Create a JSON-String (create an array)
- Format value lists
- Tree paths or values from tree elements
- Multistep formatting
- Send accesslevel of the object
- Send value of a job parameter
- Search for values in several attributes
- Format with PHP Code (deprecated)
- Format Macros
- Load data via REST Service
- AI Value Transformation Format
- AI Value Translation Format
- Store value into a Contentserv Item
- Execute a conditional format (switch-case) Format Plugin
- Load array value from the Contentserv getValues Format Plugin
- Process HTML table Format Plugin
- Show all articles ( 1 ) Collapse Articles
-
Typo3 Connector
-
-
- Send value of a PIM reference
- Loop values for CS PIM references
- Send value of a Channel (view) reference
- Loop values for CS Channel (Views) references
- Send value of a MAM reference
- Loop values for CS MAM references
- Send value of an attribute reference
- Send value of a user reference
- Loop values for user references
- Send value of a reference (deprecated)
-
- Loop values for several attributes simultaneously
- Loop values for child elements
- Loop values for CS PIM references
- Loop values for CS Channel (Views) references
- Loop values for CS MAM references
- Loop values for user references
- Loop values for SC::Prices
- Loop values for SC::Stocktable entries
- Loop values for SC::Complex products
- Loop values for a CS table
- Loop values for CS type reference
- Loop value for simple data record
- Loop values for JSON Objects
-
- Create a JSON-String (create an array)
- Format value lists
- Tree paths or values from tree elements
- Multistep formatting
- Send accesslevel of the object
- Send value of a job parameter
- Search for values in several attributes
- Format with PHP Code (deprecated)
- Format Macros
- Load data via REST Service
- AI Value Transformation Format
- AI Value Translation Format
- Store value into a Contentserv Item
- Execute a conditional format (switch-case) Format Plugin
- Load array value from the Contentserv getValues Format Plugin
- Process HTML table Format Plugin
- Show all articles ( 1 ) Collapse Articles
-
Other Connectors
Mapping Sales Channels via the Ursula AI Active Job
(Since version 1.19)
The SAWSConnector Sales Channels are useful to manage product availability and validity periods in one compact overview. Many connectors such as the Shopware 6 Connector also use Sales Channels to assign products to their respective shop categories.
For example: This TV shall be placed in the category Smart LED TV in my German shop via a Sales Channel.
Product in the Product Tree:

Target Category in the Channel Tree:
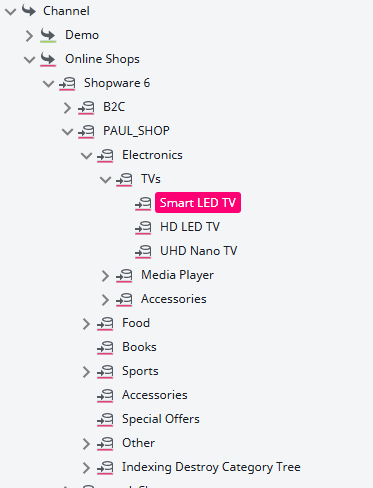
To do so, we would need to add a sales channel in the product maintenance.
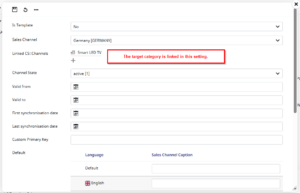
While there are many import methods for populating the sales channels, this can still take a longer amount of time.
So a new Active Job called SAWS – Mapping of Sales Channels via the Ursula AI was added to the SAWSConnector Suite allowing you to automate these category assignments via the Ursula AI.
The following article shows you how to configure this Active Job while explaining the options.
First Create An Active Job
You create an Active Job in the following steps:
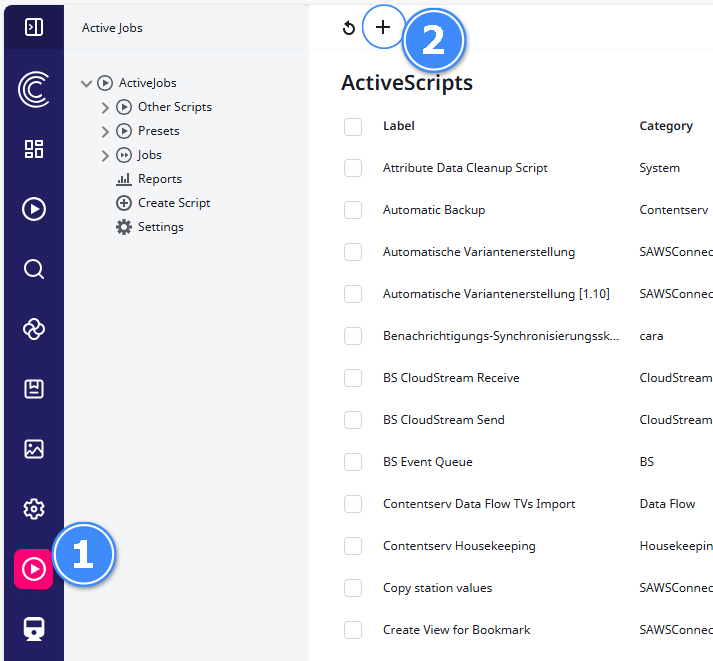
1) Select the Active Jobs in the menu on the left.
2) Click on ‘Create New’ in the top menu.
3) Click on Script and select ‘SAWS – Mapping Sales Channels via the Ursula AI’ from the drop-down menu.
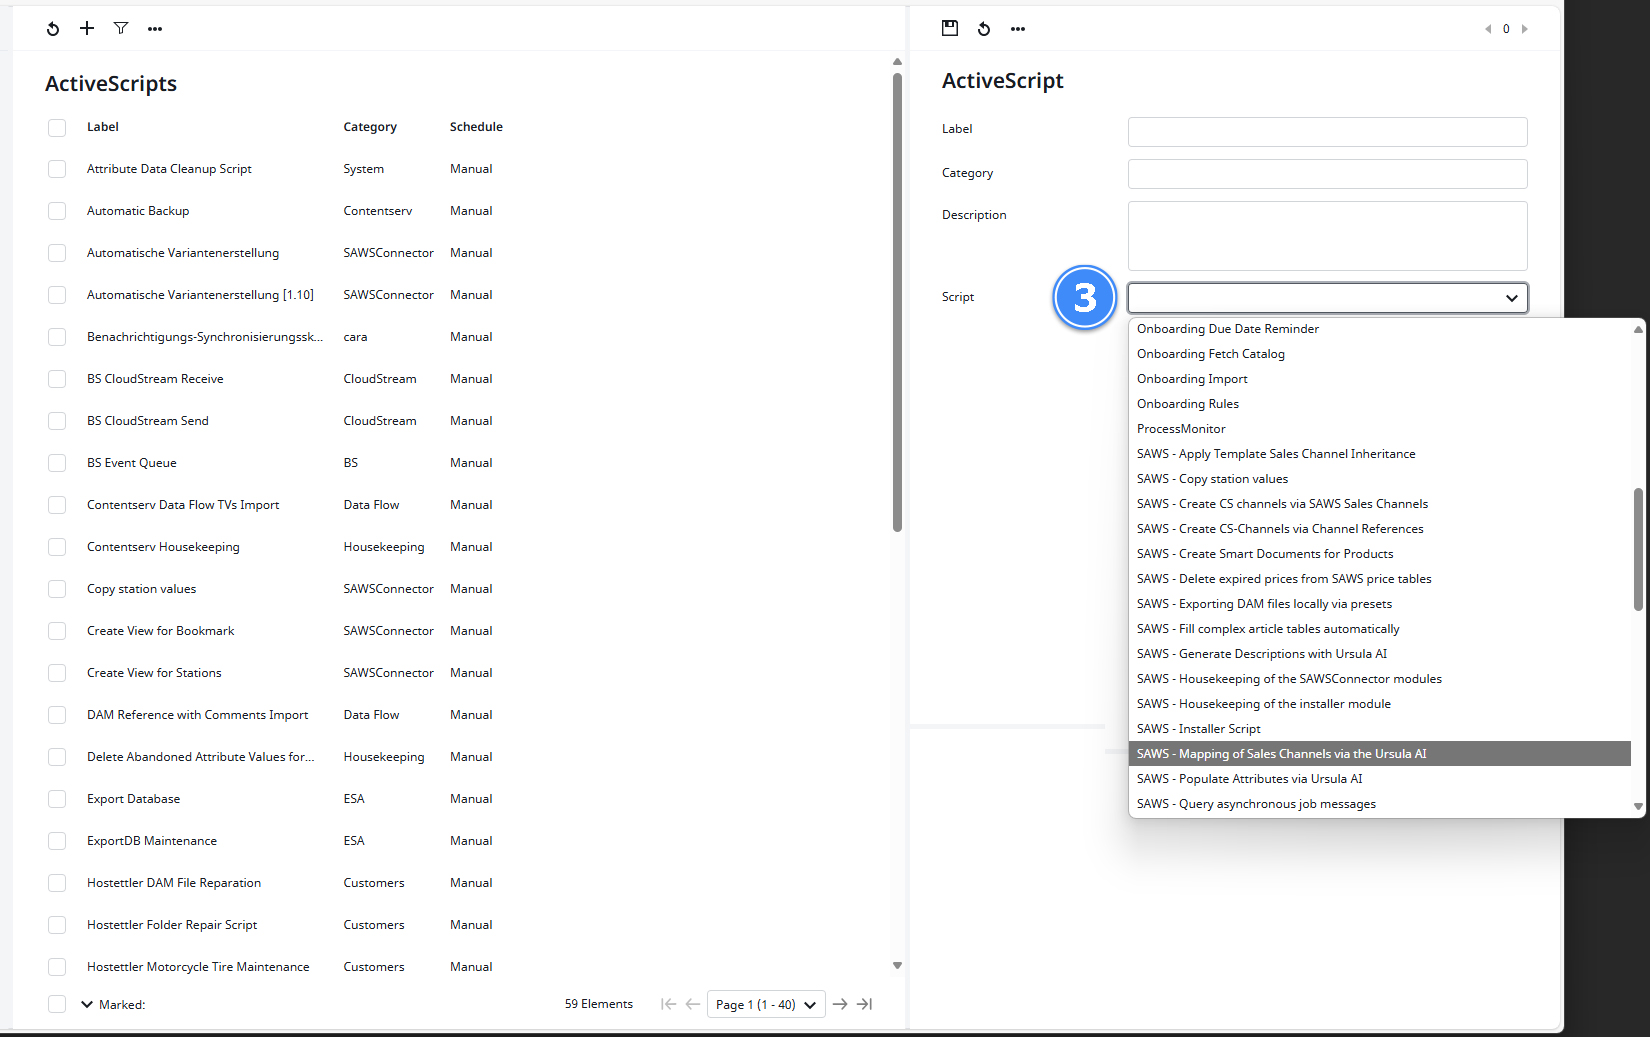
4) Then fill in the other boxes as required.
5) Save the Active Job using the Save button or the key combination ALT + S.
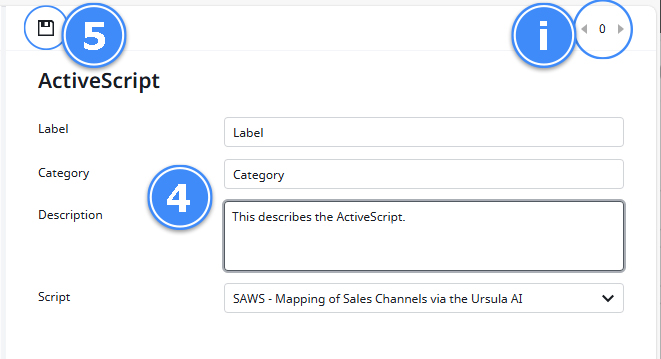
i) You can’t specify the ID for your Active Job! It will be assigned automatically and consecutively.
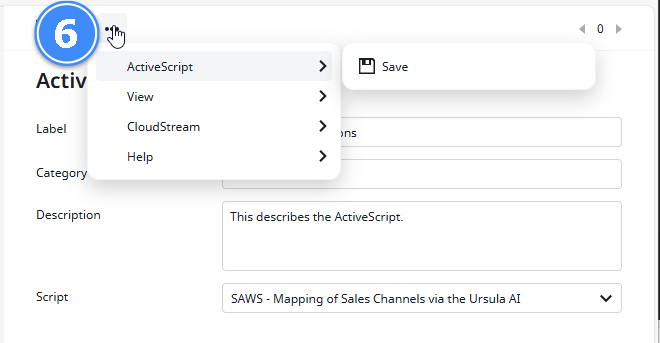
6) Under ‘Show more options …’ you will find further useful functions, such as a timeline, CloudStream tools or help pages.
Settings
After saving, you will have access to additional tabs and input boxes to precisely define your Active Job. These include:
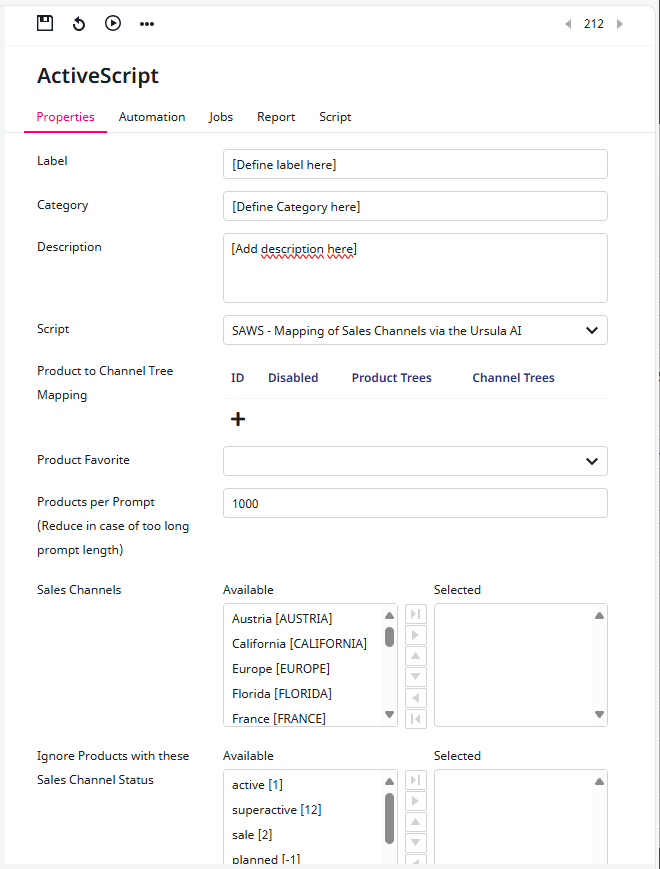
Label
Defines the name of your Active Job.
Category
Defines the associated category. This is sorted in the ‘Presets’ sub-menu.
Description
The description of the script can only be read by you and the users authorized by you.
Product to Channel Tree Mapping
Set the product trees and the channel trees here which shall be used for the category assignment. This is especially useful if you already know that a certain product sub-tree shall always be assigned to a certain category sub-tree (channel tree). For example: If Electronics products shall always be assigned to categories below the tree Tech.
Product Favorite
Set the product favorite here to filter for products which shall receive the sales channel.
Products per Prompt (Reduce in case of too long prompt length)
Use this option to manage the number of products included in each prompt. If the prompt becomes too lengthy and causes errors, reducing the product package size can help ensure smooth processing by the AI.
Sales Channels
Select the sales channels here which shall be automatically assigned.
The buttons between Available and Selected allow to easily select and deselect single sales channels or even a multitude of them. The same can be achieved by double-clicking on a channel.

Ignore Products with these Sales Channel Statuses
Use this option to specify which sales channel statuses the AI should ignore. This is important if you manually change a channel’s status and want to prevent the AI from altering it again (Delta). There are two recommended methods for managing sales channel statuses:
- Intermediate State Method: Let the AI set the status to an intermediate state, such as Planned. You can then manually change the status to Active or Disabled. This approach ensures that only correct category mappings are pushed to production.
- Direct State Method: Allow the AI to set the status directly to Active. This method requires more trust in the automation, as category assignments will be immediately pushed to production.
Example:
Initial Setup: Your job maintains the sales channels in the Planned status.
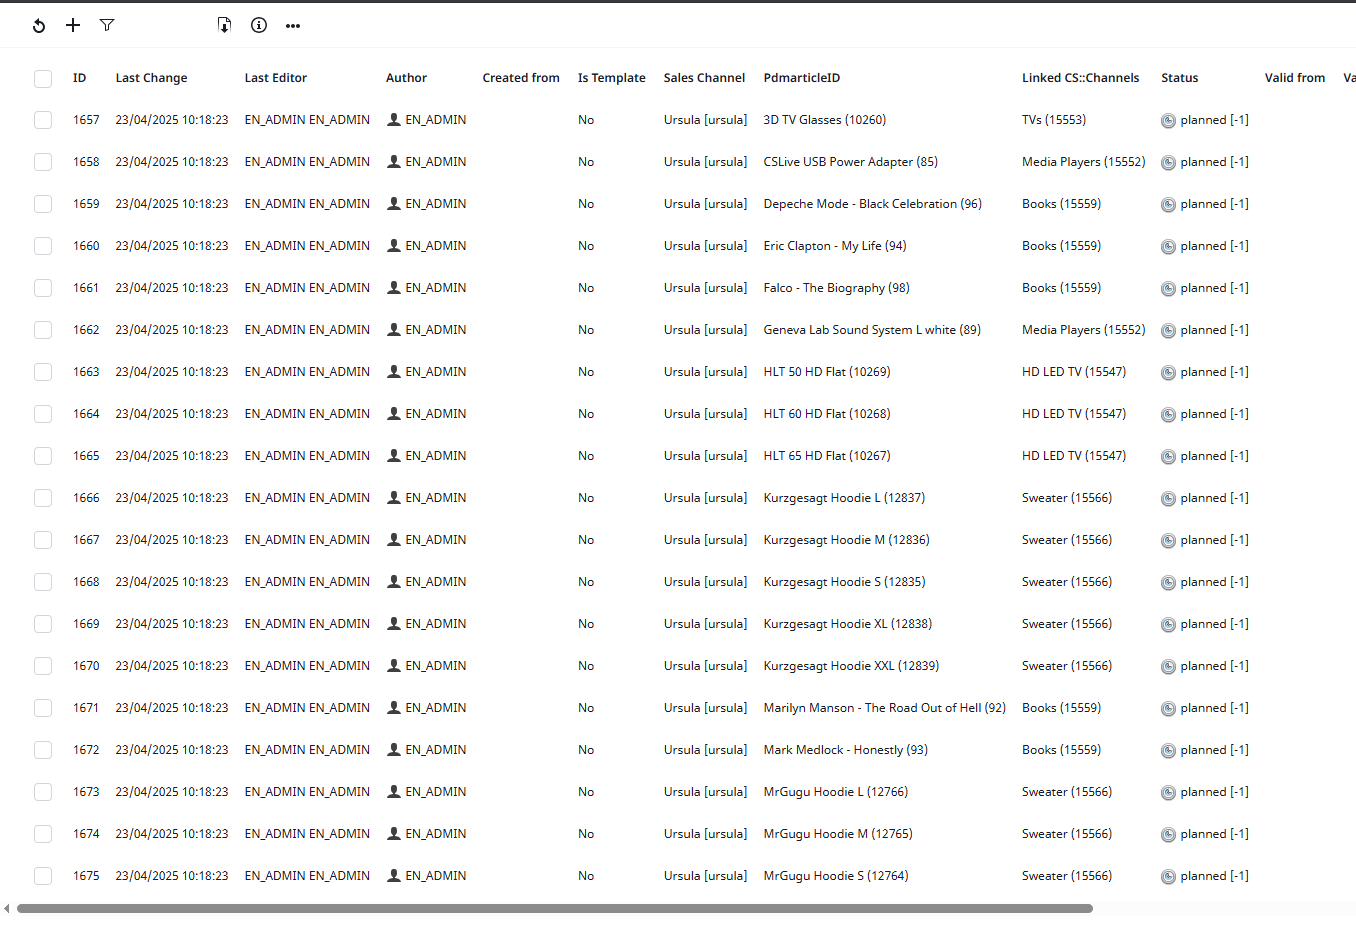
Manual Approval: Once you are satisfied with the assignments, use the Change Status mass edit option to change all channels to Active.
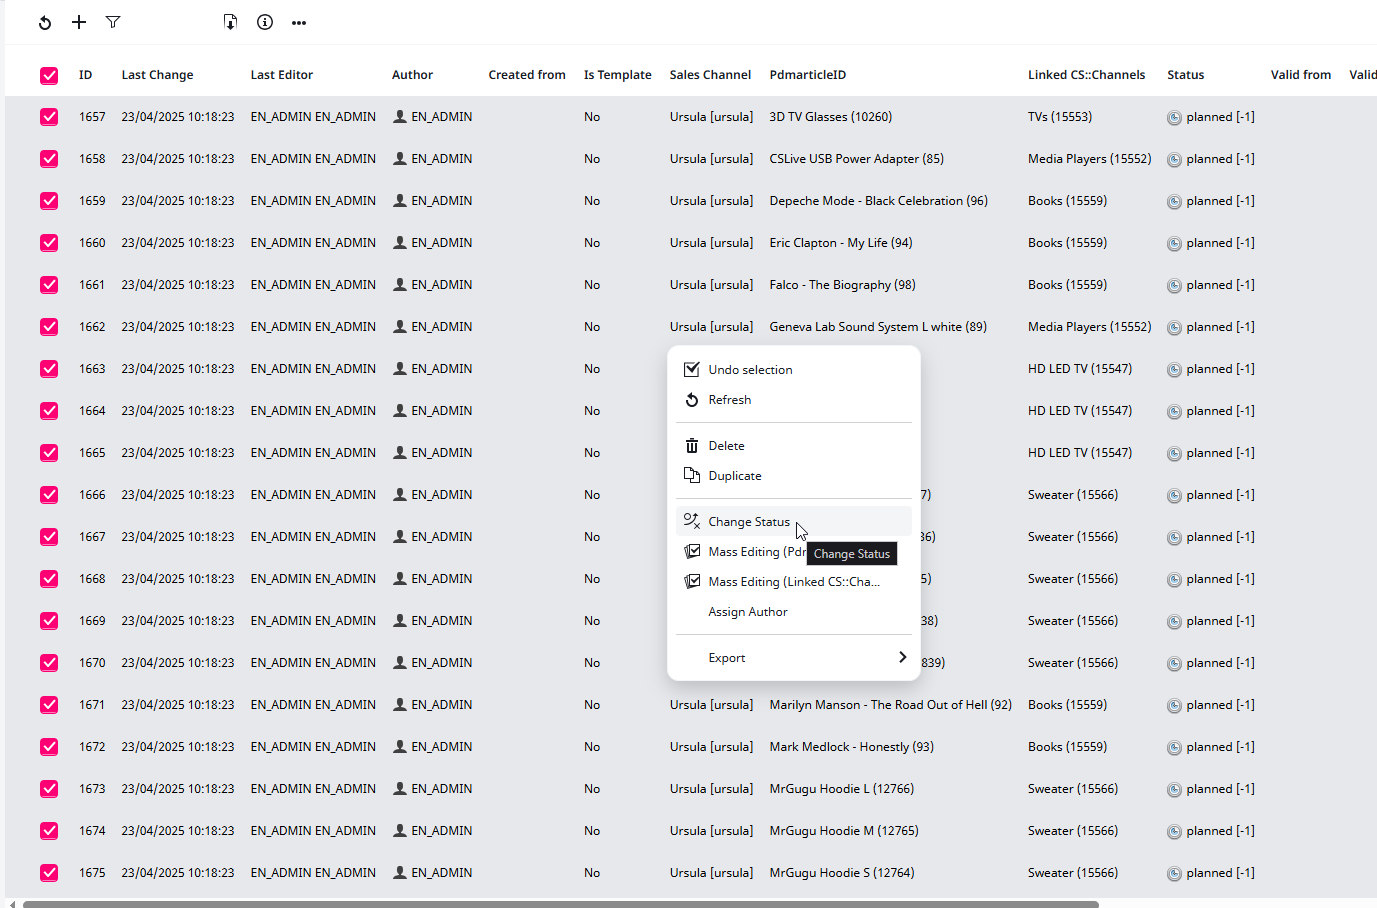
Note: It is crucial to set this option and the State for the Mapped Sales Channels correctly. This configuration controls the changes made to category assignments. Once the sales channels are in the ignored statuses, the AI will not overwrite them again.
State for the Mapped Sales Channels
Set the desired status for the sales channels that the AI will maintain. This ensures that the AI-managed channels have the correct status.
Additional Attributes for AI Context
(Since version 1.20)
Select additional attributes here to provide more context for the AI to improve the category assignments. By default, the AI only has the product label to work with, which can be insufficient for a proper category assignment. So providing the short product teaser or description attributes here could improve the results.
Only allow Assignments of the lowest Channels in the Tree
Check this box to ensure that products are only assigned to the lowest level categories (leaf categories) in the hierarchy. This setting prevents the AI from placing products in intermediate or higher-level categories, ensuring more precise and targeted product assignments.
Exceptions for the Mapping (Overwrites/Extends AI Mapping)
Use this setting to extend or override the AI’s default category assignments for specific product trees. For example, you can ensure that all book products (those within the book product tree) are placed in the Books category, regardless of the AI’s initial mapping.

Starting the Active Job

7) After you have filled out all boxes and selected your options you can start (i.e. run) the Active Job by clicking on the ‘Run ActiveScript’ button in the menu on the upper right.
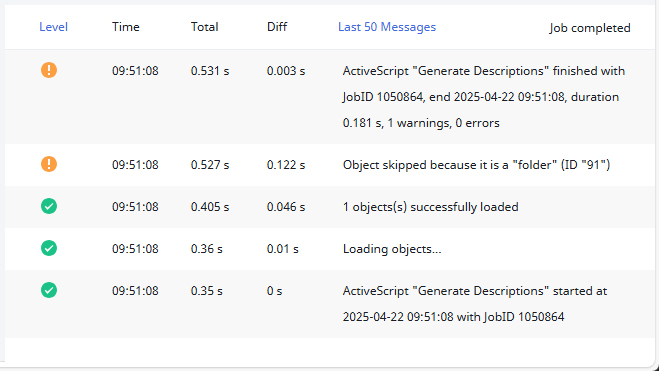
Afterwards a logs window in the lower right of the UI will show you what tasks the Ursula AI has completed, if there were possible complications, and errors:
Run Example
To fully understand how you can manage sales channels and sales channel links with the Ursula AI it is best demonstrated with a step-by-step case example.
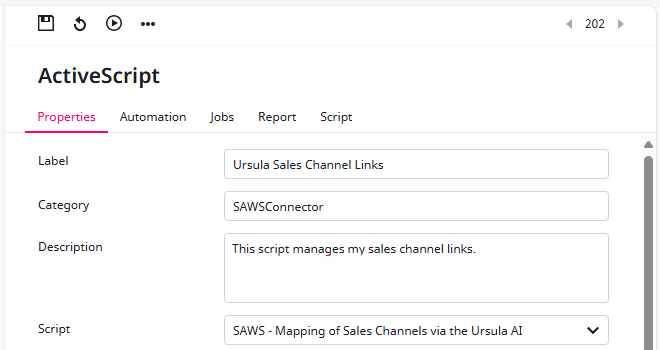
1) I create an Active Job, select the ‘SAWS – Mapping of Sales Channels via the Ursula AI‘ and fill out the input boxes.
The description is—of course—not necessary but could help me later remembering the specific purpose of this Active Job.
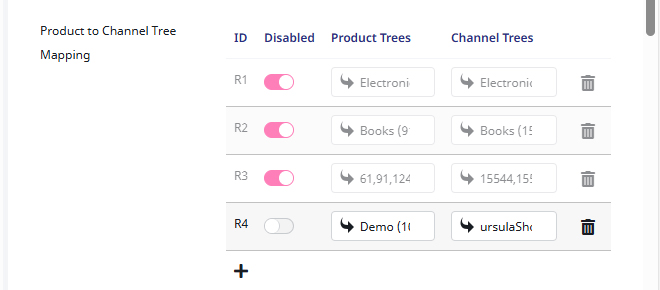
2) To add a product to my Channel Tree Mapping I simply click on the + symbol.

3) A subsequent menu opens where I can select and specify product and channel trees.

4) I fill those boxes and create the channels.
5) As Product Favorite I select ‘SAWS / Product with Product Number‘ so these get sorted into my sales channels.
6) For Products per Prompt I deem 1,000 to be enough. You can—of course—add as much zeros as you like behind the first number but please be careful not to overload the AI.

7) The sales channels are where the magic happens. I can assign countries, statuses, websites, even connectors to fit my individual needs. In this case I just choose ‘Ursula [ursula]‘.

8) The Ignore Products with these Sales Channel Status is a very useful tool for data management. It tells the AI what to ignore to ensure incremental uploads (delta).
For example purposes I went with ‘disabled [0]‘ and ‘active [1]‘.

9) Since I wish the AI maintained channels to be changed into a planned state for later review, I select it the associated option in State for the Mapped Sales Channels.

10) For the next step, I want to specify the attributes the Ursula AI uses for it’s creation process.

By clicking on ‘Add Object‘ (the curved arrow) another context menu opens:
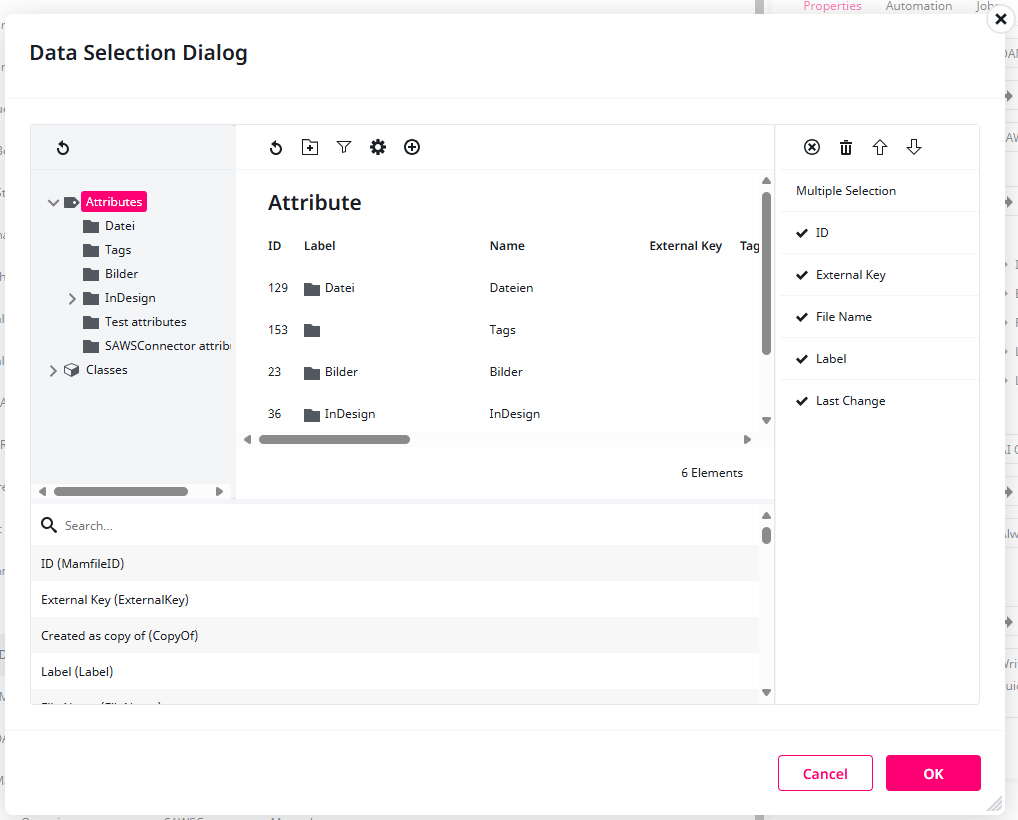
11) In the subsequent trees and folders I selected the attributes ID, External Key, File Name and Last Change for overview purposes. By double-clicking on them they’re shown in the selection list on the right.

In theory, it is possible to choose an almost infinite number of attributes. However, more then 50 entries or attributes with excessive amount of information can lengthen and complicate your prompt too much for the Ursula AI to generate a useful text.
12) I activate Only allow Assignments of the lowest Channels in the Tree so the products are assigned to the leaf categories.

13) The Exceptions for the Mapping (Overwrites/Extends AI Mapping) works very much the same as ‘Product to Channel Tree Mapping‘: I can add points via the + symbol and select my options (which is ‘Books‘ in my case). Via the ‘Behavior‘ box I can control the override process, i.e. if the Ursula AI shall replace, add or ignore the specified channel or attribute.

14) For the final step, I save my progress and run the Active Job. Let Ursula AI do its work.![]()
Warning & Disclaimer
AI-generated texts and content may be inaccurate, incorrect or misleading.
It is therefore recommended that you read, review, and edit them yourself after creation.
