-
General
-
Releases
-
Base Connector
-
- Beginner's Guide
- Overview
- Stations
- Datamaps
- Importing templates
- Setting conditions
- Job filter function
- How to create backups
- Running and Monitoring Jobs
- Export Job Automation
- Import/Export & copy of data map rows
- Synchronizing references that are not contained in views
- Get the preconfigured "Source data set - Template"
- Configuring categories and products
- Channel/View Tree Maintenance Active Job
- Configuring the price & stock modules
- Configuring the price/stock value ranges
- Configuring volume discounts/scale prices
- How to export prices
- How to export stock values from certain storage units
- Use of Contentserv Credentials
- Connector & Station User Limitation
- Formats
- SC::Dynamic Image Crop Preset
- Placeholders
- Show all articles ( 10 ) Collapse Articles
-
- Price Table
- Stock Table
- Sales Channel Table
- Complex Article Table
- Importing data into SAWS tables (price, stock, etc.)
- SAWSConnector Usages
- Variant Articles
- Assignment of articles to complex articles
- Searching for SC::Prices / SC::Stocks
- Searching for SC::Channels
- Setup a transformation list for CSTypes
- Context-Sensitive Product Value Export
-
- Working with placeholder in conditions
- Improve usability of SC::Tables
- Placeholder for SC::Price, SC::Channel, SC::Stock
- REST Service API for SAWS Tables (Prices, Stock, Channels & Complex Articles)
- Dataflow import of SC::Tables
- Dataflow export of SC::Tables
- The datamap summary - Creating an automated documentation
- Export images as a ZIP file
- Image export with direct access to the CONTENTSERV platform
- Image export with no access to the CONTENTSERV platform
- Image export from a third party system
- How to configure CS Dashboard
- Setup a transformation list for CSTypes
- FAQ
- Export Smart Document via Active Script and assign output to product
- Format Macros
- Controlling Connector Jobs via the REST API
- Sales Channel Maintenance via Excel Cross-Reference
- Sales Channel Inheritance Active Job
- Job Parameters & Context Parameters
- Logbook
- Fill complex article tables automatically
- Show all articles ( 7 ) Collapse Articles
-
-
- Send value of a PIM reference
- Loop values for CS PIM references
- Send value of a MAM reference
- Loop values for CS MAM references
- Send value of a Channel (view) reference
- Loop values for CS Channel (Views) references
- Send value of an attribute reference
- Send value of a user reference
- Loop values for user references
- Send value of a reference (deprecated)
-
- Loop values for several attributes simultaneously
- Loop values for child elements
- Loop values for CS PIM references
- Loop values for CS Channel (Views) references
- Loop values for CS MAM references
- Loop values for user references
- Loop values for SC::Prices
- Loop values for SC::Stocktable entries
- Loop values for SC::Complex products
- Loop values for CS type reference
- Loop values for a CS table
- Loop value for simple data record
- Loop values for JSON Objects
-
- Create a JSON-String (create an array)
- Format value lists
- Tree paths or values from tree elements
- Multistep formatting
- Send accesslevel of the object
- Send value of a job parameter
- Search for values in several attributes
- Format with PHP Code (deprecated)
- Format Macros
- Load data via REST Service
- AI Value Transformation Format
- AI Value Translation Format
- Store value into a Contentserv Item
- Execute a conditional format (switch-case) Format Plugin
- Load array value from the Contentserv getValues Format Plugin
- Process HTML table Format Plugin
- Show all articles ( 1 ) Collapse Articles
-
Owl Cloud Services
-
Owl Data Hub
-
Ursula AI
- Ursula AI
- Supported AIs
- AI Value Transformation Format
- AI Value Translation Format
- Generate Descriptions with Ursula AI Active Job
- Populate Attributes via Ursula AI Active Job
- AI Product Tree Organizer Active Job
- Mapping Sales Channels via the Ursula AI Active Job
- Store value into a Contentserv Item
-
GenericJSON / DynamicJSON Connector
-
-
- Send value of a PIM reference
- Loop values for CS PIM references
- Send value of a Channel (view) reference
- Loop values for CS Channel (Views) references
- Send value of a MAM reference
- Loop values for CS MAM references
- Send value of an attribute reference
- Send value of a user reference
- Loop values for user references
- Send value of a reference (deprecated)
-
- Loop values for several attributes simultaneously
- Loop values for child elements
- Loop values for CS PIM references
- Loop values for CS Channel (Views) references
- Loop values for CS MAM references
- Loop values for user references
- Loop values for SC::Prices
- Loop values for SC::Stocktable entries
- Loop values for SC::Complex products
- Loop values for a CS table
- Loop values for CS type reference
- Loop value for simple data record
- Loop values for JSON Objects
-
- Create a JSON-String (create an array)
- Format value lists
- Tree paths or values from tree elements
- Multistep formatting
- Send accesslevel of the object
- Send value of a job parameter
- Search for values in several attributes
- Format with PHP Code (deprecated)
- Format Macros
- Load data via REST Service
- AI Value Transformation Format
- AI Value Translation Format
- Store value into a Contentserv Item
- Execute a conditional format (switch-case) Format Plugin
- Load array value from the Contentserv getValues Format Plugin
- Process HTML table Format Plugin
- Show all articles ( 1 ) Collapse Articles
-
GenericXML Connector
-
- Creating your first export
- Building XML Target Keys
- Creating a Salesforce export
- GenericXML Tutorials
- SAWSConnector settings
- Station configuration
- Example station configuration
- Source data set configuration
- Example source data set mappings for the XML export
- Job configuration
- Simple XML Tags
- Images
- References
- SC::Prices
- SC::Stock
- SC::Channel
- Specials
- BMECat 1.2 Template
- Show all articles ( 3 ) Collapse Articles
-
-
- Send value of a PIM reference
- Loop values for CS PIM references
- Send value of a Channel (view) reference
- Loop values for CS Channel (Views) references
- Send value of a MAM reference
- Loop values for CS MAM references
- Send value of an attribute reference
- Send value of a user reference
- Loop values for user references
- Send value of a reference (deprecated)
-
- Loop values for several attributes simultaneously
- Loop values for child elements
- Loop values for CS PIM references
- Loop values for CS Channel (Views) references
- Loop values for CS MAM references
- Loop values for user references
- Loop values for SC::Prices
- Loop values for SC::Stocktable entries
- Loop values for SC::Complex products
- Loop values for a CS table
- Loop values for CS type reference
- Loop value for simple data record
- Loop values for JSON Objects
-
- Create a JSON-String (create an array)
- Format value lists
- Tree paths or values from tree elements
- Multistep formatting
- Send accesslevel of the object
- Send value of a job parameter
- Search for values in several attributes
- Format with PHP Code (deprecated)
- Format Macros
- Load data via REST Service
- AI Value Transformation Format
- AI Value Translation Format
- Store value into a Contentserv Item
- Execute a conditional format (switch-case) Format Plugin
- Load array value from the Contentserv getValues Format Plugin
- Process HTML table Format Plugin
- Show all articles ( 1 ) Collapse Articles
-
SimpleExcel Connector
-
-
- Send value of a PIM reference
- Loop values for CS PIM references
- Send value of a Channel (view) reference
- Loop values for CS Channel (Views) references
- Send value of a MAM reference
- Loop values for CS MAM references
- Send value of an attribute reference
- Send value of a user reference
- Loop values for user references
- Send value of a reference (deprecated)
-
- Loop values for several attributes simultaneously
- Loop values for child elements
- Loop values for CS PIM references
- Loop values for CS Channel (Views) references
- Loop values for CS MAM references
- Loop values for user references
- Loop values for SC::Prices
- Loop values for SC::Stocktable entries
- Loop values for SC::Complex products
- Loop values for a CS table
- Loop values for CS type reference
- Loop value for simple data record
- Loop values for JSON Objects
-
- Create a JSON-String (create an array)
- Format value lists
- Tree paths or values from tree elements
- Multistep formatting
- Send accesslevel of the object
- Send value of a job parameter
- Search for values in several attributes
- Format with PHP Code (deprecated)
- Format Macros
- Load data via REST Service
- AI Value Transformation Format
- AI Value Translation Format
- Store value into a Contentserv Item
- Execute a conditional format (switch-case) Format Plugin
- Load array value from the Contentserv getValues Format Plugin
- Process HTML table Format Plugin
- Show all articles ( 1 ) Collapse Articles
-
Magento Connector
-
-
- Send value of a PIM reference
- Loop values for CS PIM references
- Send value of a Channel (view) reference
- Loop values for CS Channel (Views) references
- Send value of a MAM reference
- Loop values for CS MAM references
- Send value of an attribute reference
- Send value of a user reference
- Loop values for user references
- Send value of a reference (deprecated)
-
- Loop values for several attributes simultaneously
- Loop values for child elements
- Loop values for CS PIM references
- Loop values for CS Channel (Views) references
- Loop values for CS MAM references
- Loop values for user references
- Loop values for SC::Prices
- Loop values for SC::Stocktable entries
- Loop values for SC::Complex products
- Loop values for a CS table
- Loop values for CS type reference
- Loop value for simple data record
- Loop values for JSON Objects
-
- Create a JSON-String (create an array)
- Format value lists
- Tree paths or values from tree elements
- Multistep formatting
- Send accesslevel of the object
- Send value of a job parameter
- Search for values in several attributes
- Format with PHP Code (deprecated)
- Format Macros
- Load data via REST Service
- AI Value Transformation Format
- AI Value Translation Format
- Store value into a Contentserv Item
- Execute a conditional format (switch-case) Format Plugin
- Load array value from the Contentserv getValues Format Plugin
- Process HTML table Format Plugin
- Show all articles ( 1 ) Collapse Articles
-
Shopware 5 Connector
-
- Configuration Shopware
- Configuration PIM
- Shopware attribute setting
- Configuration SAWSConnector
- Station configuration
- Source data set configuration
- Configuring categories and products
- Price table configuration for Shopware
- Result in Shopware
- Subshops and the SAWSConnector Shopware
- ean
- Custom Fields (attribute)
- highlight
- purchaseSteps
- stockMin
- supplierNumber
- notification
- shippingFree
- length
- height
- width
- weight
- shippingTime
- metaKeywords
- Show all articles ( 9 ) Collapse Articles
-
-
- Send value of a PIM reference
- Loop values for CS PIM references
- Send value of a Channel (view) reference
- Loop values for CS Channel (Views) references
- Send value of a MAM reference
- Loop values for CS MAM references
- Send value of an attribute reference
- Send value of a user reference
- Loop values for user references
- Send value of a reference (deprecated)
-
- Loop values for several attributes simultaneously
- Loop values for child elements
- Loop values for CS PIM references
- Loop values for CS Channel (Views) references
- Loop values for CS MAM references
- Loop values for user references
- Loop values for SC::Prices
- Loop values for SC::Stocktable entries
- Loop values for SC::Complex products
- Loop values for a CS table
- Loop values for CS type reference
- Loop value for simple data record
- Loop values for JSON Objects
-
- Create a JSON-String (create an array)
- Format value lists
- Tree paths or values from tree elements
- Multistep formatting
- Send accesslevel of the object
- Send value of a job parameter
- Search for values in several attributes
- Format with PHP Code (deprecated)
- Format Macros
- Load data via REST Service
- AI Value Transformation Format
- AI Value Translation Format
- Store value into a Contentserv Item
- Execute a conditional format (switch-case) Format Plugin
- Load array value from the Contentserv getValues Format Plugin
- Process HTML table Format Plugin
- Show all articles ( 1 ) Collapse Articles
-
Shopware 6 Connector
-
- Tutorial Video
- First steps
- Import Shopware settings
- Export categories
- Export media files
- Export simple products
- Export multiple languages
- Export variant products
- Export product properties
- Export custom fields
- Export product cross-selling relationships
- Export prices
- Export stocks
- Export into any other Shopware field
- How to address multiple Shopware 6 websites
- How to address different Shopware 6 Sale-Channels from one Contentserv System
- Useful Links
- Sales Channel Maintenance via Excel Cross-Reference
- Show all articles ( 3 ) Collapse Articles
-
-
- Send value of a PIM reference
- Loop values for CS PIM references
- Send value of a MAM reference
- Loop values for CS MAM references
- Send value of a Channel (view) reference
- Loop values for CS Channel (Views) references
- Send value of an attribute reference
- Send value of a user reference
- Loop values for user references
- Send value of a reference (deprecated)
-
- Loop values for several attributes simultaneously
- Loop values for child elements
- Loop values for CS PIM references
- Loop values for CS Channel (Views) references
- Loop values for CS MAM references
- Loop values for user references
- Loop values for SC::Prices
- Loop values for SC::Stocktable entries
- Loop values for SC::Complex products
- Loop values for a CS table
- Loop values for CS type reference
- Loop value for simple data record
- Loop values for JSON Objects
-
- Create a JSON-String (create an array)
- Format value lists
- Tree paths or values from tree elements
- Multistep formatting
- Send accesslevel of the object
- Send value of a job parameter
- Search for values in several attributes
- Format with PHP Code (deprecated)
- Format Macros
- Load data via REST Service
- AI Value Transformation Format
- AI Value Translation Format
- Store value into a Contentserv Item
- Execute a conditional format (switch-case) Format Plugin
- Load array value from the Contentserv getValues Format Plugin
- Process HTML table Format Plugin
- Show all articles ( 1 ) Collapse Articles
-
OXID Connector
-
-
- Send value of a PIM reference
- Loop values for CS PIM references
- Send value of a MAM reference
- Loop values for CS MAM references
- Send value of a Channel (view) reference
- Loop values for CS Channel (Views) references
- Send value of an attribute reference
- Send value of a user reference
- Loop values for user references
- Send value of a reference (deprecated)
-
- Loop values for several attributes simultaneously
- Loop values for child elements
- Loop values for CS PIM references
- Loop values for CS Channel (Views) references
- Loop values for CS MAM references
- Loop values for user references
- Loop values for SC::Prices
- Loop values for SC::Stocktable entries
- Loop values for SC::Complex products
- Loop values for a CS table
- Loop values for CS type reference
- Loop value for simple data record
- Loop values for JSON Objects
-
- Create a JSON-String (create an array)
- Format value lists
- Tree paths or values from tree elements
- Multistep formatting
- Send accesslevel of the object
- Send value of a job parameter
- Search for values in several attributes
- Format with PHP Code (deprecated)
- Format Macros
- Load data via REST Service
- AI Value Transformation Format
- AI Value Translation Format
- Store value into a Contentserv Item
- Execute a conditional format (switch-case) Format Plugin
- Load array value from the Contentserv getValues Format Plugin
- Process HTML table Format Plugin
- Show all articles ( 1 ) Collapse Articles
-
Typo3 Connector
-
-
- Send value of a PIM reference
- Loop values for CS PIM references
- Send value of a Channel (view) reference
- Loop values for CS Channel (Views) references
- Send value of a MAM reference
- Loop values for CS MAM references
- Send value of an attribute reference
- Send value of a user reference
- Loop values for user references
- Send value of a reference (deprecated)
-
- Loop values for several attributes simultaneously
- Loop values for child elements
- Loop values for CS PIM references
- Loop values for CS Channel (Views) references
- Loop values for CS MAM references
- Loop values for user references
- Loop values for SC::Prices
- Loop values for SC::Stocktable entries
- Loop values for SC::Complex products
- Loop values for a CS table
- Loop values for CS type reference
- Loop value for simple data record
- Loop values for JSON Objects
-
- Create a JSON-String (create an array)
- Format value lists
- Tree paths or values from tree elements
- Multistep formatting
- Send accesslevel of the object
- Send value of a job parameter
- Search for values in several attributes
- Format with PHP Code (deprecated)
- Format Macros
- Load data via REST Service
- AI Value Transformation Format
- AI Value Translation Format
- Store value into a Contentserv Item
- Execute a conditional format (switch-case) Format Plugin
- Load array value from the Contentserv getValues Format Plugin
- Process HTML table Format Plugin
- Show all articles ( 1 ) Collapse Articles
-
Other Connectors
Endpoints
What is an Endpoint
Endpoints in the Data Hub refer to specific URLs or API routes that allow users or systems to interact with Data Collections, execute operations, or access services provided by the platform. Each Endpoint represents a distinct function or resource, such as retrieving data, updating records, or executing a query. Endpoints are designed to facilitate smooth communication between external applications and the data stored within the Data Hub.
The key benefits of Endpoints include enabling seamless integration with external systems, providing a structured and organized way to interact with data, and allowing developers to build efficient, automated workflows. By exposing specific API Endpoints, you can define how users or systems can access and manipulate your data, whether it’s for querying, inserting, updating, or deleting information.
Export Endpoint
The Export Endpoint is connected to a single Data Collection and provides multiple Access Points, each with its own unique API Key for secure access. Its focus is to manage who can access the Endpoint and what user retrieve when accessing the Endpoint. Each Access Point can be customized with a Filter and a Formatting, allowing users to retrieve only the relevant data they need in the desired format. This ensures that different users or systems can access the same Data Collection over the same Endpoint but with varying levels of granularity or structure, based on their individual requirements which can be controlled via the API Key. The Export Endpoint provides flexibility for customized data extraction, all while ensuring secure, controlled access through the use of unique API Keys.
Import Endpoint
The Import Endpoint functions similarly to the Export Endpoint, but with a focus on uploading files to importing its content into a Data Collection. In the case of the Import Endpoint, you can connect multiple Data Collections to the Endpoint for importing data. However, the specific collection into which the data should be imported must be explicitly defined in the query if you select more than one Data Collection. You can also define multiple Access Points via an API Key per Endpoint, each of which can have its own Filter and Formatting. The Filter ensures that only valid data is imported into the Data Collection, allowing you to control which data is included based on specific criteria like expire dates. This helps maintain data integrity by preventing invalid or irrelevant information from being imported. The Formatting transforms the data in the uploaded file into the schema of the target Data Collection. This ensures that the incoming data matches the expected structure and format of the collection, making it compatible with the system’s database. By combining Filters and Formatting with each access point, you can streamline the import process, ensuring that the right data is imported in the correct format and structure, maintaining consistency across your collections.
Navigation to the Endpoints page
To get to the Endpoint page from the dashboard, find the Data Hub Tile and select Endpoints.
If the tile shown is deactivated, you do not yet have a Data Hub license. In this case, please contact sawsconnector@saws.de.
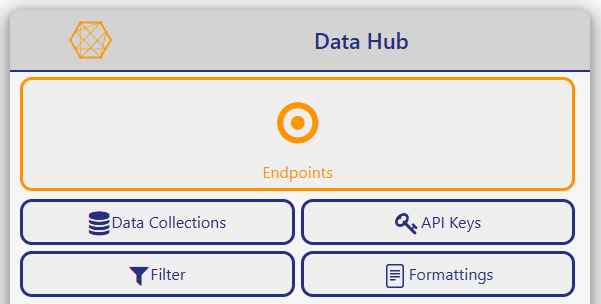
If you are not on the dashboard click the most left button in the toolbar to navigate to the dashboard page.

If you are already in the Data Hub you can use the dropdown menu in the toolbar and select the Endpoints item.
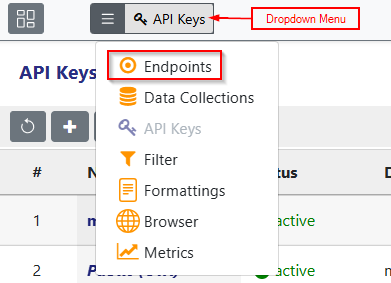
Now you should be in the Endpoints page which shows the Endpoints table list.
Navigation through the Wizard
To navigate in the wizard use the Back and Next button in the bottom right corner or directly press on the step you want to navigate to.
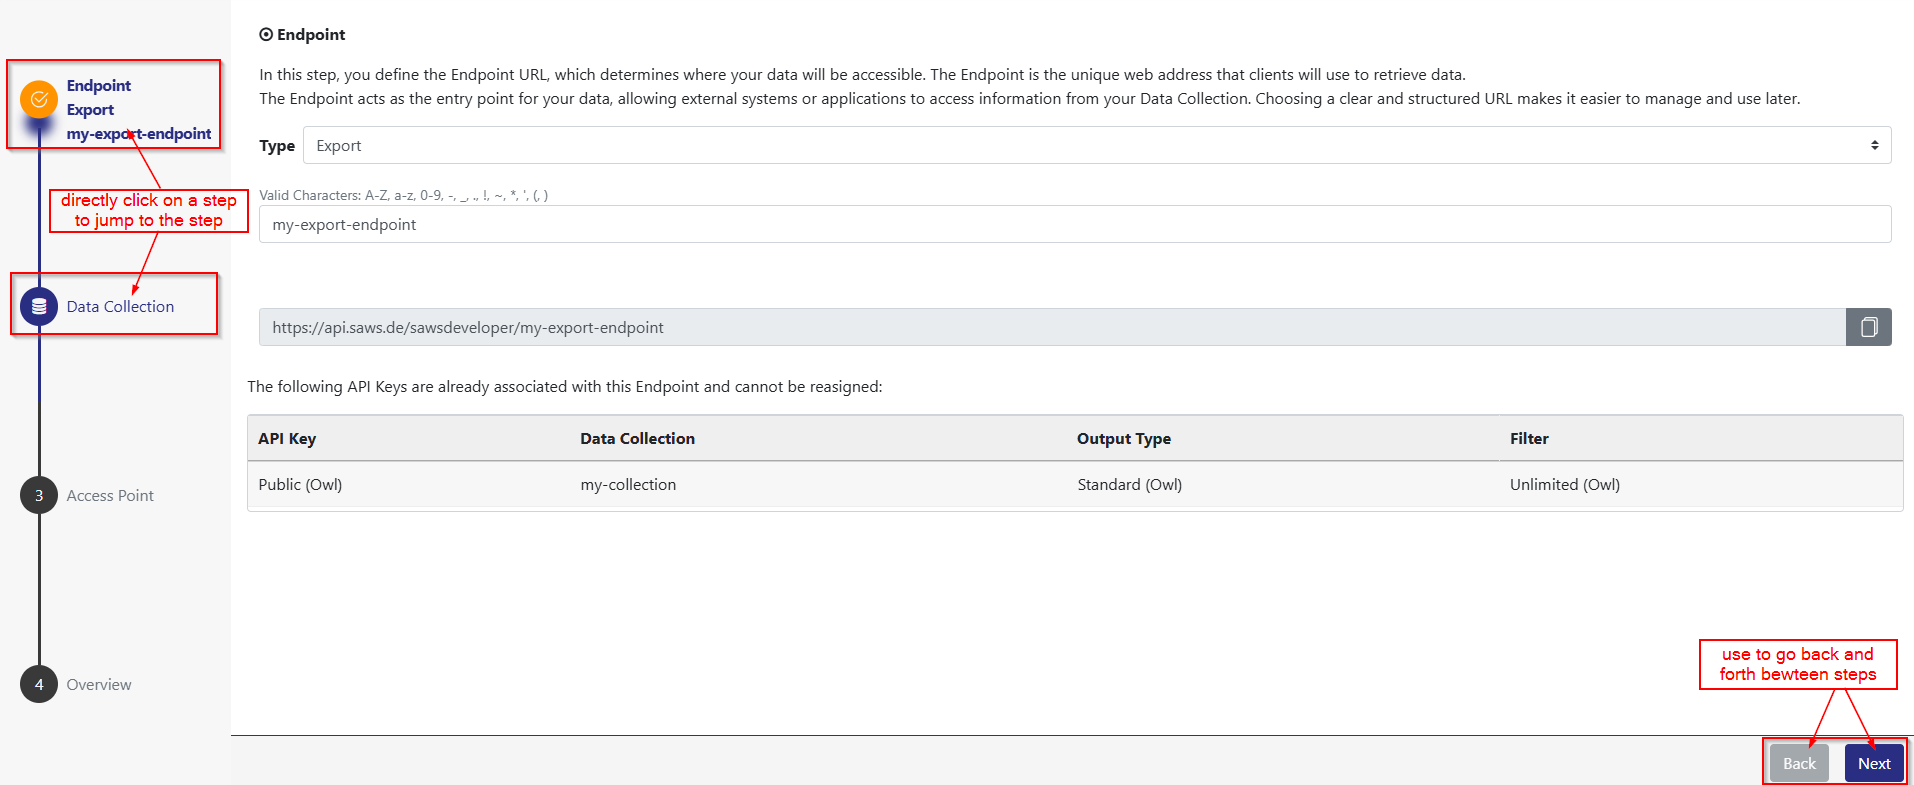
The current step you are currently in is marked in orange. If a step has a x icon some data in the current step is not valid.

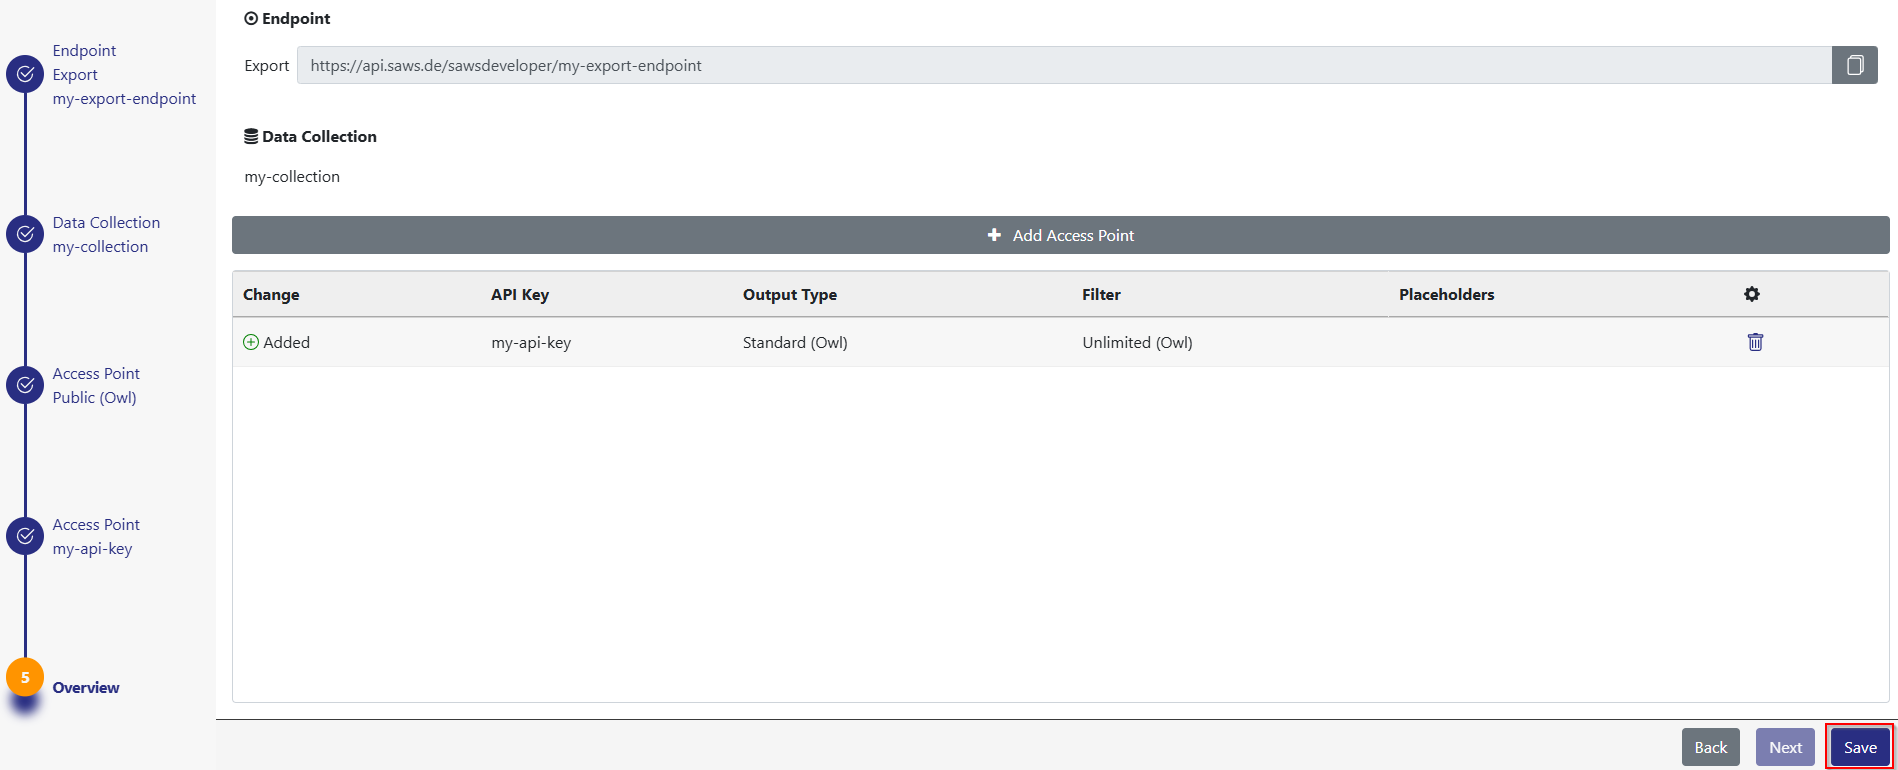
Any change made in the wizard is only stored when you click the save button in the overview step.
Creating an Export Endpoint
To create a new Export Endpoint, click on the Plus Button on the top left corner of the Endpoints table.
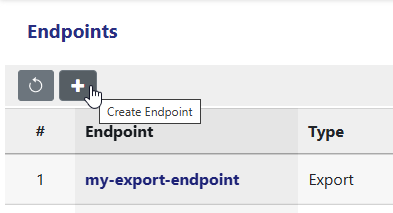
The Endpoint wizard will open where you have to go through multiple steps to create your Export Endpoint:
- Endpoint
- Data Collection
- Access Point
- Overview
Endpoint
In this step, you define the Endpoint URL, which determines where your data will be accessible. The Endpoint is the unique web address that clients will use to retrieve data. The Endpoint acts as the entry point for your data, allowing external systems or applications to access information from your Data Collection. Choosing a clear and structured URL makes it easier to manage and use later. The Endpoint can only consist of the following characters: A-Z, a-z, 0-9, -, _, ., !, ~, *, ', (, ). As type select the Export type. forth

Below you see the URL you can use to fetch the data from the Endpoint in a program.

Header
You can configure Global Endpoint-Header which are tied to the Endpoint name. A change to the Header will affect every Endpoint with the same name, Import as well as Export.
These headers are mainly for configuration Cross-Origin.

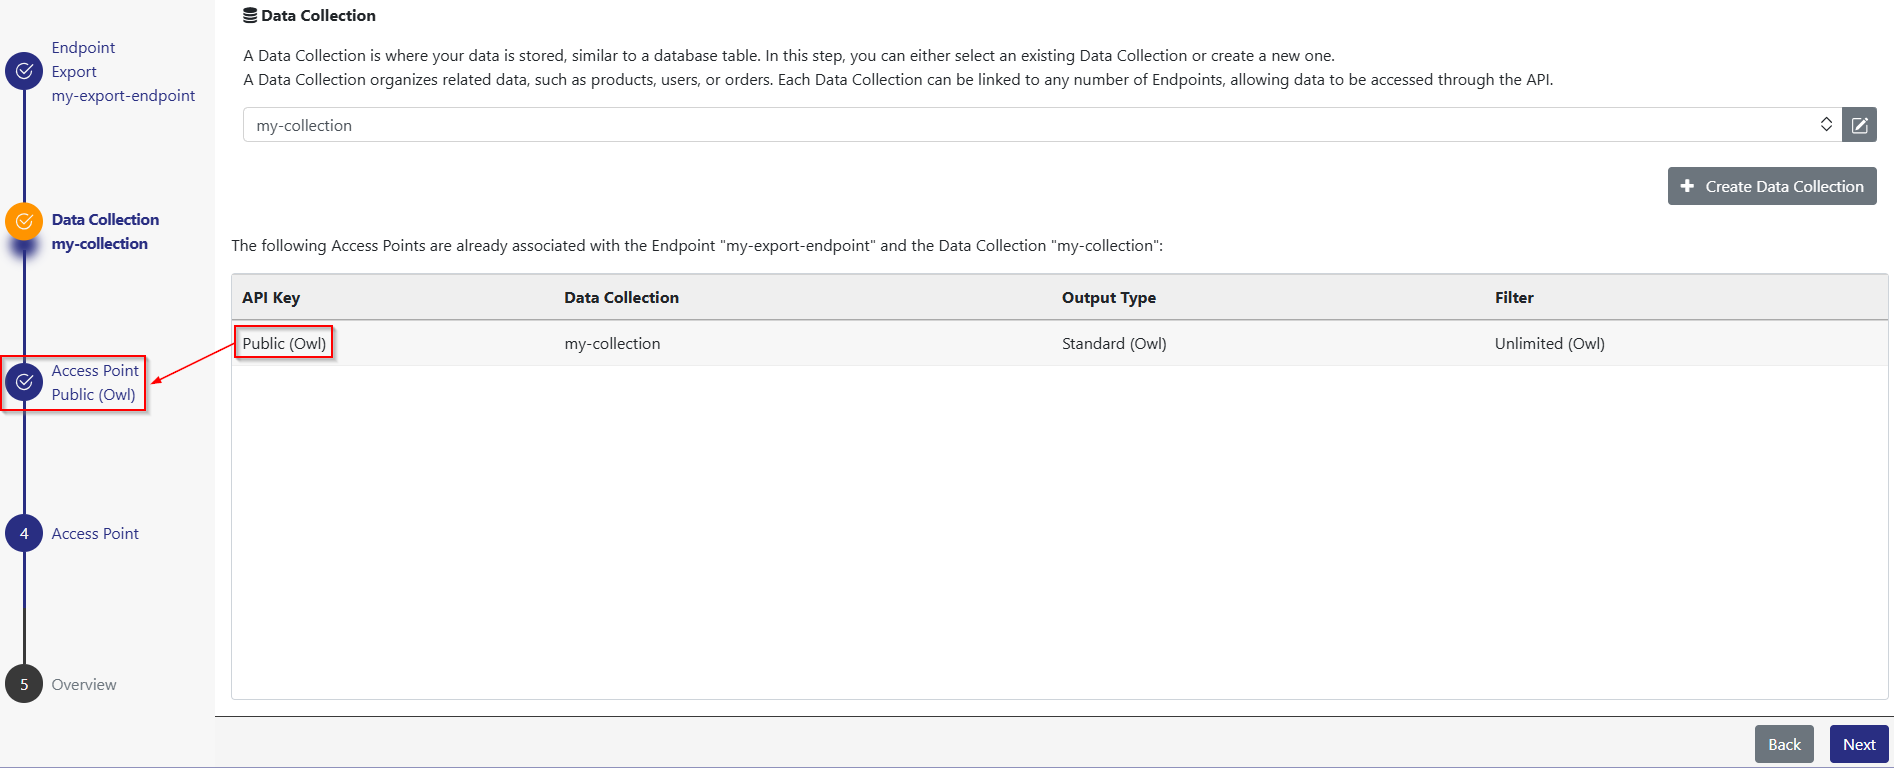
At the bottom is a table with every API Key which is already connected to the Endpoint you defined. Every API Key can only be once connected to an Endpoint URL. The table lets you verify that the API Key which you are going to use is not already in use in this Endpoint.

In this example the API Key Public (Owl) is already connected to the Endpoint my-export-endpoint and can not be assigned again to this Endpoint.
Data Collection
In the Data Collection step you select a Data Collection which the Endpoint is connected to. If you do not have any Data Collections or want to connect a new Data Collection you can create a new Data Collection with the Create Data Collection button. This will open the Data Collection editor in the wizard.

Below you see a table which shows all Access Points with the same Endpoint URL and Data Collection. Every entry in the table is also added in the wizard navigation. This is a reminder that these API Keys are already associated with this Endpoint URL. The wizard always shows every Access Point in the navigation which have the same Endpoint URL and Data Collection.
Access Point
In the Access Point step you have to select an API Key, a Filter and a Formatting.
API Key
The API Key is the identifier of the Access Point and thus can only be assigned once to every Export Endpoint URL.
You can create an API Key in the wizard using the Create API Key button.

Filter
The Filter is applied before the Formatting. You can use the Filter to refine, modify or limit the data retrieved from the Endpoint.
You can create a new Filter using the Create Filter button.

Asset Filter
The Asset Filter is only available in the Export Endpoint. If Assets are assigned to the Data Collection for the Endpoint they can be filtered using the Asset Type or the Variant. You can either include or exclude a set of Asset Types or Variants.

In the example the Endpoint only returns Assets which are of Type “images” or “documents” and are not the Variant “watermark”. An empty include on either the Asset Types or the Variants will prevent any access to Assets.
Formatting
With the Format you can transform the data from the Data Collection into another shape and/or format like CSV or XML.
You can create a new Format using the Create Formatting button. An Export Endpoint expects a Document Format.

Sync Status
Sows the current synchronization status of your Access Point.
This field is only visible for already created Access Points.
For more information read the Sync Status article.

Delete Access Point
At the bottom left you can delete an Access Point via the Delete Access Point button. The deletion is only finalized when you click the Save button in the Overview step.

Overview
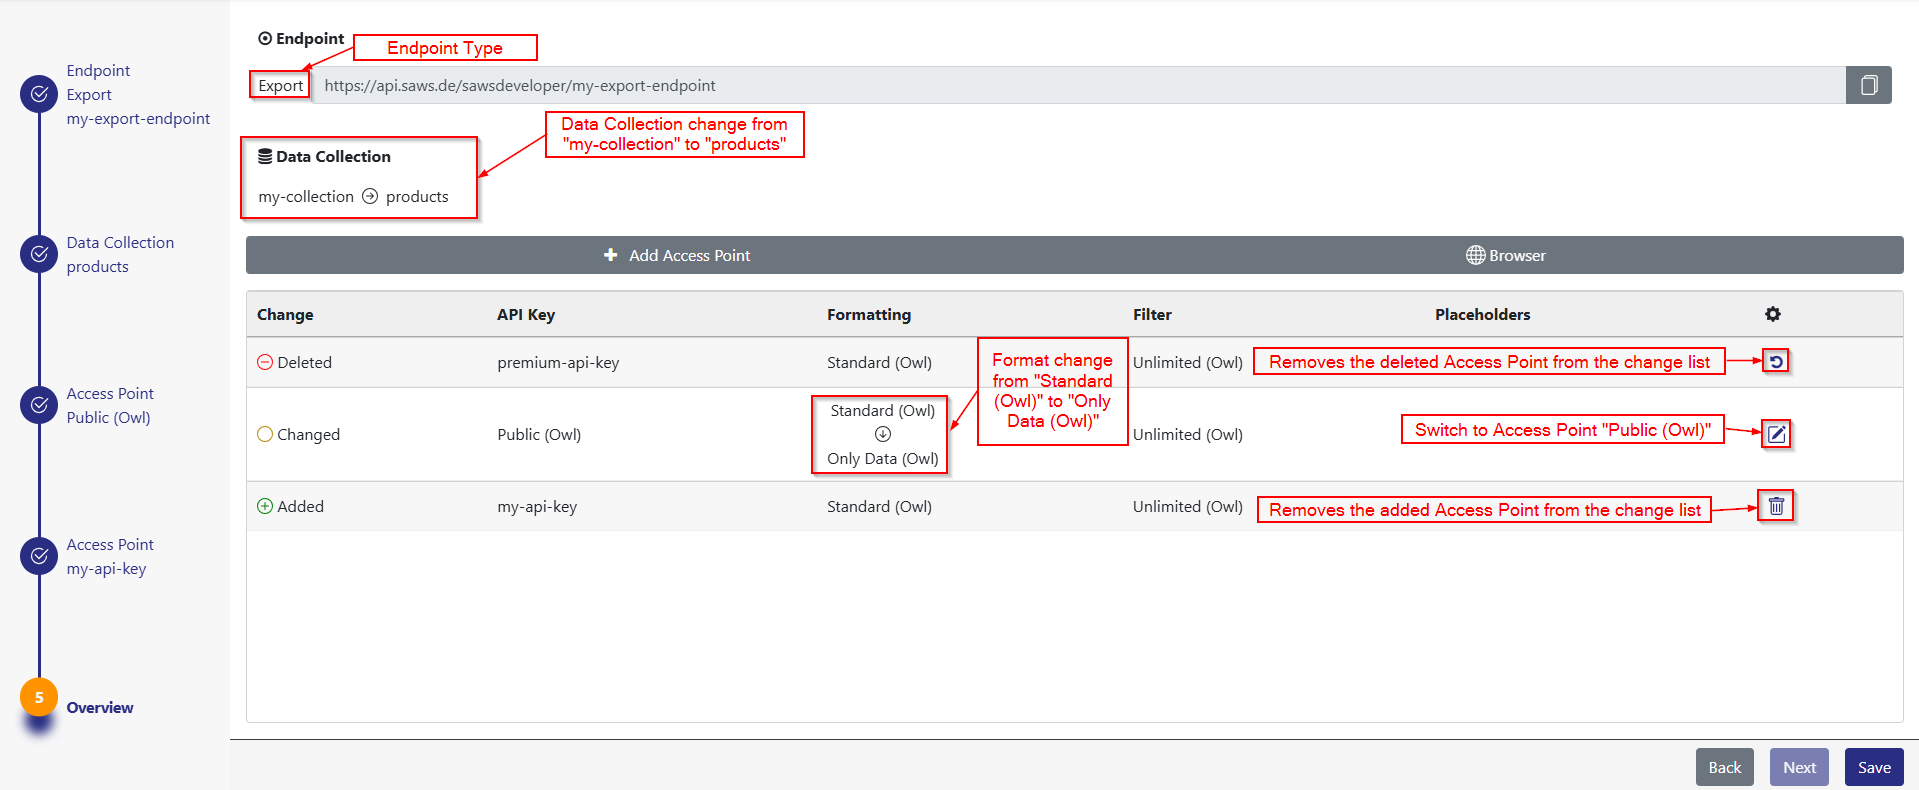
In the overview you can check your applied changes. An Access Point can either be Added, Deleted or Changed.
The counterclockwise arrow in a Delete Access Point removes the deleted Access Point from the change list and will not be delete when you press Save.
The trash can in a Added Access Point removes the added Access Point from the change list and will not be created when you press Save.
The pencil in a Changed Access Point navigates to the changed Access Point step.
Every data that got changed is marked with an arrow and follows the syntax “from → to”.
If you change the Data Collection it is changed for every Access Point you see in the wizard navigation.
You can add a new Access Point using he Add Access Point button.
The Browser button leads to the Export Browser. Be careful, every unsaved change will get lost.
Creating a Import Endpoint
The creation of a Import Endpoint is the same as for the Export Endpoint. There are just a few differences.
Endpoint
In the Endpoint step you have to select the type Import to create an Import Endpoint.

Data Collection
Instead of one you can select multiple Data Collection which are connected to the Import Endpoint.

Access Point
The API Key is also here the identifier of the Access Point and thus can only be assigned once to every Import Endpoint URL.
A Import Endpoint expects a Import Format.
