Owl Data Hub (api.saws.de) – Get Started
What is the Data Hub
The Data Hub is an online service that allows you to manage, transform, and control access to your data easy and efficiently. Whether you’re handling large datasets or fine-tuning specific data streams, the platform provides a seamless experience for data organization and accessibility which you can adjust for every customer individually.
It consists of five key features:
- Data Collections
- API Keys
- Filters
- Formattings
- Endpoints
To use the Data Hub, log into the Owl. If you do not have an account yet, you can create one by using your license. (Register).
Data Collections
A Data Collection refers to an organized set of data that is gathered, stored, and managed in a structured way. It involves grouping related pieces of information into a specific format or category for easy retrieval, analysis, and processing. Data Collections can consist of various types of data, such as text, numbers, or multimedia, and are often used in databases, spreadsheets, or data management platforms. The purpose of a Data Collection is to provide a centralized and efficient way to store and manage data, making it easier to access and manipulate for various business or analytical purposes. Data Collections are essential for maintaining data integrity, ensuring data consistency, and improving data access and scalability.
You can organize and structure your data for efficient storage, retrieval and management. They allow you to store structured datasets, making it easy to access, modify, and distribute information as needed. The data is stored as JSON but can be transformed via Formattings to XML or CSV.
You can use Data Collections for:
-
Personalization
Data Collections help personalize customer experiences by tracking their preferences, browsing history, purchase behavior, and search patterns. This allows to recommend products tailored to individual preferences.
-
Customer Segmentation
By collecting and analyzing customer data (demographics, purchase behavior, engagement), businesses can segment customers into groups, enabling targeted marketing and improved customer satisfaction.
-
Inventory Management
Data Collections can track stock levels, sales trends, and product performance. This helps in managing inventory efficiently, preventing overstock or stockouts, and optimizing supply chains.
-
Pricing Strategy
Collecting competitive pricing data and consumer behavior helps businesses set optimal pricing, offer discounts, or adjust prices dynamically based on market conditions and demand.
-
Sales Analytics and Reporting
Data Collections from sales transactions, customer behavior, and marketing campaigns can be used to generate reports, analyze trends, and assess performance, helping businesses make data-driven decisions.
-
Customer Support and Satisfaction
Tracking customer interactions, feedback, and complaints allows businesses to improve customer service, identify pain points, and measure satisfaction.
-
Marketing Optimization
Data on customer interactions with ads, email campaigns, social media, etc., can be used to optimize marketing strategies, improve targeting, and increase ROI.
-
Fraud Detection and Prevention
By collecting data on purchasing patterns, location, and payment methods, you can identify unusual activity and prevent fraudulent transactions.
-
Predictive Analytics
By collecting historical data on customer behavior, inventory, and trends, e-commerce businesses can predict future demand, optimize stocking, and tailor marketing efforts.
For a more in depth tutorial please visit the Data Collections article.
API Keys
An API Key is a unique identifier used to authenticate and authorize a user, application, or system to access specific data or services within an API (Application Programming Interface). It acts as a security token that enables secure communication between different software components, ensuring that only authorized entities can interact with the data or functionality offered by the API. They are typically passed along with API requests in headers or as query parameters, and they can be configured with specific permissions, such as read-only or full access, to control the level of access granted.
An API Key allows you to grant access to a Data Collection only to specific users or systems. In the Data Hub API Keys offer several powerful features to ensure secure and flexible data access. You can easily enable or disable API Keys, granting or revoking access as needed for specific users or systems. To enhance security, you can set IP filtering, restricting access of the API Key to specific IP addresses. Additionally, you can configure an expiration date to ensure that access is temporary and automatically revoked after a defined period, reducing the risk of unauthorized access over time. The ability to define predefined headers also adds another layer of control, allowing you to customize authentication details, metadata, or additional security measures within the request headers.
For a more in depth tutorial please visit the API Keys article.
Filters
Filters are tools or mechanisms used to refine, modify, or limit the data retrieved or processed from a larger dataset. In the context of a data management platform like the Data Hub, Filters allow you to define specific criteria to control which data is included or excluded based on conditions such as values, ranges, or patterns. The key benefits of Filters include providing data precision by retrieving exactly what you need, improving efficiency by reducing processing time and resource consumption, offering customization to tailor data access for different users or systems, and enhancing analysis by narrowing down data to the most relevant information for decision-making. Filters ensure that only the most important and actionable data is accessed or processed, streamlining workflows and improving overall data management.
A Filter in the Data Hub provides the flexibility to use a single Data Collection for multiple users or systems by applying customized data restrictions. This ensures that each user or system interacts only with the data that is relevant to their specific use case, which is particularly important when different users need access to different subsets of the same dataset. For example, you can filter data by user roles, geographic locations or specific time periods, ensuring that sensitive or unnecessary information is not exposed. This ability to dynamically adjust data access based on the caller’s needs helps maintain data security, optimize performance, and prevent data overload. Filters also make it easier to manage large and complex datasets, as they allow for fine-tuned control over how data is accessed, presented, and processed. By filtering data based on user-specific criteria, the Data Hub makes it possible to deliver a personalized and efficient data experience, even when multiple users or systems are interacting with the same underlying dataset.
For a more in depth tutorial please visit the Filters article.
Formattings
Formattings in the Data Hub refer to the process of transforming and structuring data into different formats to ensure compatibility with various systems, applications, or reporting tools. Data often comes in various raw or unstructured forms, and formatting allows you to convert it into a consistent, standardized, or machine-readable format that meets specific requirements. This can include converting data into formats such as JSON, XML or CSV.
The key benefits of Formattings include making data interoperable across different platforms, improving readability for users and systems, and ensuring that data is structured in a way that makes it easy to process, analyze, or integrate. For example, when exporting data for use in a reporting tool, you might need to format it as CSV for easy import. Or, when interacting with an external system or API, you may need to format data as JSON to match the expected request and response structures.
In the Data Hub, formatting offers the flexibility to adjust data presentation, making it adaptable to the needs of various clients, applications, or systems. Whether you need to standardize the data to a specific format or dynamically adjust the format based on the user’s requirements, Formattings provide the necessary tools for smooth data integration and efficient communication. This ensures that the data you work with is always in the right structure, enhancing overall data accessibility and usability.
For a more in depth tutorial please visit the Formattings article.
Endpoints
Endpoints in the Data Hub refer to specific URLs or API routes that allow users or systems to interact with Data Collections, execute operations, or access services provided by the platform. Each Endpoint represents a distinct function or resource, such as retrieving data, updating records, or executing a query. Endpoints are designed to facilitate smooth communication between external applications and the data stored within the Data Hub.
The key benefits of Endpoints include enabling seamless integration with external systems, providing a structured and organized way to interact with data, and allowing developers to build efficient, automated workflows. By exposing specific API Endpoints, you can define how users or systems can access and manipulate your data, whether it’s for querying, inserting, updating, or deleting information.
Export Endpoint
The Export Endpoint is connected to a single Data Collection and provides multiple Access Points, each with its own unique API Key for secure access. Its focus is to manage who can access the Endpoint and what user retrieve when accessing the Endpoint. Each Access Point can be customized with a Filter and a Formatting, allowing users to retrieve only the relevant data they need in the desired format. This ensures that different users or systems can access the same Data Collection over the same Endpoint but with varying levels of granularity or structure, based on their individual requirements which can be controlled via the API Key. The Export Endpoint provides flexibility for customized data extraction, all while ensuring secure, controlled access through the use of unique API Keys.
Import Endpoint
The Import Endpoint functions similarly to the Export Endpoint, but with a focus on uploading files to importing its content into a Data Collection. In the case of the Import Endpoint, you can connect multiple Data Collections to the Endpoint for importing data. However, the specific collection into which the data should be imported must be explicitly defined in the query if you select more than one Data Collection. You can also define multiple Access Points via an API Key per Endpoint, each of which can have its own Filter and Formatting. The Filter ensures that only valid data is imported into the Data Collection, allowing you to control which data is included based on specific criteria like expire dates. This helps maintain data integrity by preventing invalid or irrelevant information from being imported. The Formatting transforms the data in the uploaded file into the schema of the target Data Collection. This ensures that the incoming data matches the expected structure and format of the collection, making it compatible with the system’s database. By combining Filters and Formatting with each access point, you can streamline the import process, ensuring that the right data is imported in the correct format and structure, maintaining consistency across your collections.
For a more in depth tutorial please visit the Endpoints article.
Querying data via api.saws.de
The appropriate URL for your product API can be found in the attachment dialogue of the Data Collection. It always follows this nomenclature:
https://api.saws.de/<<customershortname>>/<<data-collection-name>>
Authentication
There are several ways to authenticate yourself to api.saws.de. The simplest option is to use the API key.
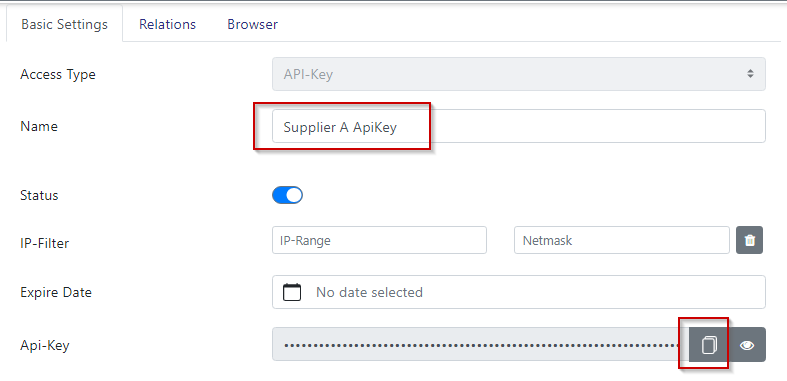
This is given as a header in the GET or POST request. To do this, copy it from the OWL and enter it as a header variable with the name “x-api-token” or “Authorization” (without the prefix “Bearer “). The best way to test the authorization and queries is with a common REST browser such as Postman or Yet another Rest Client.

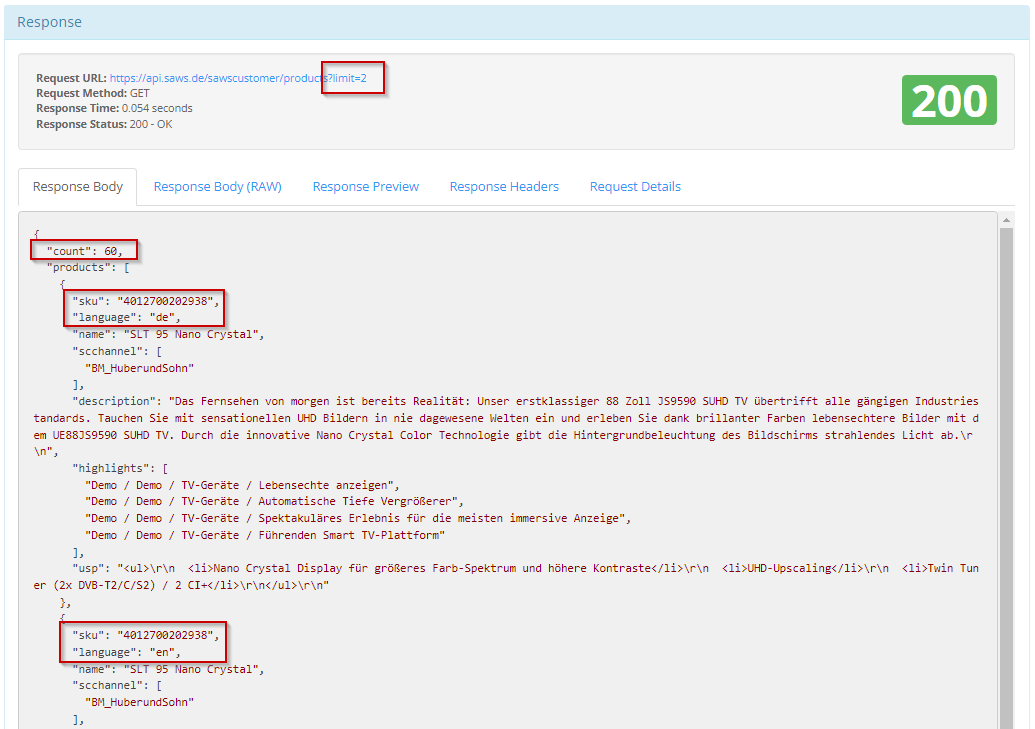
When you run the query, you should get a response in this format. The total number of records found in the data and the records delivered are according to your limit parameter.
Direct access to records
If you want to access records directly, you can do so by extending the URL with the unique keys you specified in the collection.
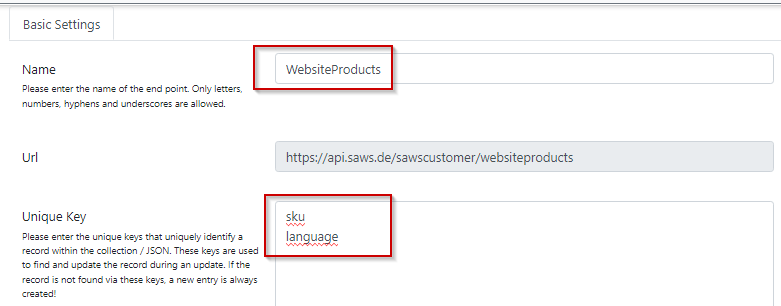
The URL expands with the respective keys
https://api.saws.de/<<customershortname>>/<<data collection name>>/<<unique key 1>>
https://api.saws.de/<<customershortname>>/<<data collection name>>/<<unique key 1>>/<<unique key 2>>
Example:
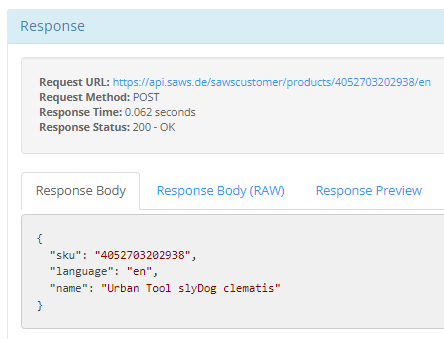
https://api.saws.de/sawscustomer/products/<<sku>>/ //delivere all records of the specific sku
Result:
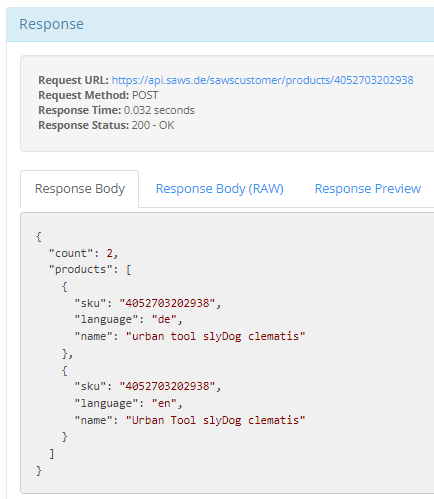
Example:
https://api.saws.de/sawscustomer/products/<<sku>>/<<language>> //delivere one record of the specific sku with the given language
Result:
Attention: If you choose the direct link to a record, the collection level (“products”) and the “count” parameter will be lost!
Filter
To filter the data, you can include a data filter in JSON format in the body. To do this, the data must be sent as POST. The filters correspond to the MongoDB filter
Examples:
or
{
"filter": {
"sku": "*2938",
"language": [ "de", "en" ]
}
}
or
{
"filter": {
"scchannel": [ "BM_HuberundSohn" ]
}
}
or
{
"filter": {
"scchannel": [ "BM_HuberundSohn" ]
}
}
or
{
"filter": {
"width": [ ">", 147 ]
}
}

Limitation of data columns
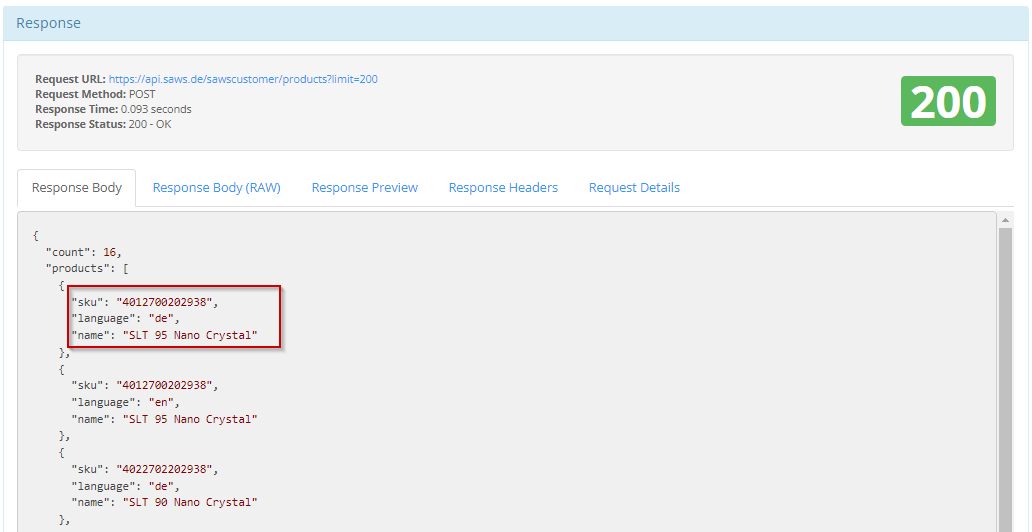
If you want to limit the data columns, you can specify the required columns in the attribute: fields in the body. When the data is delivered, only these columns are delivered.
Examples:
{
 "fields": ["sku", "language", "name"],
 "filter": {
    "sku": "*2938",
    "language": [ "de", "en" ]
  }
}
Result:
Examples of GET:
https://api.saws.de/<<customershortname>>/<<data collection name>>?fields=[sku,language]
Limit of records
If you want to limit the data sets and query the data on packets, you can do this via the parameter limit.
Examples for POST:
{
 "fields": ["sku", "language", "name"],
 "limit" : "5"   //retrieve 5 records beginning atoffset 0
 "filter": {
    "sku": "*2938",
    "language": [ "de", "en" ]
  }
}
or
{
"fields": ["sku", "language", "name"],
 "limit" : "10,2" //retrieve 2 records beginning at offset 10
"filter": { "sku": "*2938", "language": [ "de", "en" ] } }
Examples of GET:
https://api.saws.de/<<customershortname>>/<<data collection name>>?limit=10,2
Sort of data
If you want to sort the data, you can do this with the parameter “sort”. The column name is also given. If only the name is given, then the data is sorted in ascending order. If a “-” is placed in front of the name, then it is sorted in descending order.
Examples for POST:
{
 "fields": ["sku", "language", "name"],
 "sort" : "-name"
 "filter": {
    "sku": "*2938",
    "language": [ "de", "en" ]
  }
}
Examples of GET:
https://api.saws.de/<<customershortname>>/<<data collection name>>?&sort=-name
Filter data by change date
The query for changed data is very important, as you usually only want to query the changed information. With the latest version of the data hub, it is now possible to query this not only at object level, but also at attribute level.
The following record shows you all changed objects with only the changed attributes (plus unique key) that have changed between 1 January 2024 and 10 September 2024.
Examples for POST:
{
  "changes": {
    "changed": {
      "$gte": "2024-01-01 22:20:00+02" ,
      "$lte": "2024-09-10 22:20:00+02"
     }
  }
}
If you want to have all attributes of all changed products, you have to add the fields parameter. Either with specific fields or with * for all fields.
Examples for POST:
{
  "fields" : "*",
  "changes": {
    "changed": {
      "$gte": "2024-01-01 22:20:00+02" ,
      "$lte": "2024-09-10 22:20:00+02"
     }
  }
}
If you want to search only in specific fields for a change, like changes in price or stock in our example, you can add the field parameter also in the “changes” section.
Examples for POST:
{
  "fields" : ["Label", "Supplier", "Price", "Stock"],
  "changes": {
    "field" : ["Price", "Stock"],
    "changed": {
      "$gte": "2024-01-01 22:20:00+02" ,
      "$lte": "2024-09-10 22:20:00+02"
     }
  }
}
In Addtion you can add a standard object filter as well.
Examples for POST:
{
  "fields" : "*",
  "filter" : ["sku" : "4711*"],
  "changes": {
    "field" : ["Price", "Stock"],
    "changed": {
      "$gte": "2024-01-01 22:20:00+02" ,
      "$lte": "2024-09-10 22:20:00+02"
     }
  }
}
Some additional Information about the filter:
The ‘changes’ attribut can be either an object or an array of objects [or filters].
A filter with the following attributes can be specified under ‘changes’:
field: Changes are only searched for in the specified fields [optional] changed: Period in which the last change must have been made.
Possible filters are:
$gt = greater than
$gte = greater than or equal
$lt = lower than
$lte = lower than or equal
