-
General
-
Releases
-
Base Connector
-
- Beginner's Guide
- Overview
- Stations
- Datamaps
- Importing templates
- Setting conditions
- Job filter function
- How to create backups
- Running and Monitoring Jobs
- Export Job Automation
- Import/Export & copy of data map rows
- Synchronizing references that are not contained in views
- Get the preconfigured "Source data set - Template"
- Configuring categories and products
- Fill Bundle and Variant tables from children
- Channel/View Tree Maintenance Active Job
- Configuring the price & stock modules
- Configuring the price/stock value ranges
- Configuring volume discounts/scale prices
- How to export prices
- How to export stock values from certain storage units
- Use of Contentserv Credentials
- Connector & Station User Limitation
- Formats
- SC::Dynamic Image Crop Preset
- Placeholders
- Show all articles ( 11 ) Collapse Articles
-
- Working with placeholder in conditions
- Improve usability of SC::Tables
- Placeholder for SC::Price, SC::Channel, SC::Stock
- REST Service API for SAWS Tables (Prices, Stock, Channels & Complex Articles)
- Dataflow import of SC::Tables
- Dataflow export of SC::Tables
- The datamap summary - Creating an automated documentation
- Export images as a ZIP file
- Image export with direct access to the CONTENTSERV platform
- Image export with no access to the CONTENTSERV platform
- Image export from a third party system
- How to configure CS Dashboard
- Setup a transformation list for CSTypes
- FAQ
- Export Smart Document via Active Script and assign output to product
- Format Macros
- Controlling Connector Jobs via the REST API
- Sales Channel Maintenance via Excel Cross-Reference
- Sales Channel Inheritance Active Job
- Job Parameters & Context Parameters
- Show all articles ( 5 ) Collapse Articles
-
-
- Send value of a PIM reference
- Loop values for CS PIM references
- Send value of a MAM reference
- Loop values for CS MAM references
- Send value of a Channel (view) reference
- Loop values for CS Channel (Views) references
- Send value of an attribute reference
- Send value of a user reference
- Loop values for user references
- Send value of a reference (deprecated)
-
- Loop values for several attributes simultaneously
- Loop values for child elements
- Loop values for CS PIM references
- Loop values for CS Channel (Views) references
- Loop values for CS MAM references
- Loop values for user references
- Loop values for SC::Prices
- Loop values for SC::Stocktable entries
- Loop values for SC::Complex products
- Loop values for CS type reference
- Loop values for a CS table
- Loop value for simple data record
- Loop values for JSON Objects
-
- Create a JSON-String (create an array)
- Format value lists
- Tree paths or values from tree elements
- Multistep formatting
- Send accesslevel of the object
- Send value of a job parameter
- Search for values in several attributes
- Format with PHP Code (deprecated)
- Format Macros
- Load data via REST Service
- AI Value Transformation Format
- AI Value Translation Format
- Store value into a Contentserv Item
- Execute a conditional format (switch-case) Format Plugin
- Load array value from the Contentserv getValues Format Plugin
- Process HTML table Format Plugin
- Show all articles ( 1 ) Collapse Articles
-
Owl Cloud Services
-
Owl Data Hub
-
Ursula AI
- Ursula AI
- Supported AIs
- AI Value Transformation Format
- AI Value Translation Format
- Generate Descriptions with Ursula AI Active Job
- Populate Attributes via Ursula AI Active Job
- AI Product Tree Organizer Active Job
- Mapping Sales Channels via the Ursula AI Active Job
- Store value into a Contentserv Item
-
GenericJSON / DynamicJSON Connector
-
-
- Send value of a PIM reference
- Loop values for CS PIM references
- Send value of a Channel (view) reference
- Loop values for CS Channel (Views) references
- Send value of a MAM reference
- Loop values for CS MAM references
- Send value of an attribute reference
- Send value of a user reference
- Loop values for user references
- Send value of a reference (deprecated)
-
- Loop values for several attributes simultaneously
- Loop values for child elements
- Loop values for CS PIM references
- Loop values for CS Channel (Views) references
- Loop values for CS MAM references
- Loop values for user references
- Loop values for SC::Prices
- Loop values for SC::Stocktable entries
- Loop values for SC::Complex products
- Loop values for a CS table
- Loop values for CS type reference
- Loop value for simple data record
- Loop values for JSON Objects
-
- Create a JSON-String (create an array)
- Format value lists
- Tree paths or values from tree elements
- Multistep formatting
- Send accesslevel of the object
- Send value of a job parameter
- Search for values in several attributes
- Format with PHP Code (deprecated)
- Format Macros
- Load data via REST Service
- AI Value Transformation Format
- AI Value Translation Format
- Store value into a Contentserv Item
- Execute a conditional format (switch-case) Format Plugin
- Load array value from the Contentserv getValues Format Plugin
- Process HTML table Format Plugin
- Show all articles ( 1 ) Collapse Articles
-
GenericXML Connector
-
- Creating your first export
- Building XML Target Keys
- Creating a Salesforce export
- All Tutorials for creating XMLs
- SAWSConnector settings
- Station configuration
- Example station configuration
- Source data set configuration
- Example source data set mappings for the XML export
- Job configuration
- Simple XML Tags
- Images
- References
- SC::Prices
- SC::Stock
- SC::Channel
- Specials
- BMECat 1.2 Template
- Show all articles ( 3 ) Collapse Articles
-
-
- Send value of a PIM reference
- Loop values for CS PIM references
- Send value of a Channel (view) reference
- Loop values for CS Channel (Views) references
- Send value of a MAM reference
- Loop values for CS MAM references
- Send value of an attribute reference
- Send value of a user reference
- Loop values for user references
- Send value of a reference (deprecated)
-
- Loop values for several attributes simultaneously
- Loop values for child elements
- Loop values for CS PIM references
- Loop values for CS Channel (Views) references
- Loop values for CS MAM references
- Loop values for user references
- Loop values for SC::Prices
- Loop values for SC::Stocktable entries
- Loop values for SC::Complex products
- Loop values for a CS table
- Loop values for CS type reference
- Loop value for simple data record
- Loop values for JSON Objects
-
- Create a JSON-String (create an array)
- Format value lists
- Tree paths or values from tree elements
- Multistep formatting
- Send accesslevel of the object
- Send value of a job parameter
- Search for values in several attributes
- Format with PHP Code (deprecated)
- Format Macros
- Load data via REST Service
- AI Value Transformation Format
- AI Value Translation Format
- Store value into a Contentserv Item
- Execute a conditional format (switch-case) Format Plugin
- Load array value from the Contentserv getValues Format Plugin
- Process HTML table Format Plugin
- Show all articles ( 1 ) Collapse Articles
-
SimpleExcel Connector
-
-
- Send value of a PIM reference
- Loop values for CS PIM references
- Send value of a Channel (view) reference
- Loop values for CS Channel (Views) references
- Send value of a MAM reference
- Loop values for CS MAM references
- Send value of an attribute reference
- Send value of a user reference
- Loop values for user references
- Send value of a reference (deprecated)
-
- Loop values for several attributes simultaneously
- Loop values for child elements
- Loop values for CS PIM references
- Loop values for CS Channel (Views) references
- Loop values for CS MAM references
- Loop values for user references
- Loop values for SC::Prices
- Loop values for SC::Stocktable entries
- Loop values for SC::Complex products
- Loop values for a CS table
- Loop values for CS type reference
- Loop value for simple data record
- Loop values for JSON Objects
-
- Create a JSON-String (create an array)
- Format value lists
- Tree paths or values from tree elements
- Multistep formatting
- Send accesslevel of the object
- Send value of a job parameter
- Search for values in several attributes
- Format with PHP Code (deprecated)
- Format Macros
- Load data via REST Service
- AI Value Transformation Format
- AI Value Translation Format
- Store value into a Contentserv Item
- Execute a conditional format (switch-case) Format Plugin
- Load array value from the Contentserv getValues Format Plugin
- Process HTML table Format Plugin
- Show all articles ( 1 ) Collapse Articles
-
Magento Connector
-
-
- Send value of a PIM reference
- Loop values for CS PIM references
- Send value of a Channel (view) reference
- Loop values for CS Channel (Views) references
- Send value of a MAM reference
- Loop values for CS MAM references
- Send value of an attribute reference
- Send value of a user reference
- Loop values for user references
- Send value of a reference (deprecated)
-
- Loop values for several attributes simultaneously
- Loop values for child elements
- Loop values for CS PIM references
- Loop values for CS Channel (Views) references
- Loop values for CS MAM references
- Loop values for user references
- Loop values for SC::Prices
- Loop values for SC::Stocktable entries
- Loop values for SC::Complex products
- Loop values for a CS table
- Loop values for CS type reference
- Loop value for simple data record
- Loop values for JSON Objects
-
- Create a JSON-String (create an array)
- Format value lists
- Tree paths or values from tree elements
- Multistep formatting
- Send accesslevel of the object
- Send value of a job parameter
- Search for values in several attributes
- Format with PHP Code (deprecated)
- Format Macros
- Load data via REST Service
- AI Value Transformation Format
- AI Value Translation Format
- Store value into a Contentserv Item
- Execute a conditional format (switch-case) Format Plugin
- Load array value from the Contentserv getValues Format Plugin
- Process HTML table Format Plugin
- Show all articles ( 1 ) Collapse Articles
-
Shopware 5 Connector
-
- Configuration Shopware
- Configuration PIM
- Shopware attribute setting
- Configuration SAWSConnector
- Station configuration
- Source data set configuration
- Configuring categories and products
- Price table configuration for Shopware
- Result in Shopware
- Subshops and the SAWSConnector Shopware
- ean
- Custom Fields (attribute)
- highlight
- purchaseSteps
- stockMin
- supplierNumber
- notification
- shippingFree
- length
- height
- width
- weight
- shippingTime
- metaKeywords
- Show all articles ( 9 ) Collapse Articles
-
-
- Send value of a PIM reference
- Loop values for CS PIM references
- Send value of a Channel (view) reference
- Loop values for CS Channel (Views) references
- Send value of a MAM reference
- Loop values for CS MAM references
- Send value of an attribute reference
- Send value of a user reference
- Loop values for user references
- Send value of a reference (deprecated)
-
- Loop values for several attributes simultaneously
- Loop values for child elements
- Loop values for CS PIM references
- Loop values for CS Channel (Views) references
- Loop values for CS MAM references
- Loop values for user references
- Loop values for SC::Prices
- Loop values for SC::Stocktable entries
- Loop values for SC::Complex products
- Loop values for a CS table
- Loop values for CS type reference
- Loop value for simple data record
- Loop values for JSON Objects
-
- Create a JSON-String (create an array)
- Format value lists
- Tree paths or values from tree elements
- Multistep formatting
- Send accesslevel of the object
- Send value of a job parameter
- Search for values in several attributes
- Format with PHP Code (deprecated)
- Format Macros
- Load data via REST Service
- AI Value Transformation Format
- AI Value Translation Format
- Store value into a Contentserv Item
- Execute a conditional format (switch-case) Format Plugin
- Load array value from the Contentserv getValues Format Plugin
- Process HTML table Format Plugin
- Show all articles ( 1 ) Collapse Articles
-
Shopware 6 Connector
-
- Tutorial Video
- First steps
- Import Shopware settings
- Export categories
- Export media files
- Export simple products
- Export multiple languages
- Export variant products
- Export product properties
- Export custom fields
- Export product cross-selling relationships
- Export prices
- Export stocks
- Export into any other Shopware field
- How to address multiple Shopware 6 websites
- How to address different Shopware 6 Sale-Channels from one Contentserv System
- Useful Links
- Sales Channel Maintenance via Excel Cross-Reference
- Show all articles ( 3 ) Collapse Articles
-
-
- Send value of a PIM reference
- Loop values for CS PIM references
- Send value of a MAM reference
- Loop values for CS MAM references
- Send value of a Channel (view) reference
- Loop values for CS Channel (Views) references
- Send value of an attribute reference
- Send value of a user reference
- Loop values for user references
- Send value of a reference (deprecated)
-
- Loop values for several attributes simultaneously
- Loop values for child elements
- Loop values for CS PIM references
- Loop values for CS Channel (Views) references
- Loop values for CS MAM references
- Loop values for user references
- Loop values for SC::Prices
- Loop values for SC::Stocktable entries
- Loop values for SC::Complex products
- Loop values for a CS table
- Loop values for CS type reference
- Loop value for simple data record
- Loop values for JSON Objects
-
- Create a JSON-String (create an array)
- Format value lists
- Tree paths or values from tree elements
- Multistep formatting
- Send accesslevel of the object
- Send value of a job parameter
- Search for values in several attributes
- Format with PHP Code (deprecated)
- Format Macros
- Load data via REST Service
- AI Value Transformation Format
- AI Value Translation Format
- Store value into a Contentserv Item
- Execute a conditional format (switch-case) Format Plugin
- Load array value from the Contentserv getValues Format Plugin
- Process HTML table Format Plugin
- Show all articles ( 1 ) Collapse Articles
-
OXID Connector
-
-
- Send value of a PIM reference
- Loop values for CS PIM references
- Send value of a MAM reference
- Loop values for CS MAM references
- Send value of a Channel (view) reference
- Loop values for CS Channel (Views) references
- Send value of an attribute reference
- Send value of a user reference
- Loop values for user references
- Send value of a reference (deprecated)
-
- Loop values for several attributes simultaneously
- Loop values for child elements
- Loop values for CS PIM references
- Loop values for CS Channel (Views) references
- Loop values for CS MAM references
- Loop values for user references
- Loop values for SC::Prices
- Loop values for SC::Stocktable entries
- Loop values for SC::Complex products
- Loop values for a CS table
- Loop values for CS type reference
- Loop value for simple data record
- Loop values for JSON Objects
-
- Create a JSON-String (create an array)
- Format value lists
- Tree paths or values from tree elements
- Multistep formatting
- Send accesslevel of the object
- Send value of a job parameter
- Search for values in several attributes
- Format with PHP Code (deprecated)
- Format Macros
- Load data via REST Service
- AI Value Transformation Format
- AI Value Translation Format
- Store value into a Contentserv Item
- Execute a conditional format (switch-case) Format Plugin
- Load array value from the Contentserv getValues Format Plugin
- Process HTML table Format Plugin
- Show all articles ( 1 ) Collapse Articles
-
Typo3 Connector
-
-
- Send value of a PIM reference
- Loop values for CS PIM references
- Send value of a Channel (view) reference
- Loop values for CS Channel (Views) references
- Send value of a MAM reference
- Loop values for CS MAM references
- Send value of an attribute reference
- Send value of a user reference
- Loop values for user references
- Send value of a reference (deprecated)
-
- Loop values for several attributes simultaneously
- Loop values for child elements
- Loop values for CS PIM references
- Loop values for CS Channel (Views) references
- Loop values for CS MAM references
- Loop values for user references
- Loop values for SC::Prices
- Loop values for SC::Stocktable entries
- Loop values for SC::Complex products
- Loop values for a CS table
- Loop values for CS type reference
- Loop value for simple data record
- Loop values for JSON Objects
-
- Create a JSON-String (create an array)
- Format value lists
- Tree paths or values from tree elements
- Multistep formatting
- Send accesslevel of the object
- Send value of a job parameter
- Search for values in several attributes
- Format with PHP Code (deprecated)
- Format Macros
- Load data via REST Service
- AI Value Transformation Format
- AI Value Translation Format
- Store value into a Contentserv Item
- Execute a conditional format (switch-case) Format Plugin
- Load array value from the Contentserv getValues Format Plugin
- Process HTML table Format Plugin
- Show all articles ( 1 ) Collapse Articles
-
Other Connectors
Shopify Transmitter
We provide a full configured station template with the necessary datamap and jobs for the Dynamic JSON Transmitter!
Setup the transmitter
In the transmitter settings you need to setup the following things:
- The URL to the Shopify Shop
- The custom Metafield Identifier
- The Shopify API Version
- The Shopify Admin API Token
- The Shopify Storefront API Token
There is no need to install importer plugins in Shopify, as the SAWSConnector seamlessly integrates with Shopify’s HTTP Web API using GraphQL.
Custom Metafield Identifier
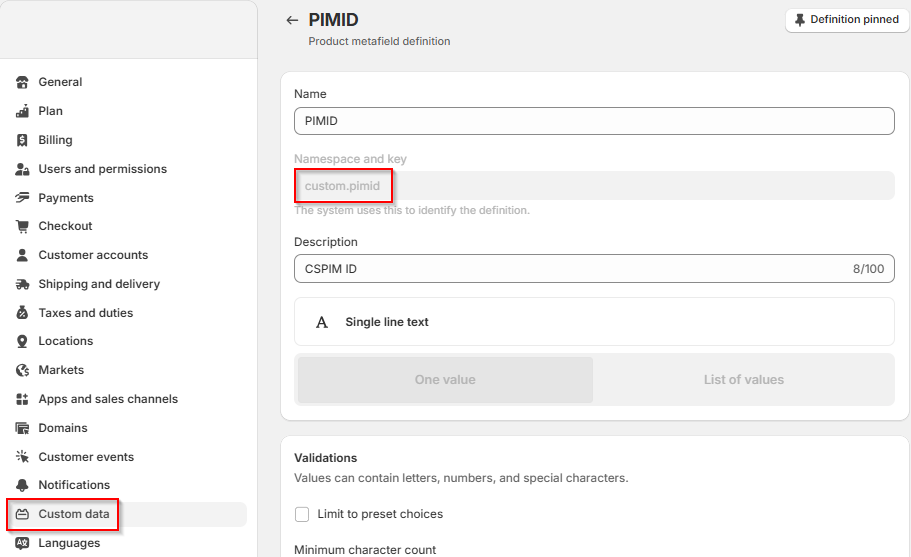
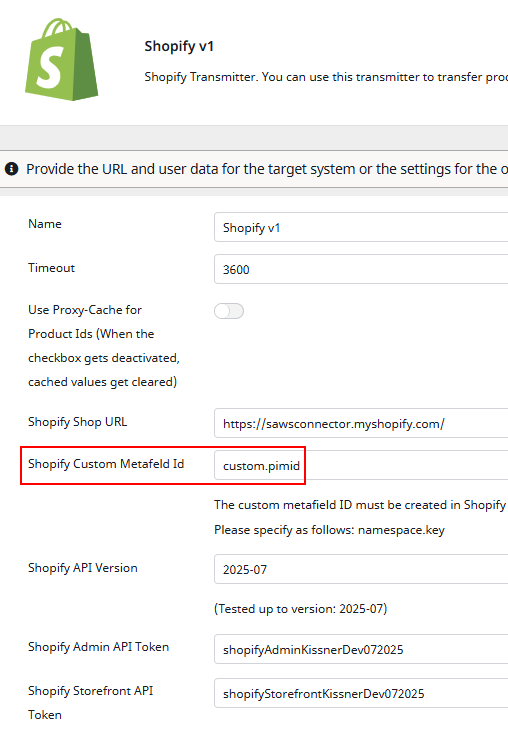
To create the custom Metafield for the identifier in the Shopify backend, set the name as you like and copy the name with the namespace after creation.
The custom metafield identifier is used to identify the product in Shopify with a value stored in Contentserv. The metafield identifier needs to be configured in the datamap to add, update or delete products or collections. In the transmitter configuration the identifier is set with <namespace>.<key>.
| Shopify Backend | Shopify Transmitter |
|---|---|
 |
 |
| e.g. productsUpdateCreate-Datamap |
|---|
 |
Version 1.20. and higher:
You can activate the checkbox for the proxy cache. If the checkbox is activated, all product ids will be cached so the initial loading time is reduced.
By deactivating the checkbox the cache gets cleared.
API Tokens
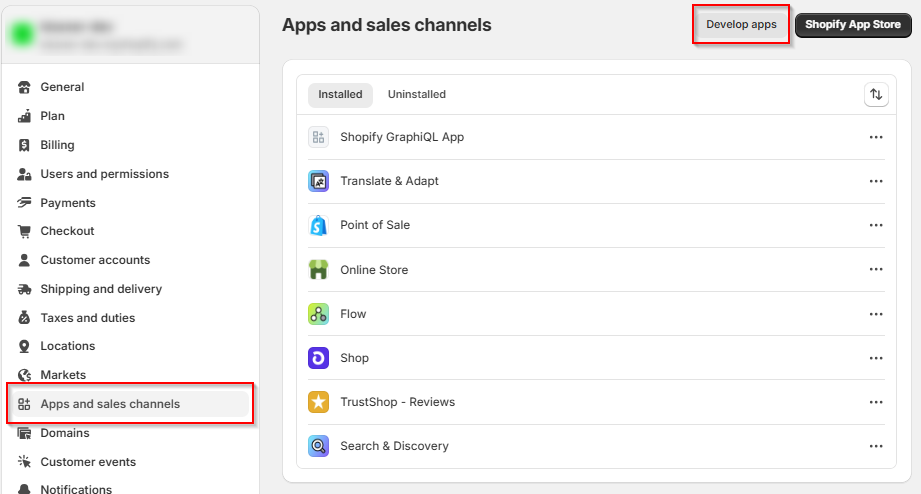
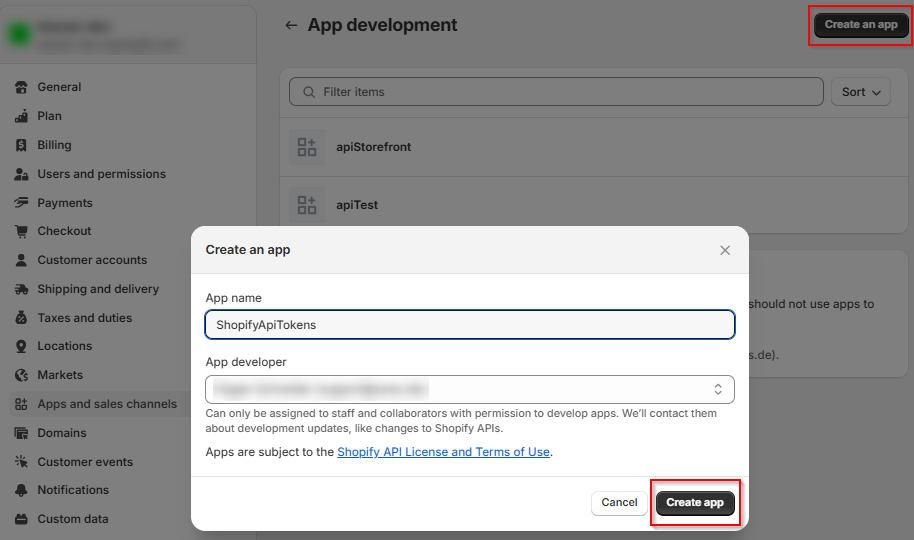
To use the Shopify Transmitter set the API Key for the Storefront API and the Admin API in the Contentserv credentials and select them in the transmitter settings.
First you need to generate these tokens, therefore you can follow this guideline
| Shopify generate Tokens |
|---|
 |
 |
| Go to the configuration tab and select the Admin API Integration. Please select every point in the Admin Api access scope |
| After the access scope please select the API version e.g. 2024-07 |
 |
| Now that the Admin API is configured correct, go to the configuration of the Storefront API and select every point of the access scope In the Storefront API you can’t set a version for the API |
| With both APIs setup, click on “Install” and install the app |
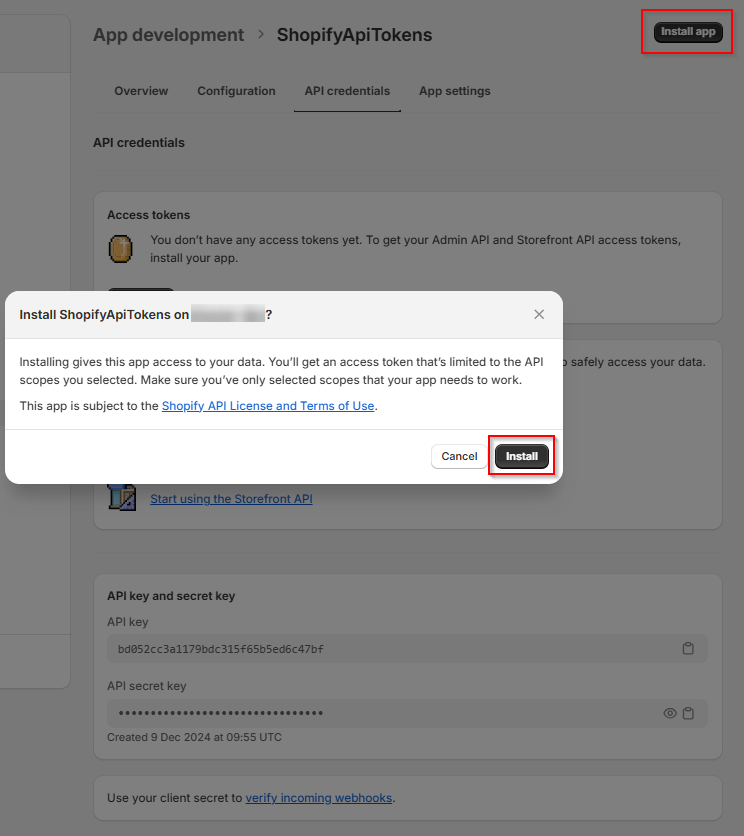 |
| Important: Copy the Admin API key now and save them, because you can only reveal the admin API key once! |
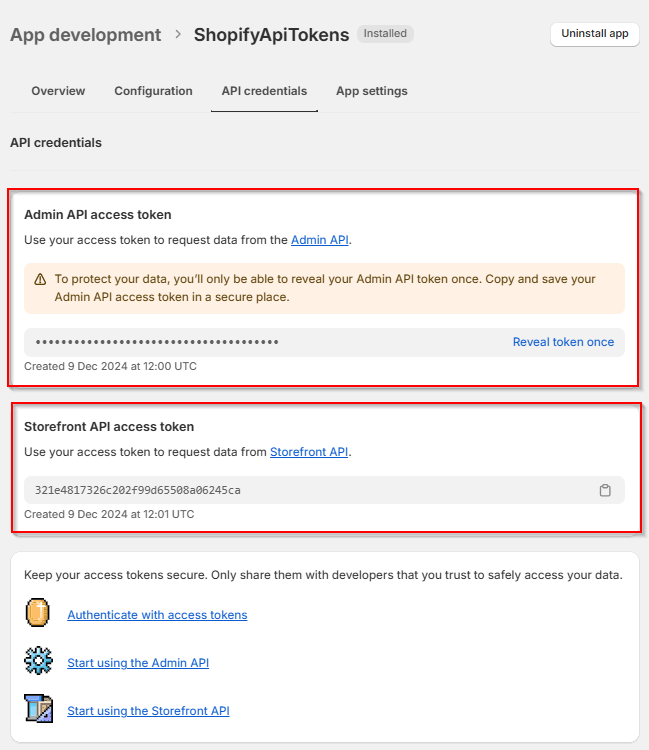 |
After configuring the tokens save them in Contentserv and select them in the Shopify Transmitter configuration.
| Contentserv configuration |
|---|
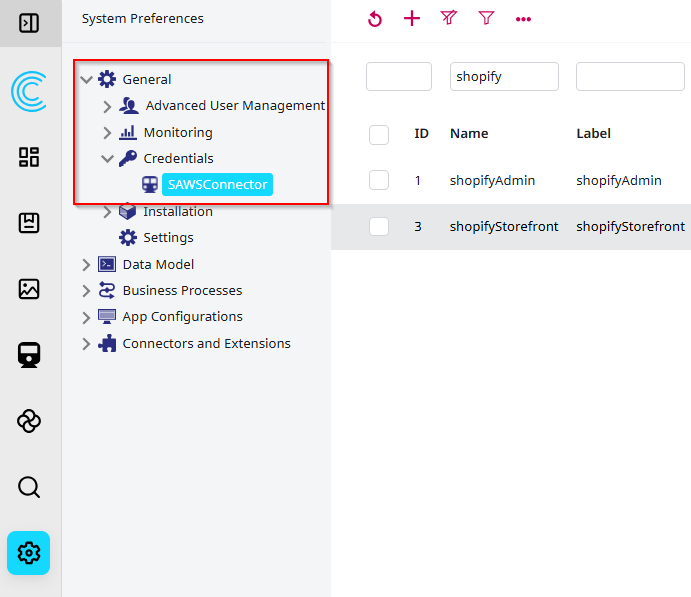 |
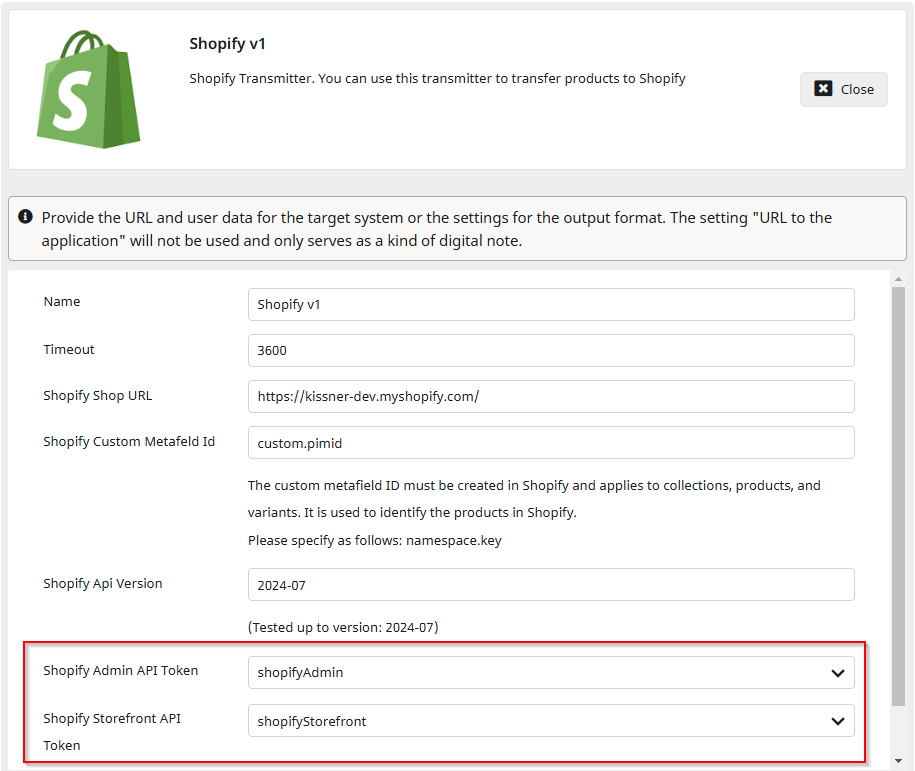 |
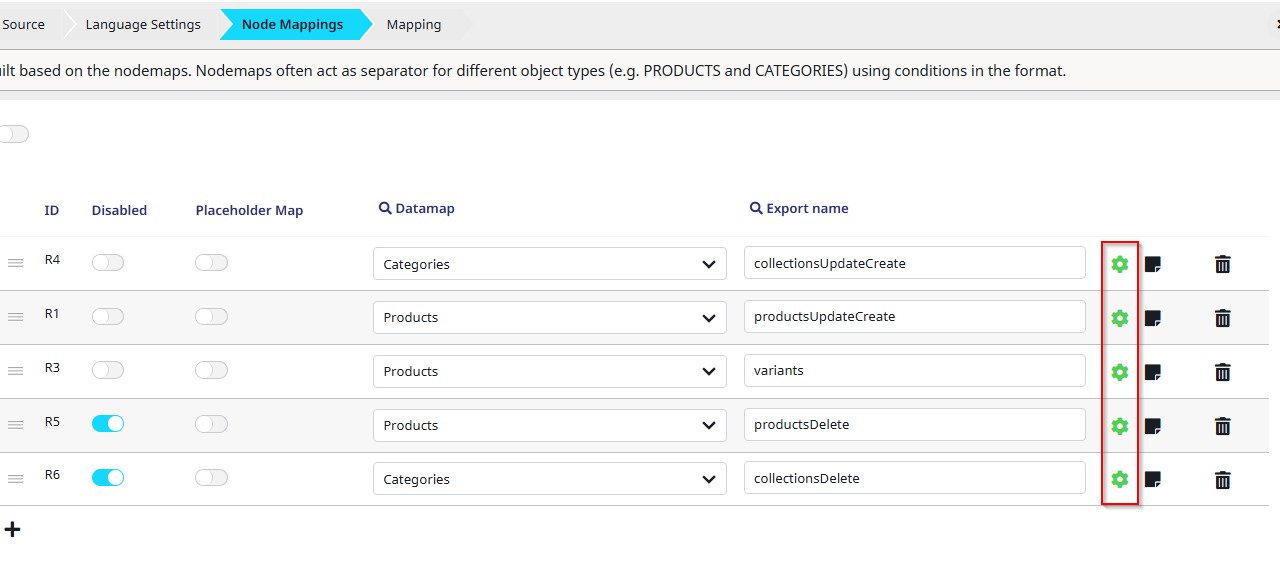
Node Mappings
Please ensure that the nodemap settings are set correctly to identify products and variants and to differentiate if the record needs to be created/updated or deleted.
 |
Configuring the datamaps
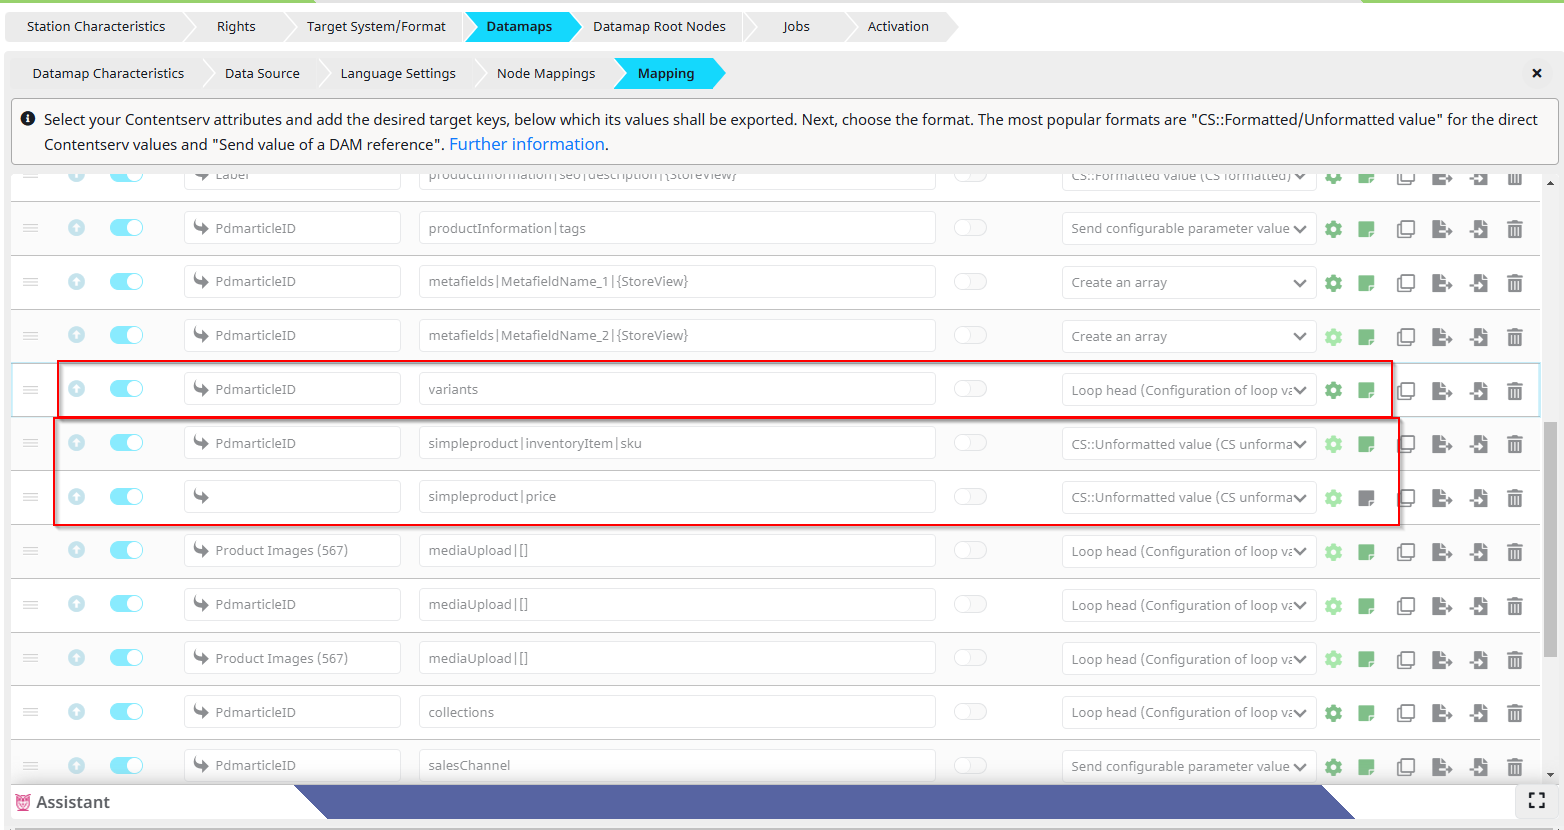
Every datamap (except for the variant datamap) needs the custom identifier metafield. Also Shopify needs at least a title to create a resource, the other rows are optional. The last row in the datamaps is always called ‘additionalInformation’. This row is ignored by Shopify but is necessary for the connector to work. In this row the csrecordid and the csrecordclass are stored.
If you export products with variants you need to configure the row called ‘variants’ in the ‘productUpdateCreate’ datamap, in which an array of the skus from the variants is stored. To connect the variants correctly to the product, you need to setup the sku for the variant in the ‘variants’ datamap.
If you export simple products you need to configure the simple product datamap rows.
Bundles
The transmitter can also create “Bundles” in Shopify. This only works for bundles of simple products. To implement bundles you need to configure the datamap row “bundleInput”.
You can also import the datamap row into an existing datamap.
There are two options for the configuration, bundles with an attribute of PIM references or bundles with the complex article table.

This row is used to set the structure of the bundle. All the other values are set with the product datamap, similar to a simple product.
Metafields
If the metafield is language dependent, you need to set |{StoreView} behind the name.
In the datamap you always configure the metafield with the following key:
metafields|your-name
Version 1.20. and higher:
We provide a Format Plugin for Shopify Metafields as easier way to configure metafields.

You can find a detailed guide on how to use the Format Plugin here.
Legacy:
Every metafield gets configured as an array and needs the namespace, the key and its value. You can see the namespace and the key in your Shopify backend.
The value needs to be a string.

To fill a metafield with multiple values (List) you need to send an Array containing all the values which is encoded as a JSON-string.
Metafield References
This is only necessary when creating Metafields without the “Metafield Formal Plugin”
We also provide the following reference types for metafields:
- products (e.g @productRef:{PIM_IDENTIFIER} )
- variants (e.g. @variantRef:{SKU} )
- collections (e.g. @collectionRef:{PIM_IDENTIFIER} )
- media files (e.g. @mediaRef:{FILENAME} )
- meta objects (e.g. @metaobjectRef:{METAOBJECT_DEFINITION_TYPE}|{METAOBJECT_HANDLE} )
To use these reference values, the result value has to contain the key from the examples as prefix of the value.
This is a way to dynamically add the value, but you can also provide the Shopify ID.
Handle Metaobject Entries
The Transmitter can create, update or delete entries for existing metaobjects. Therefore we provide a configured datamap template which is also included in the Shopify Station template. A metaobject entry is always identified with the metaobject definition type and its unique handle.
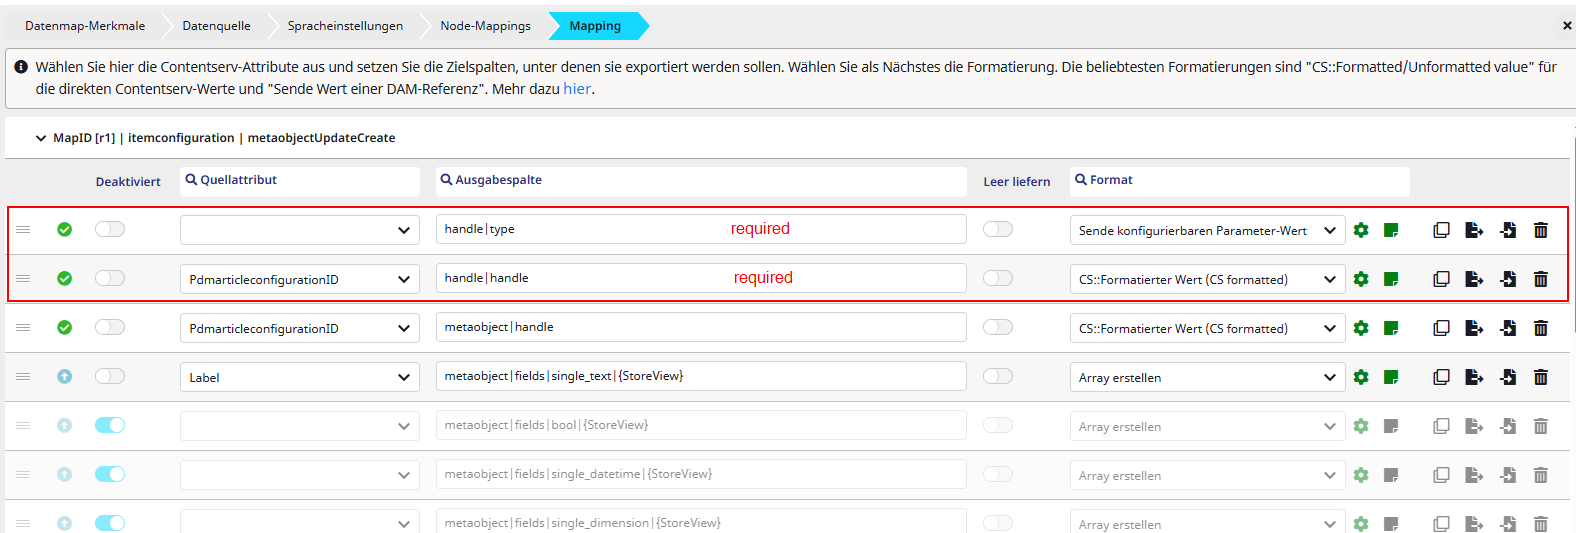
In Shopify you can find the values for the type and the field keys in the Metaobject Definition
(Settings > Custom Data > Metaobject definitions)
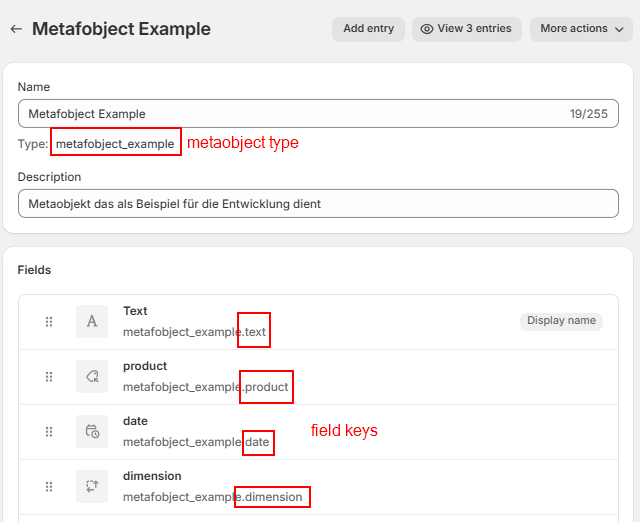
You can use references the same way as in the metafields.
Create for each field that you want to fill a row in the datamap with a key and a value. There are some examples for different types already configured in the template.
You can also set the status of the entry (ACTIVE or DRAFT) and a template suffix.
Media to upload
Media can be uploaded in two different ways.
The datamap export column is “mediaUpload|[]” or “upload|[]”
| mediaUpload | This is used for images or videos which are part of the product like product pictures. Also, with this key you can create the media for variants in Shopify Types: IMAGE, VIDEO, EXTERNAL_VIDEO, MODEL_3D |
| upload | This is used for just uploading files to Shopify – the files are not connected to a product or variant but then e.g. can be referenced by metafields. Types: FILE, IMAGE, VIDEO, EXTERNAL_VIDEO, MODEL_3D |
The media for variants and products gets uploaded via the ‘productUpdateCreate’ datamap. You can send only 1 image per variant but multiple media files per product.
To connect the media files to a variant you also need to maintain the datamap row ‘additionalInformation’.
Version 1.20. and higher:
We provide a Format Plugin for Shopify Media as easier way to send media to Shopify.

You can find a detailed guide on how to use the Format Plugin here.
Legacy:
| Every media upload needs the following keys: |
|---|
 |
Note: for collections you also need to maintain the collectionInformation|image row in the datamap, otherwise the image can’t be connected to the collection.
