-
General
-
Releases
-
Base Connector
-
- Beginner's Guide
- Overview
- Stations
- Datamaps
- Importing templates
- Formats
- Setting conditions
- Placeholders
- Job filter function
- How to create backups
- Running and Monitoring Jobs
- Export Job Automation
- Import/Export & copy of data map rows
- Synchronizing references that are not contained in views
- Get the preconfigured "Source data set - Template"
- Configuring categories and products
- Channel/View Tree Maintenance Active Job
- Configuring the price & stock modules
- Configuring the price/stock value ranges
- Configuring volume discounts/scale prices
- How to export prices
- How to export stock values from certain storage units
- Use of Contentserv Credentials
- Connector & Station User Limitation
- SC::Dynamic Image Crop Preset
- Todos
- Show all articles ( 11 ) Collapse Articles
-
- Price Table
- Stock Table
- Sales Channel Table
- Complex Article Table
- Importing data into SAWS tables (price, stock, etc.)
- SAWSConnector Usages
- Variant Articles
- Assignment of articles to complex articles
- Searching for SC::Prices / SC::Stocks
- Searching for SC::Channels
- Setup a transformation list for CSTypes
- Context-Sensitive Product Value Export
-
- Working with placeholder in conditions
- Improve usability of SC::Tables
- Placeholder for SC::Price, SC::Channel, SC::Stock
- REST Service API for SAWS Tables (Prices, Stock, Channels & Complex Articles)
- Dataflow import of SC::Tables
- Dataflow export of SC::Tables
- The datamap summary - Creating an automated documentation
- Export images as a ZIP file
- Image export with direct access to the CONTENTSERV platform
- Image export with no access to the CONTENTSERV platform
- Image export from a third party system
- How to configure CS Dashboard
- Setup a transformation list for CSTypes
- FAQ
- Export Smart Document via Active Script and assign output to product
- Format Macros
- Controlling Connector Jobs via the REST API
- Sales Channel Maintenance via Excel Cross-Reference
- Sales Channel Inheritance Active Job
- Job Parameters & Context Parameters
- Logbook
- Fill complex article tables automatically
- Datamap Mapping Status
- SAWS Create CS Channels via SAWS Sales Channels
- Show all articles ( 9 ) Collapse Articles
-
-
- Send value of a PIM reference
- Loop values for CS PIM references
- Send value of a MAM reference
- Loop values for CS MAM references
- Send value of a Channel (view) reference
- Loop values for CS Channel (Views) references
- Send value of an attribute reference
- Send value of a user reference
- Loop values for user references
- Send value of a reference (deprecated)
- Merge reference values format plugin
- Search for usage of item
- Search for item IDs using attribute data
-
- Loop Head and Loop Value
- Loop values for several attributes simultaneously
- Loop values for child elements
- Loop values for CS PIM references
- Loop values for CS Channel (Views) references
- Loop values for CS MAM references
- Loop values for user references
- Loop values for SC::Prices
- Loop values for SC::Stocktable entries
- Loop values for SC::Complex products
- Loop values for CS type reference
- Loop values for a CS table
- Loop value for simple data record
- Loop values for JSON Objects
- Loop for value range entries
-
- Create a JSON-String (create an array)
- Format value lists
- Tree paths or values from tree elements
- Multistep formatting
- Send accesslevel of the object
- Send value of a job parameter
- Search for values in several attributes
- Format with PHP Code (deprecated)
- Format Macros
- Load data via REST Service
- AI Value Transformation Format
- AI Value Translation Format
- Store value into a Contentserv Item
- Execute a conditional format (switch-case) Format Plugin
- Load array value from the Contentserv getValues Format Plugin
- Process HTML table Format Plugin
- Replace via regex pattern format plugin
- Convert value ranges into each other
- Merge Array Format Plugin
- Export several attributes simultaneously
- Show all articles ( 5 ) Collapse Articles
-
Owl Cloud Services
-
Owl Data Hub
-
Ursula AI
- Ursula AI
- Supported AIs
- AI Value Transformation Format
- AI Value Translation Format
- Generate Descriptions with Ursula AI Active Job
- Populate Attributes via Ursula AI Active Job
- AI Product Tree Organizer Active Job
- Mapping Sales Channels via the Ursula AI Active Job
- Store value into a Contentserv Item
-
GenericJSON / DynamicJSON Connector
-
- SAWSConnector settings
- Categories
- Products
- Product-Category assignment
- Export von Feldkonfigurationen/Attribute/Wertelisten
- Finish the export
- Response log
- Sample JSONs
- SQL Transmitter
- Shopify Transmitter
- Base. (Baselinker) Transmitter
- PlentyONE Transmitter
- Building JSON Target Keys
- Default HTTP Transmitter
- Configuratorware Transmitter
-
-
- Send value of a PIM reference
- Loop values for CS PIM references
- Send value of a Channel (view) reference
- Loop values for CS Channel (Views) references
- Send value of a MAM reference
- Loop values for CS MAM references
- Send value of an attribute reference
- Send value of a user reference
- Loop values for user references
- Send value of a reference (deprecated)
- Merge reference values format plugin
- Search for usage of item
- Search for item IDs using attribute data
-
- Loop Head and Loop Value
- Loop values for several attributes simultaneously
- Loop values for child elements
- Loop values for CS PIM references
- Loop values for CS Channel (Views) references
- Loop values for CS MAM references
- Loop values for user references
- Loop values for SC::Prices
- Loop values for SC::Stocktable entries
- Loop values for SC::Complex products
- Loop values for a CS table
- Loop values for CS type reference
- Loop value for simple data record
- Loop values for JSON Objects
- Loop for value range entries
-
- Create a JSON-String (create an array)
- Format value lists
- Tree paths or values from tree elements
- Multistep formatting
- Send accesslevel of the object
- Send value of a job parameter
- Search for values in several attributes
- Format with PHP Code (deprecated)
- Format Macros
- Load data via REST Service
- AI Value Transformation Format
- AI Value Translation Format
- Store value into a Contentserv Item
- Execute a conditional format (switch-case) Format Plugin
- Load array value from the Contentserv getValues Format Plugin
- Process HTML table Format Plugin
- Response Handler Field Plugin
- Replace via regex pattern format plugin
- Convert value ranges into each other
- Merge Array Format Plugin
- Export several attributes simultaneously
- Show all articles ( 6 ) Collapse Articles
-
GenericXML Connector
-
-
- Send value of a PIM reference
- Loop values for CS PIM references
- Send value of a Channel (view) reference
- Loop values for CS Channel (Views) references
- Send value of a MAM reference
- Loop values for CS MAM references
- Send value of an attribute reference
- Send value of a user reference
- Loop values for user references
- Send value of a reference (deprecated)
- Merge reference values format plugin
- Search for usage of item
- Search for item IDs using attribute data
-
- Loop Head and Loop Value
- Loop values for several attributes simultaneously
- Loop values for child elements
- Loop values for CS PIM references
- Loop values for CS Channel (Views) references
- Loop values for CS MAM references
- Loop values for user references
- Loop values for SC::Prices
- Loop values for SC::Stocktable entries
- Loop values for SC::Complex products
- Loop values for a CS table
- Loop values for CS type reference
- Loop value for simple data record
- Loop values for JSON Objects
- Loop for value range entries
-
- Create a JSON-String (create an array)
- Format value lists
- Tree paths or values from tree elements
- Multistep formatting
- Send accesslevel of the object
- Send value of a job parameter
- Search for values in several attributes
- Format with PHP Code (deprecated)
- Format Macros
- Load data via REST Service
- AI Value Transformation Format
- AI Value Translation Format
- Store value into a Contentserv Item
- Execute a conditional format (switch-case) Format Plugin
- Load array value from the Contentserv getValues Format Plugin
- Process HTML table Format Plugin
- Replace via regex pattern format plugin
- Convert value ranges into each other
- Merge Array Format Plugin
- Export several attributes simultaneously
- Show all articles ( 5 ) Collapse Articles
-
SimpleExcel Connector
-
-
- Send value of a PIM reference
- Loop values for CS PIM references
- Send value of a Channel (view) reference
- Loop values for CS Channel (Views) references
- Send value of a MAM reference
- Loop values for CS MAM references
- Send value of an attribute reference
- Send value of a user reference
- Loop values for user references
- Send value of a reference (deprecated)
- Merge reference values format plugin
- Search for usage of item
- Search for item IDs using attribute data
-
- Loop Head and Loop Value
- Loop values for several attributes simultaneously
- Loop values for child elements
- Loop values for CS PIM references
- Loop values for CS Channel (Views) references
- Loop values for CS MAM references
- Loop values for user references
- Loop values for SC::Prices
- Loop values for SC::Stocktable entries
- Loop values for SC::Complex products
- Loop values for a CS table
- Loop values for CS type reference
- Loop value for simple data record
- Loop values for JSON Objects
- Loop for value range entries
-
- Create a JSON-String (create an array)
- Format value lists
- Tree paths or values from tree elements
- Multistep formatting
- Send accesslevel of the object
- Send value of a job parameter
- Search for values in several attributes
- Format with PHP Code (deprecated)
- Format Macros
- Load data via REST Service
- AI Value Transformation Format
- AI Value Translation Format
- Store value into a Contentserv Item
- Execute a conditional format (switch-case) Format Plugin
- Load array value from the Contentserv getValues Format Plugin
- Process HTML table Format Plugin
- Replace via regex pattern format plugin
- Convert value ranges into each other
- Merge Array Format Plugin
- Export several attributes simultaneously
- Show all articles ( 5 ) Collapse Articles
-
Magento Connector
-
-
- Send value of a PIM reference
- Loop values for CS PIM references
- Send value of a Channel (view) reference
- Loop values for CS Channel (Views) references
- Send value of a MAM reference
- Loop values for CS MAM references
- Send value of an attribute reference
- Send value of a user reference
- Loop values for user references
- Send value of a reference (deprecated)
- Merge reference values format plugin
- Search for usage of item
- Search for item IDs using attribute data
-
- Loop Head and Loop Value
- Loop values for several attributes simultaneously
- Loop values for child elements
- Loop values for CS PIM references
- Loop values for CS Channel (Views) references
- Loop values for CS MAM references
- Loop values for user references
- Loop values for SC::Prices
- Loop values for SC::Stocktable entries
- Loop values for SC::Complex products
- Loop values for a CS table
- Loop values for CS type reference
- Loop value for simple data record
- Loop values for JSON Objects
- Loop for value range entries
-
- Create a JSON-String (create an array)
- Format value lists
- Tree paths or values from tree elements
- Multistep formatting
- Send accesslevel of the object
- Send value of a job parameter
- Search for values in several attributes
- Format with PHP Code (deprecated)
- Format Macros
- Load data via REST Service
- AI Value Transformation Format
- AI Value Translation Format
- Store value into a Contentserv Item
- Execute a conditional format (switch-case) Format Plugin
- Load array value from the Contentserv getValues Format Plugin
- Process HTML table Format Plugin
- Replace via regex pattern format plugin
- Convert value ranges into each other
- Merge Array Format Plugin
- Export several attributes simultaneously
- Show all articles ( 5 ) Collapse Articles
-
Shopware 5 Connector
-
- Configuration Shopware
- Configuration PIM
- Shopware attribute setting
- Configuration SAWSConnector
- Station configuration
- Source data set configuration
- Configuring categories and products
- Price table configuration for Shopware
- Result in Shopware
- Subshops and the SAWSConnector Shopware
- ean
- Custom Fields (attribute)
- highlight
- purchaseSteps
- stockMin
- supplierNumber
- notification
- shippingFree
- length
- height
- width
- weight
- shippingTime
- metaKeywords
- Show all articles ( 9 ) Collapse Articles
-
-
- Send value of a PIM reference
- Loop values for CS PIM references
- Send value of a Channel (view) reference
- Loop values for CS Channel (Views) references
- Send value of a MAM reference
- Loop values for CS MAM references
- Send value of an attribute reference
- Send value of a user reference
- Loop values for user references
- Send value of a reference (deprecated)
- Merge reference values format plugin
- Search for usage of item
- Search for item IDs using attribute data
-
- Loop Head and Loop Value
- Loop values for several attributes simultaneously
- Loop values for child elements
- Loop values for CS PIM references
- Loop values for CS Channel (Views) references
- Loop values for CS MAM references
- Loop values for user references
- Loop values for SC::Prices
- Loop values for SC::Stocktable entries
- Loop values for SC::Complex products
- Loop values for a CS table
- Loop values for CS type reference
- Loop value for simple data record
- Loop values for JSON Objects
- Loop for value range entries
-
- Create a JSON-String (create an array)
- Format value lists
- Tree paths or values from tree elements
- Multistep formatting
- Send accesslevel of the object
- Send value of a job parameter
- Search for values in several attributes
- Format with PHP Code (deprecated)
- Format Macros
- Load data via REST Service
- AI Value Transformation Format
- AI Value Translation Format
- Store value into a Contentserv Item
- Execute a conditional format (switch-case) Format Plugin
- Load array value from the Contentserv getValues Format Plugin
- Process HTML table Format Plugin
- Replace via regex pattern format plugin
- Convert value ranges into each other
- Merge Array Format Plugin
- Export several attributes simultaneously
- Show all articles ( 5 ) Collapse Articles
-
Shopware 6 Connector
-
- Tutorial Video
- Initial Connection & Authentication
- Import Shopware settings
- Export categories
- Export media files
- Export simple products
- Export multiple languages
- Export variant products
- Export product properties
- Export custom fields
- Export product cross-selling relationships
- Export prices
- Export stocks
- Export into any other Shopware field
- How to address multiple Shopware 6 websites
- How to address different Shopware 6 Sale-Channels from one Contentserv System
- Useful Links
- Sales Channel Maintenance via Excel Cross-Reference
- Show all articles ( 3 ) Collapse Articles
-
-
- Send value of a PIM reference
- Loop values for CS PIM references
- Send value of a MAM reference
- Loop values for CS MAM references
- Send value of a Channel (view) reference
- Loop values for CS Channel (Views) references
- Send value of an attribute reference
- Send value of a user reference
- Loop values for user references
- Send value of a reference (deprecated)
- Merge reference values format plugin
- Search for usage of item
- Search for item IDs using attribute data
-
- Loop Head and Loop Value
- Loop values for several attributes simultaneously
- Loop values for child elements
- Loop values for CS PIM references
- Loop values for CS Channel (Views) references
- Loop values for CS MAM references
- Loop values for user references
- Loop values for SC::Prices
- Loop values for SC::Stocktable entries
- Loop values for SC::Complex products
- Loop values for a CS table
- Loop values for CS type reference
- Loop value for simple data record
- Loop values for JSON Objects
- Loop for value range entries
-
- Create a JSON-String (create an array)
- Format value lists
- Tree paths or values from tree elements
- Multistep formatting
- Send accesslevel of the object
- Send value of a job parameter
- Search for values in several attributes
- Format with PHP Code (deprecated)
- Format Macros
- Load data via REST Service
- AI Value Transformation Format
- AI Value Translation Format
- Store value into a Contentserv Item
- Execute a conditional format (switch-case) Format Plugin
- Load array value from the Contentserv getValues Format Plugin
- Process HTML table Format Plugin
- Replace via regex pattern format plugin
- Convert value ranges into each other
- Merge Array Format Plugin
- Export several attributes simultaneously
- Show all articles ( 5 ) Collapse Articles
-
OXID Connector
-
-
- Send value of a PIM reference
- Loop values for CS PIM references
- Send value of a MAM reference
- Loop values for CS MAM references
- Send value of a Channel (view) reference
- Loop values for CS Channel (Views) references
- Send value of an attribute reference
- Send value of a user reference
- Loop values for user references
- Send value of a reference (deprecated)
- Merge reference values format plugin
- Search for usage of item
- Search for item IDs using attribute data
-
- Loop Head and Loop Value
- Loop values for several attributes simultaneously
- Loop values for child elements
- Loop values for CS PIM references
- Loop values for CS Channel (Views) references
- Loop values for CS MAM references
- Loop values for user references
- Loop values for SC::Prices
- Loop values for SC::Stocktable entries
- Loop values for SC::Complex products
- Loop values for a CS table
- Loop values for CS type reference
- Loop value for simple data record
- Loop values for JSON Objects
- Loop for value range entries
-
- Create a JSON-String (create an array)
- Format value lists
- Tree paths or values from tree elements
- Multistep formatting
- Send accesslevel of the object
- Send value of a job parameter
- Search for values in several attributes
- Format with PHP Code (deprecated)
- Format Macros
- Load data via REST Service
- AI Value Transformation Format
- AI Value Translation Format
- Store value into a Contentserv Item
- Execute a conditional format (switch-case) Format Plugin
- Load array value from the Contentserv getValues Format Plugin
- Process HTML table Format Plugin
- Replace via regex pattern format plugin
- Convert value ranges into each other
- Merge Array Format Plugin
- Export several attributes simultaneously
- Show all articles ( 5 ) Collapse Articles
-
Typo3 Connector
-
-
- Send value of a PIM reference
- Loop values for CS PIM references
- Send value of a Channel (view) reference
- Loop values for CS Channel (Views) references
- Send value of a MAM reference
- Loop values for CS MAM references
- Send value of an attribute reference
- Send value of a user reference
- Loop values for user references
- Send value of a reference (deprecated)
- Merge reference values format plugin
- Search for usage of item
- Search for item IDs using attribute data
-
- Loop Head and Loop Value
- Loop values for several attributes simultaneously
- Loop values for child elements
- Loop values for CS PIM references
- Loop values for CS Channel (Views) references
- Loop values for CS MAM references
- Loop values for user references
- Loop values for SC::Prices
- Loop values for SC::Stocktable entries
- Loop values for SC::Complex products
- Loop values for a CS table
- Loop values for CS type reference
- Loop value for simple data record
- Loop values for JSON Objects
- Loop for value range entries
-
- Create a JSON-String (create an array)
- Format value lists
- Tree paths or values from tree elements
- Multistep formatting
- Send accesslevel of the object
- Send value of a job parameter
- Search for values in several attributes
- Format with PHP Code (deprecated)
- Format Macros
- Load data via REST Service
- AI Value Transformation Format
- AI Value Translation Format
- Store value into a Contentserv Item
- Execute a conditional format (switch-case) Format Plugin
- Load array value from the Contentserv getValues Format Plugin
- Process HTML table Format Plugin
- Replace via regex pattern format plugin
- Convert value ranges into each other
- Merge Array Format Plugin
- Export several attributes simultaneously
- Show all articles ( 5 ) Collapse Articles
-
Other Connectors
Installation
Installation on Centric PXM™ SaaS Systems
The SAWSConnectors are available for purchase and activation in the Centric PXM™ Marketplace. To find all available SAWSConnectors, simply search for the keyword “saws”. After installation, each connector will receive updates automatically, as detailed in this article.

Installation on Centric PXM™ OnPrem Systems via the SAWS Installer
All SAWSConnectors can be easily installed and updated using our installer.
The following video will guide you through the setup, starting from the initial installation up to your first export.
To reinstall or update your SAWSConnector suite, navigate to the installer.
You can find the installer in your options.
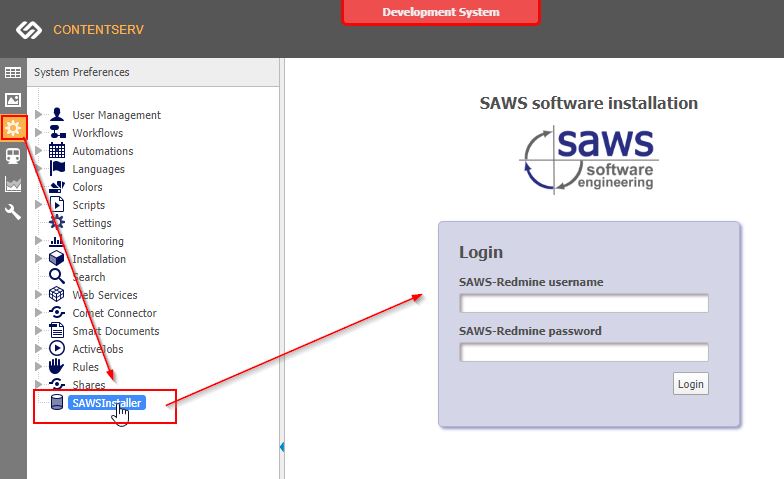
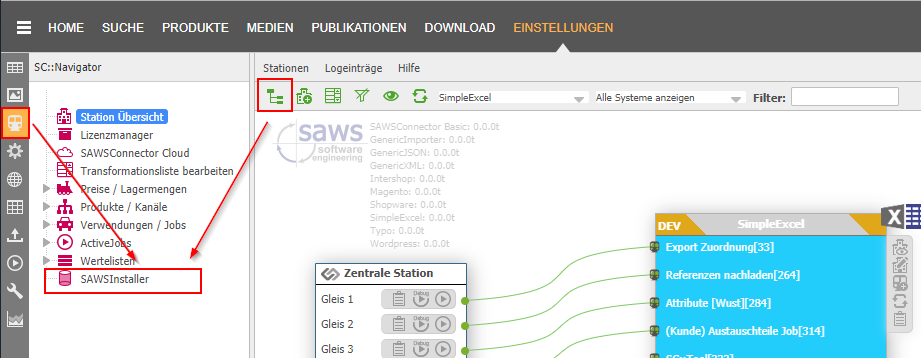
If you already have a SAWSConnector installed, you can also access the installer through the SC::Navigator.
You need a Redmine account in order to use our installer. If you don’t have an account yet, please contact us via our email sawsconnector@saws.de .
After logging in you will be greeted by an overview of your installed connectors and their versions:
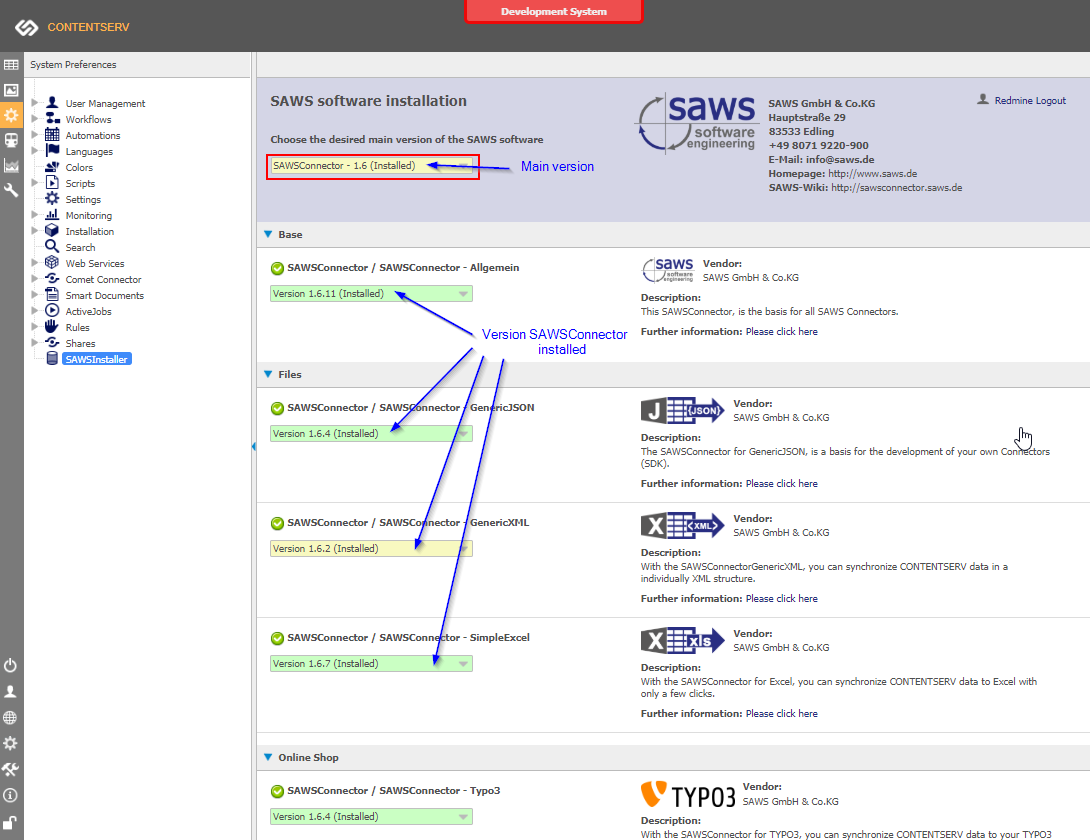
You can determine the version type by checking the color.

To update your SAWSConnector suite choose your main version at the top. All module versions should automatically change to match the desired release.
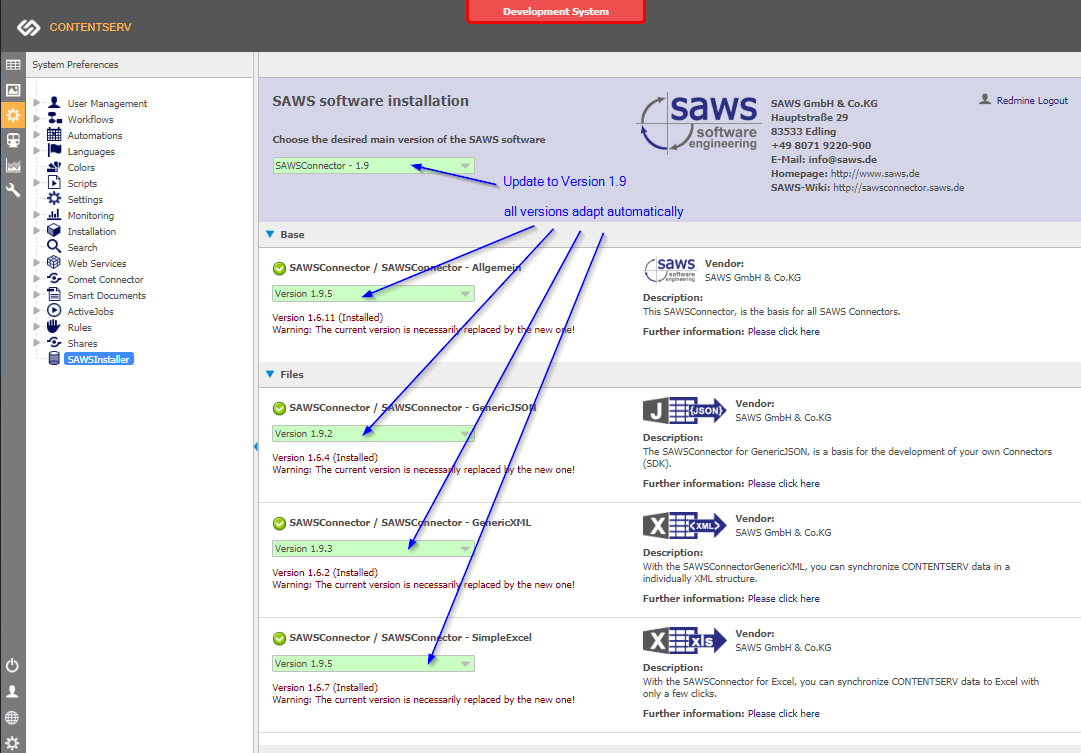
Check your settings before clicking on “Continue with the installation”.

At the top you should see a summary of your selected versions:
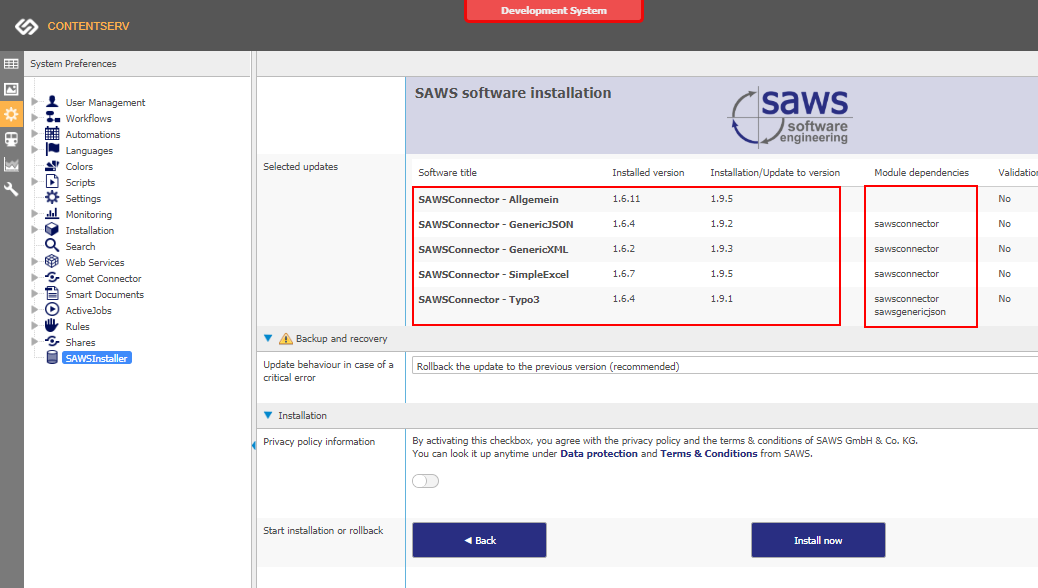
Choose how the installer should react in case of an error.
After accepting our privacy policy you can start the installation.
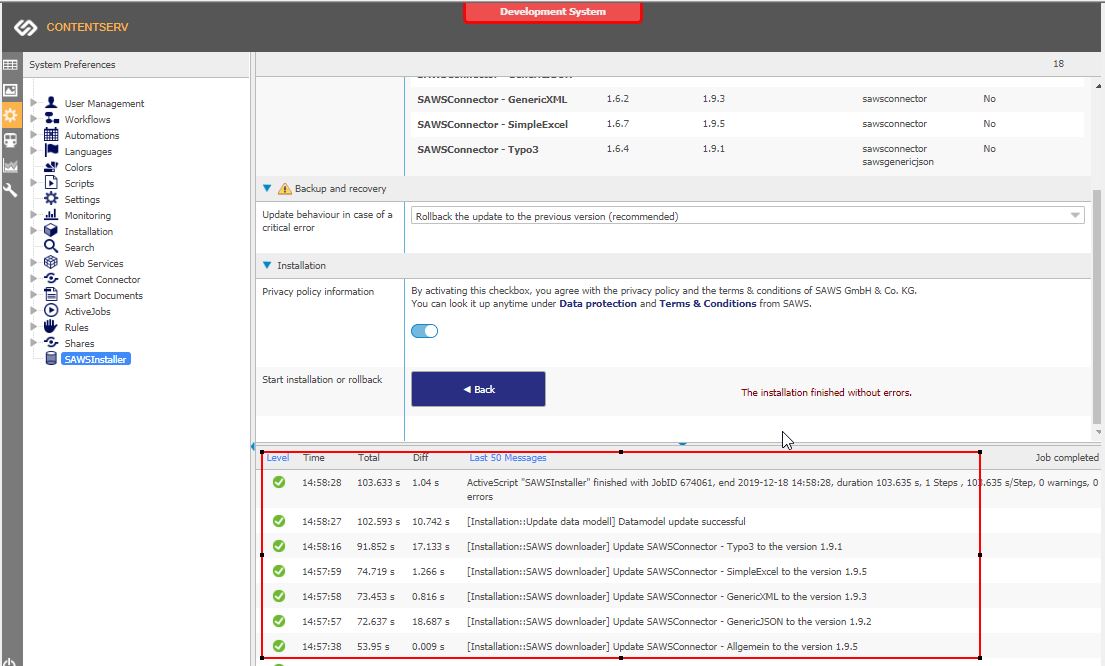
Once the installation is finished, the installer should display a report on the performed actions.
Installation on Centric PXM™ OnPrem Systems via SVN
To install SAWSConnectors, start by connecting to your server via SSH. Navigate to the “modules” directory within your Centric PXM project folder. The default location is typically:
/var/www/CONTENTSERV/{{Your_Project_Name}}/modules/Important: Before installing any specific connector, you must install the base connector called sawsconnector. This serves as the shared foundation for all other connectors.
svn checkout https://svn.saws.de/development/tags/sc/1.21/sawsconnector/stable sawsconnector/Once the base connector is installed, you can proceed with installing your desired connectors. Below are the commands for the most common connectors:
Available Connectors
- OXID Connector:
svn checkout https://svn.saws.de/development/tags/sc/1.21/oxidconnector/stable oxidconnector/ - GenericJSON Connector:
svn checkout https://svn.saws.de/development/tags/sc/1.21/sawsgenericjson/stable sawsgenericjson/ - GenericXML Connector:
svn checkout https://svn.saws.de/development/tags/sc/1.21/sawsgenericxml/stable sawsgenericxml/ - Intershop Connector:
svn checkout https://svn.saws.de/development/tags/sc/1.21/sawsintershop/stable sawsintershop/ - Magento Connector:
svn checkout https://svn.saws.de/development/tags/sc/1.21/sawsmagento/stable sawsmagento/ - Shopware Connector:
svn checkout https://svn.saws.de/development/tags/sc/1.21/sawsshopware/stable sawsshopware/ - SimpleExcel Connector:
svn checkout https://svn.saws.de/development/tags/sc/1.21/sawssimpleexcel/stable sawssimpleexcel/ - TYPO3 Connector:
svn checkout https://svn.saws.de/development/tags/sc/1.21/sawstypo3/stable sawstypo3/
Version Note: The version number 1.21 represents the major/feature version of the installation. For the latest features and improvements, always check the Releases section on the SAWS website and use the newest released version.
Post-Installation Steps
After installing the connectors, ensure proper permissions by running the following command in the modules directory:
chown www-data:www-data ./ -RThis assigns the modules to the Centric group, ensuring smooth operation.
Updating Connectors
To update a connector, navigate to its folder and run:
svn update sawsconnector/Since the connectors are checked out from the stable branch, running this command will always fetch the latest patch version.
Finalizing the Installation
After installation or updates, perform the following steps in your Centric system:
- Run a data model update.
- Deactivate and reactivate the plugin cache in the settings.
SAWS Service IP Configuration
Service Endpoints and IP Addresses
To ensure proper connectivity to SAWS services, configure your firewall or network settings to allow traffic to the following three proxy IP addresses. These IPs are used for all SAWS services via DNS load balancing:
| Service | Hostname | IP Addresses (All Required) |
|---|---|---|
| Datahub API | api.saws.de |
46.254.140.136, 46.254.140.137, 46.254.140.138 |
| Owl | owl.saws.de |
46.254.140.136, 46.254.140.137, 46.254.140.138 |
| Websocket Server | blackbird.saws.de |
46.254.140.136, 46.254.140.137, 46.254.140.138 |
Important Notes
- All three IPs must be whitelisted in your network/firewall configuration. DNS resolution may direct traffic to any of these IPs based on availability.
- The previous IP address for Blackbird (
46.254.138.251) is no longer in use and should be removed from any configurations. - If connectivity issues arise, verify that all three IPs are accessible and not blocked by security policies.