-
General
-
Releases
-
Owl Cloud Services
-
Base connector
-
- Beginner's Guide
- SAWSConnector settings
- Overview
- Station Overview
- Station configuration
- Datamaps
- Importing templates
- Format plugins explained
- Chaining format plugins
- Setting conditions
- Placeholders in format plugins
- Notes for field settings
- Jobs
- Testing exports and the development editor
- Job related tasks
- Job filter function
- How to create backups
- Running and Monitoring Jobs
- Start jobs automatically
- Import/Export & copy of data map rows
- Synchronizing references that are not contained in views
- Get the preconfigured "Source data set - Template"
- Configuring categories and products
- Fill Bundle and Variant tables from children
- Create View tree automatically
- Configuring the price & stock modules
- Configuring the price/stock value ranges
- Configuring volume discounts/scale prices
- How to export prices
- How to export stock values from certain storage units
- Use of Contentserv Credentials
- Rename export.zip Archives
- Connector & Station User Limitation
- Show all articles ( 18 ) Collapse Articles
-
- Importing data to our price tables
- SAWSConnector Usages
- Variant Articles
- Grouped products
- Virtual products
- Assignment of articles to complex articles
- SC::Channel Management
- Searching for SC::Prices / SC::Stocks
- Searching for SC::Channels
- Setup a transformation list for CSTypes
- Context-Sensitive Product Value Export
-
- Working with placeholder in conditions
- Improve usability of SC::Tables
- Placeholder for SC::Price, SC::Channel, SC::Stock
- REST Service API for SAWS Tables (Prices, Stock, Channels & Complex Articles)
- Dataflow import of SC::Tables
- Dataflow export of SC::Tables
- The datamap summary - Creating an automated documentation
- Export images as a ZIP file
- Image export with direct access to the CONTENTSERV platform
- Image export with no access to the CONTENTSERV platform
- Image export from a third party system
- How to configure CS Dashboard
- Setup a transformation list for CSTypes
- FAQ
- Transfer final result files to remote server by using FTP, sFTP, WebDAV or Azure Blob Storage
- Export Smart Document via Active Script and assign output to product
- Format Macros
- Controlling Connector Jobs via the REST API
- Basic Placeholders
- Job Parameters
- Input Types
- Sales Channel Maintenance via Excel Cross-Reference
- Show all articles ( 7 ) Collapse Articles
-
-
- Send value of a PIM reference
- Loop values for CS PIM references
- Send value of a MAM reference
- Loop values for CS MAM references
- Send value of a Channel (view) reference
- Loop values for CS Channel (Views) references
- Send value of an attribute reference
- Send value of a user reference
- Loop values for user references
- Send value of a reference (deprecated)
- Merge reference values
-
- Loops explained
- Loop values for several attributes simultaneously
- Loop values for child elements
- Loop values for CS PIM references
- Loop values for CS Channel (Views) references
- Loop values for CS MAM references
- Loop values for user references
- Loop values for SC::Prices
- Loop values for SC::Stocktable entries
- Loop values for SC::Complex products
- Loop values for CS type reference
- Loop values for a CS table
- Loop value for simple data record
-
- Create a JSON-String (create an array)
- Export several values simultaneously
- Format value lists
- Execute a conditional format (switch-case)
- Tree paths or values from tree elements
- Export value of current attribute
- Multistep formatting
- Send accesslevel of the object
- Send value of a job parameter
- Search for values in several attributes
- Format with PHP Code (deprecated)
- Format Macros
-
GenericJSON / DynamicJSON Connector
-
-
- Send value of a PIM reference
- Loop values for CS PIM references
- Send value of a Channel (view) reference
- Loop values for CS Channel (Views) references
- Send value of a MAM reference
- Loop values for CS MAM references
- Send value of an attribute reference
- Send value of a user reference
- Loop values for user references
- Send value of a reference (deprecated)
- Merge reference values
-
- Loops explained
- Loop values for several attributes simultaneously
- Loop values for child elements
- Loop values for CS PIM references
- Loop values for CS Channel (Views) references
- Loop values for CS MAM references
- Loop values for user references
- Loop values for SC::Prices
- Loop values for SC::Stocktable entries
- Loop values for SC::Complex products
- Loop values for a CS table
- Loop values for CS type reference
- Loop value for simple data record
-
- Create a JSON-String (create an array)
- Export several values simultaneously
- Format value lists
- Execute a conditional format (switch-case)
- Tree paths or values from tree elements
- Export value of current attribute
- Multistep formatting
- Send accesslevel of the object
- Send value of a job parameter
- Search for values in several attributes
- Format with PHP Code (deprecated)
- Format Macros
-
GenericXML Connector
-
- All Tutorials for creating XMLs
- SAWSConnector settings
- Station configuration
- Example station configuration
- Source data set configuration
- Example source data set mappings for the XML export
- Job configuration
- Simple XML Tags
- Images
- References
- SC::Prices
- SC::Stock
- SC::Channel
- Specials
- BMECat 1.2 Template
-
-
- Send value of a PIM reference
- Loop values for CS PIM references
- Send value of a Channel (view) reference
- Loop values for CS Channel (Views) references
- Send value of a MAM reference
- Loop values for CS MAM references
- Send value of an attribute reference
- Send value of a user reference
- Loop values for user references
- Send value of a reference (deprecated)
- Merge reference values
-
- Loops explained
- Loop values for several attributes simultaneously
- Loop values for child elements
- Loop values for CS PIM references
- Loop values for CS Channel (Views) references
- Loop values for CS MAM references
- Loop values for user references
- Loop values for SC::Prices
- Loop values for SC::Stocktable entries
- Loop values for SC::Complex products
- Loop values for a CS table
- Loop values for CS type reference
- Loop value for simple data record
-
- Create a JSON-String (create an array)
- Export several values simultaneously
- Format value lists
- Execute a conditional format (switch-case)
- Tree paths or values from tree elements
- Export value of current attribute
- Multistep formatting
- Send accesslevel of the object
- Send value of a job parameter
- Search for values in several attributes
- Format with PHP Code (deprecated)
- Format Macros
-
SimpleExcel Connector
-
-
- Send value of a PIM reference
- Loop values for CS PIM references
- Send value of a Channel (view) reference
- Loop values for CS Channel (Views) references
- Send value of a MAM reference
- Loop values for CS MAM references
- Send value of an attribute reference
- Send value of a user reference
- Loop values for user references
- Send value of a reference (deprecated)
- Merge reference values
-
- Loops explained
- Loop values for several attributes simultaneously
- Loop values for child elements
- Loop values for CS PIM references
- Loop values for CS Channel (Views) references
- Loop values for CS MAM references
- Loop values for user references
- Loop values for SC::Prices
- Loop values for SC::Stocktable entries
- Loop values for SC::Complex products
- Loop values for a CS table
- Loop values for CS type reference
- Loop value for simple data record
-
- Create a JSON-String (create an array)
- Export several values simultaneously
- Format value lists
- Execute a conditional format (switch-case)
- Tree paths or values from tree elements
- Export value of current attribute
- Multistep formatting
- Send accesslevel of the object
- Send value of a job parameter
- Search for values in several attributes
- Format with PHP Code (deprecated)
- Format Macros
-
Magento Connector
-
- Magento 2.x configuration
- Creating views
- Configuring categories and products
- Stations
- Add and configure a new source data set
- Assigning a Magento website
- Advanced pricing export
- Configurable products
- Bundle products
- country_of_manufacture
- max_sale_qty
- meta_description
- meta_keyword
- min_sale_qty
- msrp
- msrp_display_actual_price_type
- msrp_enabled
- news_from_date
- news_to_date
- special_from_date
- special_price
- special_to_date
- _links_crosssell_sku
- _links_related_sku
- _links_upsell_sku
- _media_image
- available_sort_by
- default_sort_by
- image
- include_in_menu
- is_active
- is_anchor
- is_in_stock
- meta_title
- name
- price
- small_image
- status
- tax_class_id
- thumbnail
- visibility
- weight
- description
- qty
- short_description
- sku
- Adding Jobs
- Show all articles ( 32 ) Collapse Articles
-
-
- Send value of a PIM reference
- Loop values for CS PIM references
- Send value of a Channel (view) reference
- Loop values for CS Channel (Views) references
- Send value of a MAM reference
- Loop values for CS MAM references
- Send value of an attribute reference
- Send value of a user reference
- Loop values for user references
- Send value of a reference (deprecated)
- Merge reference values
-
- Loops explained
- Loop values for several attributes simultaneously
- Loop values for child elements
- Loop values for CS PIM references
- Loop values for CS Channel (Views) references
- Loop values for CS MAM references
- Loop values for user references
- Loop values for SC::Prices
- Loop values for SC::Stocktable entries
- Loop values for SC::Complex products
- Loop values for a CS table
- Loop values for CS type reference
- Loop value for simple data record
-
- Create a JSON-String (create an array)
- Export several values simultaneously
- Format value lists
- Execute a conditional format (switch-case)
- Tree paths or values from tree elements
- Export value of current attribute
- Multistep formatting
- Send accesslevel of the object
- Send value of a job parameter
- Search for values in several attributes
- Format with PHP Code (deprecated)
- Format Macros
-
Shopware 5 Connector
-
- Configuration Shopware
- Configuration PIM
- Shopware attribute setting
- Configuration SAWSConnector
- Station configuration
- Source data set configuration
- Configuring categories and products
- Price table configuration for Shopware
- Result in Shopware
- Subshops and the SAWSConnector Shopware
- ean
- Custom Fields (attribute)
- highlight
- purchaseSteps
- stockMin
- supplierNumber
- notification
- shippingFree
- length
- height
- width
- weight
- shippingTime
- metaKeywords
- added
- blog
- descriptionLong
- hidefilter
- hideTop
- inStock
- keywords
- lastStock
- maxPurchase
- metaDescription
- minPurchase
- noViewSelect
- pseudoSales
- related
- releaseDate
- showFilterGroups
- similar
- tax
- template
- cmsHeadline
- cmsText
- description
- metaTitle
- name
- number
- supplier
- Show all articles ( 35 ) Collapse Articles
-
-
- Send value of a PIM reference
- Loop values for CS PIM references
- Send value of a Channel (view) reference
- Loop values for CS Channel (Views) references
- Send value of a MAM reference
- Loop values for CS MAM references
- Send value of an attribute reference
- Send value of a user reference
- Loop values for user references
- Send value of a reference (deprecated)
- Merge reference values
-
- Loops explained
- Loop values for several attributes simultaneously
- Loop values for child elements
- Loop values for CS PIM references
- Loop values for CS Channel (Views) references
- Loop values for CS MAM references
- Loop values for user references
- Loop values for SC::Prices
- Loop values for SC::Stocktable entries
- Loop values for SC::Complex products
- Loop values for a CS table
- Loop values for CS type reference
- Loop value for simple data record
-
- Create a JSON-String (create an array)
- Export several values simultaneously
- Format value lists
- Execute a conditional format (switch-case)
- Tree paths or values from tree elements
- Export value of current attribute
- Multistep formatting
- Send accesslevel of the object
- Send value of a job parameter
- Search for values in several attributes
- Format with PHP Code (deprecated)
- Format Macros
-
Shopware 6 Connector
-
- Tutorial Video
- First steps
- Import Shopware settings
- Export categories
- Export media files
- Export simple products
- Export multiple languages
- Export variant products
- Export product properties
- Export custom fields
- Export product cross-selling relationships
- Export prices
- Export stocks
- Export into any other Shopware field
- How to address multiple Shopware 6 websites
- How to address different Shopware 6 Sale-Channels from one Contentserv System
- Useful Links
- Export via RabbitMQ
- Sales Channel Maintenance via Excel Cross-Reference
- Show all articles ( 4 ) Collapse Articles
-
-
- Send value of a PIM reference
- Loop values for CS PIM references
- Send value of a MAM reference
- Loop values for CS MAM references
- Send value of a Channel (view) reference
- Loop values for CS Channel (Views) references
- Send value of an attribute reference
- Send value of a user reference
- Loop values for user references
- Send value of a reference (deprecated)
- Merge reference values
-
- Loops explained
- Loop values for several attributes simultaneously
- Loop values for child elements
- Loop values for CS PIM references
- Loop values for CS Channel (Views) references
- Loop values for CS MAM references
- Loop values for user references
- Loop values for SC::Prices
- Loop values for SC::Stocktable entries
- Loop values for SC::Complex products
- Loop values for a CS table
- Loop values for CS type reference
- Loop value for simple data record
-
- Create a JSON-String (create an array)
- Export several values simultaneously
- Format value lists
- Execute a conditional format (switch-case)
- Tree paths or values from tree elements
- Export value of current attribute
- Multistep formatting
- Send accesslevel of the object
- Send value of a job parameter
- Search for values in several attributes
- Format with PHP Code (deprecated)
- Format Macros
-
OXID Connector
-
-
- Send value of a PIM reference
- Loop values for CS PIM references
- Send value of a MAM reference
- Loop values for CS MAM references
- Send value of a Channel (view) reference
- Loop values for CS Channel (Views) references
- Send value of an attribute reference
- Send value of a user reference
- Loop values for user references
- Send value of a reference (deprecated)
- Merge reference values
-
- Loops explained
- Loop values for several attributes simultaneously
- Loop values for child elements
- Loop values for CS PIM references
- Loop values for CS Channel (Views) references
- Loop values for CS MAM references
- Loop values for user references
- Loop values for SC::Prices
- Loop values for SC::Stocktable entries
- Loop values for SC::Complex products
- Loop values for a CS table
- Loop values for CS type reference
- Loop value for simple data record
-
- Create a JSON-String (create an array)
- Export several values simultaneously
- Format value lists
- Execute a conditional format (switch-case)
- Tree paths or values from tree elements
- Export value of current attribute
- Multistep formatting
- Send accesslevel of the object
- Send value of a job parameter
- Search for values in several attributes
- Format with PHP Code (deprecated)
- Format Macros
-
Typo3 Connector
-
-
- Send value of a PIM reference
- Loop values for CS PIM references
- Send value of a Channel (view) reference
- Loop values for CS Channel (Views) references
- Send value of a MAM reference
- Loop values for CS MAM references
- Send value of an attribute reference
- Send value of a user reference
- Loop values for user references
- Send value of a reference (deprecated)
- Merge reference values
-
- Loops explained
- Loop values for several attributes simultaneously
- Loop values for child elements
- Loop values for CS PIM references
- Loop values for CS Channel (Views) references
- Loop values for CS MAM references
- Loop values for user references
- Loop values for SC::Prices
- Loop values for SC::Stocktable entries
- Loop values for SC::Complex products
- Loop values for a CS table
- Loop values for CS type reference
- Loop value for simple data record
-
- Create a JSON-String (create an array)
- Export several values simultaneously
- Format value lists
- Execute a conditional format (switch-case)
- Tree paths or values from tree elements
- Export value of current attribute
- Multistep formatting
- Send accesslevel of the object
- Send value of a job parameter
- Search for values in several attributes
- Format with PHP Code (deprecated)
- Format Macros
-
WooCommerce Connector
-
-
- Send value of a PIM reference
- Loop values for CS PIM references
- Send value of a Channel (view) reference
- Loop values for CS Channel (Views) references
- Send value of a MAM reference
- Loop values for CS MAM references
- Send value of an attribute reference
- Send value of a user reference
- Loop values for user references
- Send value of a reference (deprecated)
- Merge reference values
-
- Loops explained
- Loop values for several attributes simultaneously
- Loop values for child elements
- Loop values for CS PIM references
- Loop values for CS Channel (Views) references
- Loop values for CS MAM references
- Loop values for user references
- Loop values for SC::Prices
- Loop values for SC::Stocktable entries
- Loop values for SC::Complex products
- Loop values for a CS table
- Loop values for CS type reference
- Loop value for simple data record
-
- Create a JSON-String (create an array)
- Export several values simultaneously
- Format value lists
- Execute a conditional format (switch-case)
- Tree paths or values from tree elements
- Export value of current attribute
- Multistep formatting
- Send accesslevel of the object
- Send value of a job parameter
- Search for values in several attributes
- Format with PHP Code (deprecated)
- Format Macros
-
Other connectors
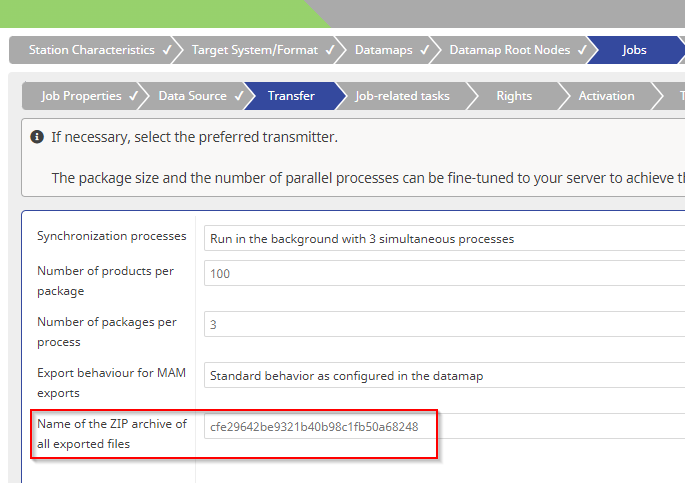
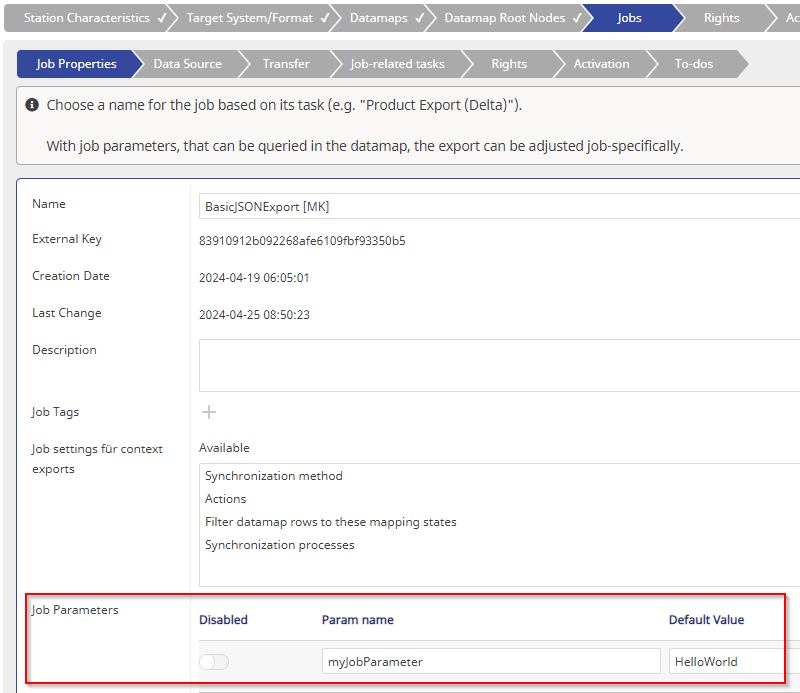
Rename export.zip Archives
Job Settings
To manually rename the ZIP archive you get after an export is complete, you can navigate to the transfer settings of your job. The name you set will be the same for every exported ZIP archive that you export with this job, but you can use placeholders to dynamically change the name:
- {JOB:Name} = Name of the job
- {JOB:StartDate} = Start date of the job
- {JOB:EndDate} = End date of the job
- {JOB:StartDateUnformatted} = Start date of the job (Format ‘YYYYMMDD_HHMMSS’)
- {JOB:EndDateUnformatted} = End date of the job (Format ‘YYYYMMDD_HHMMSS’)
- {JOB:RootID} = Root-ID of the job
- {JOB:RecordCount} = Record count of the job
- {JOB:ErrorCount} = Error count of the job
- {JOB:SyncState} = State of the job
- {JOB:All} = Count of all log entries
- {JOB:Errors} = Count of all error log entries
- {JOB:Warning} = Count of all warning log entries
- {JOB:Plugins} = Count of selected plugins of the job
- {STATION:Name} = Name of the station
- {STATION:StationType} = Type of the station
- {STATION:StationUrl} = URL of the station
- {USER:UserID} = ID of the user
- {USER:UserName} = Username of the user
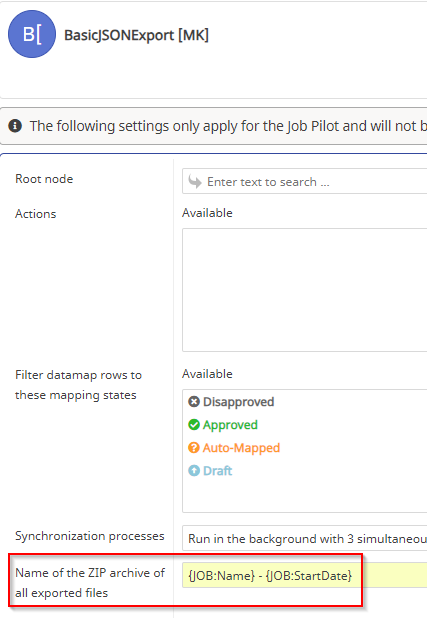
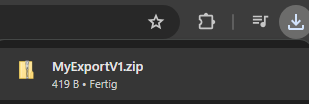
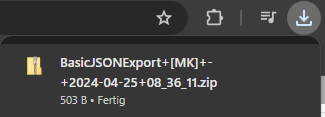
In this example the result should look like this:
You can also create job parameters that you can use to rename your ZIP archive:
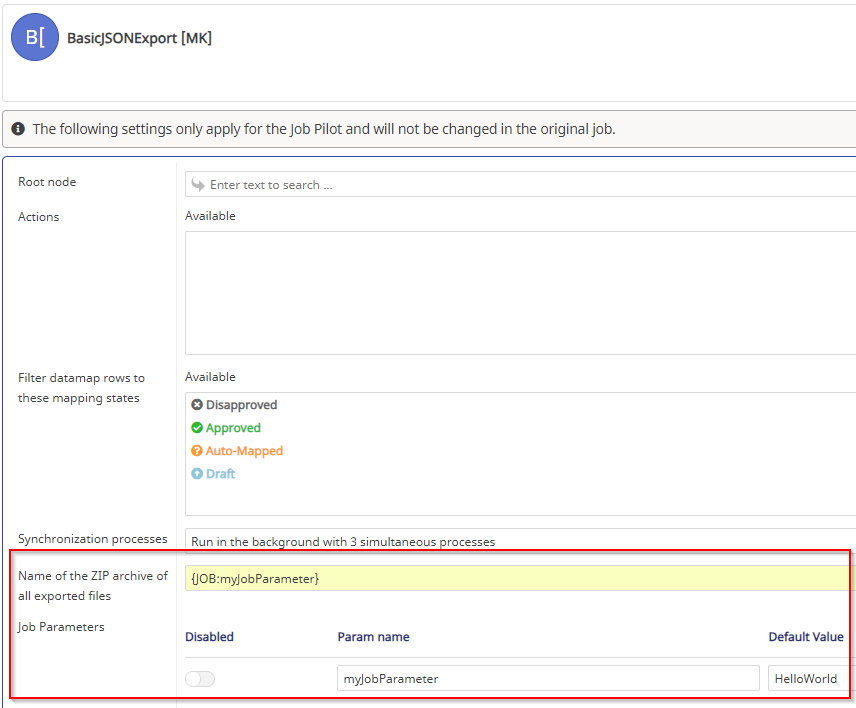
The result in this example will look like this:

Contentserv Context Menu
(Since 1.18.0)
Another way to rename the ZIP archive is by selecting job settings for context exports in the properties of your job. This only works when you use the export via the CS context menu.
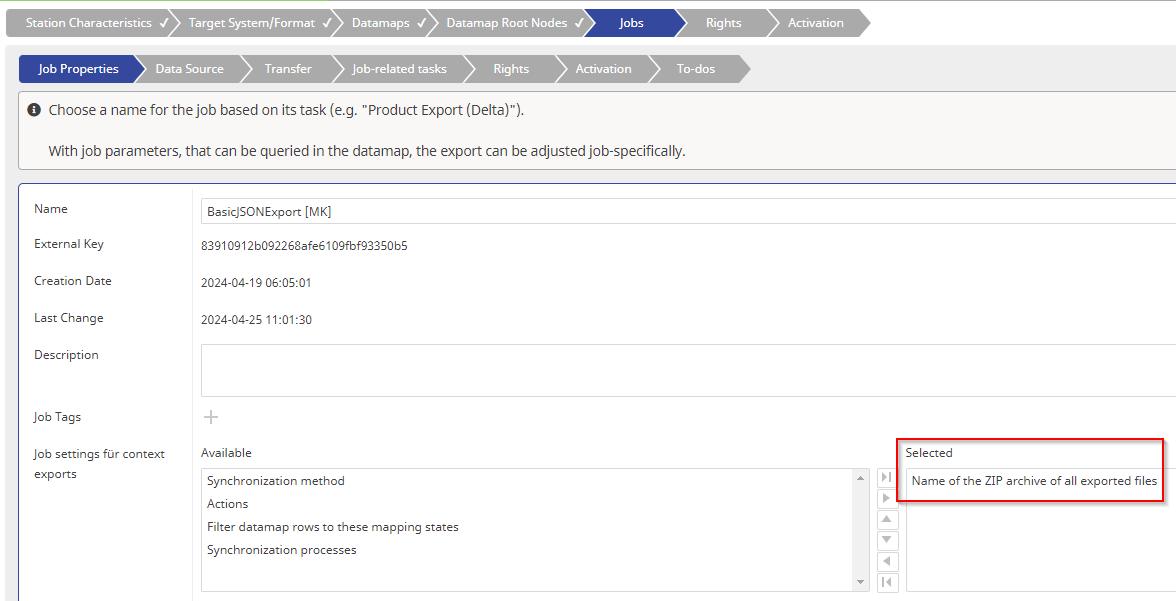
In the context menu you get a text field where you can set the name for the archive.
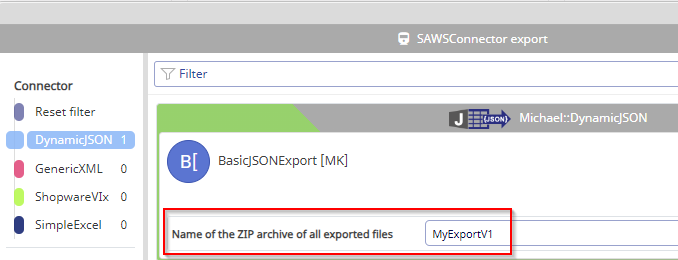
The result in this example will look like this: